How to use Parental Control function on TP-Link 11N Wireless router (new logo)
Parental Control function can control children´s internet activities, restrict some certain websites´ admission and limit the time of surfing.
Step 1
Log into the router’s web management page:
How do I log into the web-based Utility (Management Page) of TP-Link wireless router?
Step 2
On the left-side menu, click Parental Control to open settings page. Select Enable and input the MAC address of parental PC on this page.
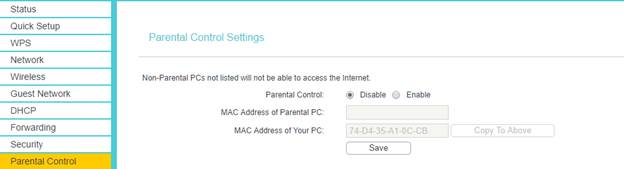
Note: If you want to set the current PC as the parental PC, please click ‘Copy To Above’ button to add this PC’s MAC Address to the above Parental PC field automatically.
Click Save to save the settings.
Step 3
Click Add New.

Step 4
Enter appropriate parameters in corresponding fields.
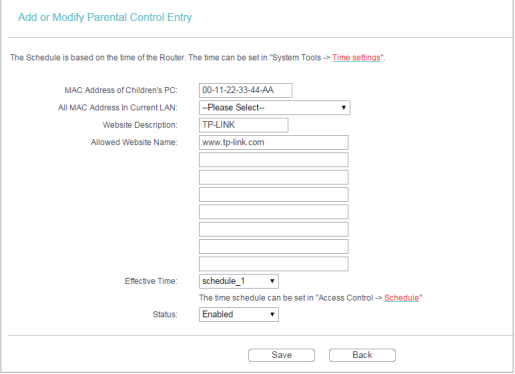
For Example:
• Enter XX-XX-XX-33-44-AA in the MAC Address of Children’s PC field.
If your child’s pc is connected, you may also select the MAC Address from All MAC Address In Current LAN
• Enter Allow TP-LINK in the Website Description field.
• Enter www.tp-link.com in the Allowed Website Name field.
• Select Schedule_1 you created from the Effective Time drop-down list.
• In the Status field, select Enable.
Step 5
Now we need to set the time settings for the rule. Go to Access Control > Schedule, click ‘Add New’. 
Step 6
As used in the example above you will create a new schedule entry with Schedule Description as Schedule_1. Then set day as every day and set time as all day-24 hours, and then click Save.

Step 7
Then you can go back to the Parental Control Settings page to check the following list.

Now based on the example your child’s PC is only abled to access the tp-link website.
Get to know more details of each function and configuration please go to Download Center to download the manual of your product.
Is this faq useful?
Your feedback helps improve this site.
TP-Link Community
Still need help? Search for answers, ask questions, and get help from TP-Link experts and other users around the world.