How to secure wireless network by using ADSL Modem Router with WPA2-PSK
You can set up WPA2 -PSK wireless security mode on your wireless modem router by following these steps:
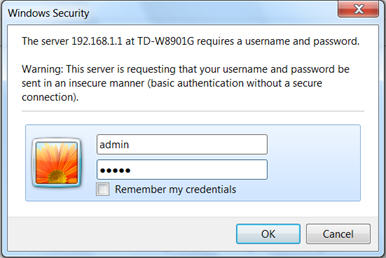
Step 1: Log in to your DSL router.
- Open your web browser and type the LAN IP address of the router in the address bar (the default IP address of TP-Link routers is 192.168.1.1), then press Enter.

- When you are prompted, enter the router´s username and password (the default username and password are both admin)
Step 2:
- Once you are logged in to your wireless modem router , click the Interface Setup menu option.

- On the Interface Setup page, click Wireless.
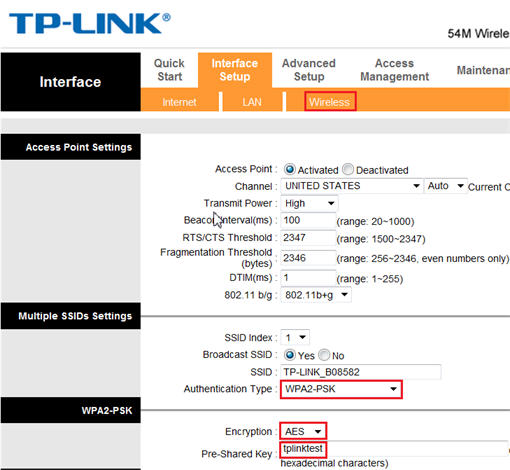
Step 3:
-
Select "WPA2-PSK" in the Authentication Type menu . WPA2-PSK is also known as WPA2-Personal.
-
Select "AES" as the Encryption Type
- Enter a pre-shared key (wireless password) of your choice in the Pre-Shared Key field. Here we have used " tplinktest" , but you can use any pre-shared key you would like to configure.
* The pre-shared key can be made up of letters (upper- and lowercase), numbers and some symbols (i.e. underscores (_), hyphens (-), etc).
Step 4:
Click the Save button at the bottom of the page. The settings will then be saved, and WPA2-PSK wireless security will be enabled on your router.

Please note: If you find that you´re unable to connect to your wireless network after changing your router´s wireless settings, please refer to the related articles below:
* Please note: This process can also be used to remove the existing wireless profile on Windows 7.
Get to know more details of each function and configuration please go to Download Center to download the manual of your product.
Is this faq useful?
Your feedback helps improve this site.
TP-Link Community
Still need help? Search for answers, ask questions, and get help from TP-Link experts and other users around the world.