How to set up QoS on the TP-Link Wi-Fi router that doesn’t support HomeCare function
The QoS (Quality of Service) feature allows you to prioritize the internet traffic of specific devices to guarantee a faster connection when you need it the most. The router has preset an appropriate bandwidth allocation policy, so you don’t need to set different priorities for all devices. Simply set the desired device to High Priority and set how long you want it to remain the high priority, then the device will be allocated with more bandwidth when the network is overloaded.
Case1:
I have a TP-Link router Archer AX10 and I want to prioritize my computer for the next 2 hours when the network is overloaded.
1. Visit http://tplinkwifi.net, and log in with your TP-Link ID or the password you set for the router. If you don’t know how to do that, please refer to
How do I log into the web-based Utility (Management Page) of TP-Link wireless router?
2. Go to Advanced > QoS.
3. Enable QoS.
4. Enter the upload and download bandwidth provided by your internet service provider. Click Save.

Note: QoS will take effect only when the total network traffic rate is greater than the bandwidth you have set here.
If your web interface is different please refer to How to set up QoS using TP-Link Wi-Fi router?
5. Under Device Priority, find your computer and toggle on Priority. Click the entry in the Timing column and select 2 hours as the duration you want the device to be prioritized for.
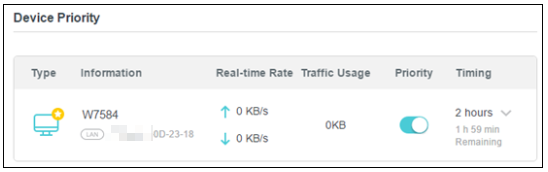
Done! Now, the traffic of this computer will be prioritized to guarantee a faster connection for the next 2 hours when the network is overloaded.
Case2:
1. Log into the web interface of your TP-Link device by referring to How do I log into the web-based Utility (Management Page) of TP-Link wireless router?
2. Click on Advanced>QoS>Settings.

3. Enable QoS, enter the upload and download bandwidth provided by your internet service provider.

4. Click Advanced and drag the scroll bar to set the bandwidth priority percentage, then click on Save.

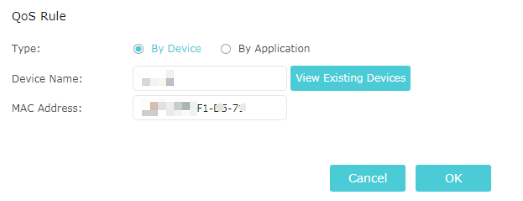
5. Add a high-priority QoS rule for the phone.
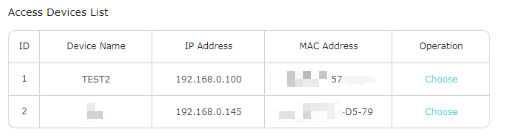
1). Select By Device and then click View Existing Devices.

2). Choose the respective device from the list.
3). Click OK.
6. Add a middle priority QoS rule for the Application.
1). Select By Application and then choose the Applications or custom Application.

2). Click OK.


7. Refer to the steps above to apply other QoS rules if any.
Done! Now QoS is implemented to prioritize internet traffic.
Case3:
For the older UI, you may refer to the FAQ: How to set up QoS using TP-Link Wi-Fi Router (new designed blue UI)?
Fick du svar på din fråga?
Your feedback helps improve this site.
TP-Link Community
Still need help? Search for answers, ask questions, and get help from TP-Link experts and other users around the world.