How to configure Bandwidth Control on TL-WR902AC (standard wireless router/hotspot router mode) (new logo)
For the new UI, please refer to the FAQ: How to use bandwidth control or Speed Limit on TP-Link Wi-Fi Routers?
Bandwidth Control is only available when the TL-WR902AC is on standard wireless router/hotspot router mode. Before we start, please make sure it’s configured successfully, otherwise, click the corresponding mode below for internet setup instruction.
1. Visit http://tplinkwifi.net, and log in with the username and password you set for the router.
2. Go to Bandwidth Control.
3. Enable Bandwidth Control. Type in Egress Bandwidth (upload speed) and Ingress Bandwidth (download speed) through the WAN port. click Save.
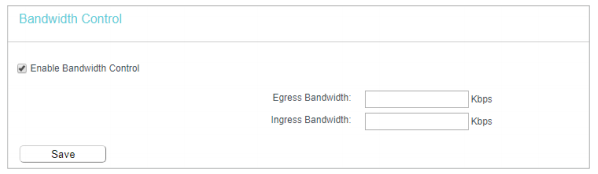
The values you configure for the Egress Bandwidth and Ingress Bandwidth should be less than 100,000Kbps. For optimal control of the bandwidth, please select the right Line Type and consult your ISP for the total egress and ingress bandwidth.
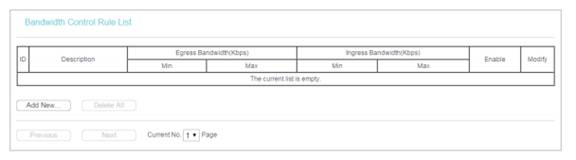
4. Click Add New.
5. Tick Enable. Enter the IP address range or a single IP address. Enter Min and Max bandwidth for the group or specific device.
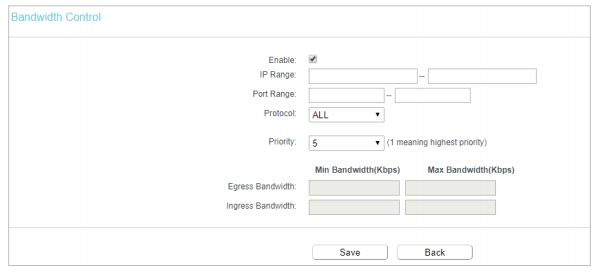
Priority - Priority of Bandwidth Control rules. ‘1’ stands for the highest priority while ‘8’ stands for the lowest priority. The total Upstream/ Downstream Bandwidth is first allocated to guarantee all the Min Rate of Bandwidth Control rules. If there is any bandwidth left, it is first allocated to the rule with the highest priority, then to the rule with the second highest priority, and so on.
6. Click Save.
Get to know more details of each function and configuration please go to Download Center to download the manual of your product.
Is this faq useful?
Your feedback helps improve this site.
TP-Link Community
Still need help? Search for answers, ask questions, and get help from TP-Link experts and other users around the world.