How Do I Setup my Kasa Cam?
Please following the instructions step by step in this article to go through the entire setup process, then you can control the Kasa Cam with your Kasa app.
Before we begin:
1. Please download Kasa Smart from App Store or Google Play and install it on your smartphone.
2. Connect your smartphone to your home Wi-Fi network.
3. Plug your Kasa Cam into a power socket.
Here we use KC120 for example
Step 1: Open the Kasa App
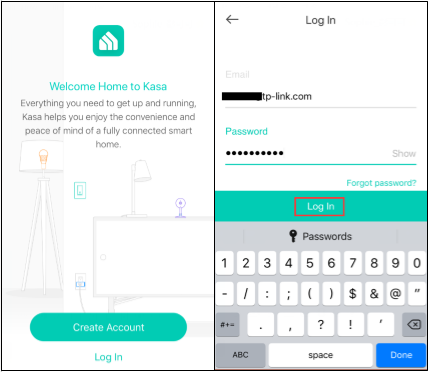
Log into your cloud account. Please refer to the link to sign up if you don’t have a cloud account.
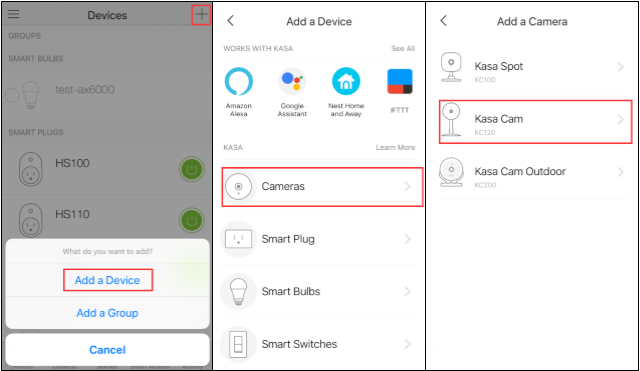
Step 2: Tap “+” button to add a Kasa Cam, select “Add a Device”, and choose “Cameras” icon according to your model number.
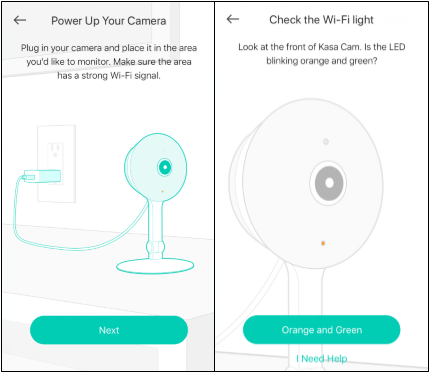
Step 3: Follow the instruction on the Kasa app to power on the Kasa Cam, and wait for the light to blink orange and green.
If the light does not blink orange and green, please reset the Kasa Cam as per UG/QIG.
Step 4: Connect your phone to the Kasa Cam’s Wi-Fi network.
For Andriod:
Kasa will look for your Kasa Cam automatically, and it will take about a minute.
If you have a problem with this step, please go to Settings->Wi-Fi on your smartphone and manually connect to Kasa Cam’s Wi-Fi network (same as iOS).
For iOS:
You need to connect to the Kasa Cam’s Wi-Fi network manually, please go to Settings->Wi-Fi on your smartphone and manually connect to Kasa Cam’s Wi-Fi network (which is named Kasa_Cam_xxxx), and then go back to the Kasa app to continue the setup process.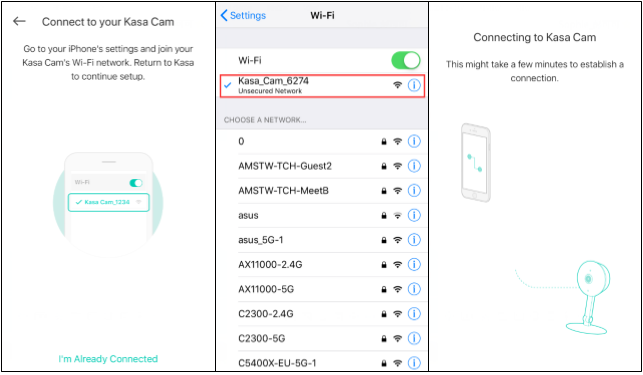
Step 5: Choose your home network to connect, enter the password of your home network.
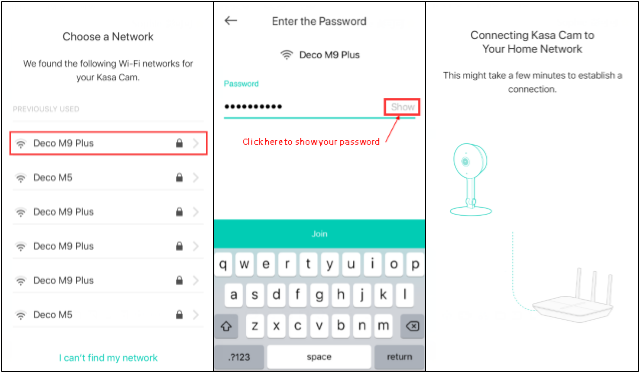
Step 6: Name your Kasa Cam

Step 7: Enable Activity Notifications. If you enable this function, your camera can alert you whenever it detects motion. If you don’t want to be notified, click on “I don’t want to be notified”.

Step 8: Follow the instruction to mount your camera. If you do not want to do it now, click on “No Thanks”, and we have completed the setup of Kasa Cam.


If you need further assistance contact TP-Link Customer Support here.
Fick du svar på din fråga?
Your feedback helps improve this site.
TP-Link Community
Still need help? Search for answers, ask questions, and get help from TP-Link experts and other users around the world.