
Tapo Smart Actions: How to Set Up Automations and Shortcuts on the Tapo App
Tapo Smart Actions is the umbrella feature in the Tapo app that includes both Shortcuts and Automation for controlling your Tapo devices. Shortcuts let you run a set of device actions with a single tap — for example, turning off your Tapo devices and dimming the lights when you're ready for bed. Automation uses triggers, conditions, and actions to control devices automatically — for example, turning your lights on a few minutes before you get home from work every weekday. Follow the steps below to set up either type of Tapo smart action.
Key Takeaways
- Tapo Smart Actions includes two features: Shortcuts, which execute a set of device actions with one tap, and Automation, which triggers device actions automatically based on time, device status, or sensor input.
- Shortcuts can be accessed and run from both the Smart page and the Home page in the Tapo app.
- Automation supports a wide range of triggers, including time of day, geofencing (arrive/leave), device status changes, camera detections, sensor readings, and more — availability varies by product model.
- Conditions can be added to Automations to control when an action executes—for example, triggering only if a specific device is already on or off.
- Smart Actions can be created from pre-built templates or built from scratch. If multiple triggers are added to an Automation, any one of them will activate it.
Triggers, Conditions, and Actions
In this section, you can find all the triggers/conditions/actions that can be used in the Smart Action feature.
Trigger List
*Triggers may vary by product models and Tapo Care plans. More devices will be supported soon.
|
Trigger* (When) |
||
|
Time of Day |
At Sunrise |
Offset(±5h59min) |
|
At Sunset |
Offset(±5h59min) |
|
|
At a Specific Time |
00:00 ~ 23:59 |
|
|
Arrive/Leave |
Arrive |
When the phone/tablet arrives at a specific area |
|
(Geofencing) |
Leave |
When the phone/tablet leaves a specific area |
|
Device Status Change |
Plug/Lighting |
Turn On |
|
Turn Off |
||
|
Turn On/Off |
||
|
Switch/Fan Switch |
Turn On |
|
|
Turn Off |
||
|
Dimmer Switch |
Single Tap |
|
|
Double Tap |
||
|
Rotate Clockwise |
||
|
Rotate Anticlockwise |
||
|
Camera (varies by models) |
Motion Detected |
|
|
Person Detected |
||
|
Baby Crying Detected |
||
|
Pet Detected |
||
|
Area Intrusion Detected |
||
|
Line Crossing Detected |
||
|
Camera Tampering Detected |
||
|
... |
||
|
Doorbell |
Doorbell Is Pressed |
|
|
Hub |
Ring |
|
|
Water Leak Sensor |
Water Leak Detected |
|
|
Water Leak Solved |
||
|
Motion Sensor |
Motion Detected |
|
|
No Motion Detected for a Set Time |
||
|
Contact Sensor |
Open |
|
|
Close |
||
|
Triggered |
||
|
Kept Open for 1 min |
||
|
Kept Open for a Set Time |
||
|
Temperature and Humidity Sensor |
Temperature over ( -4℉~ 140℉) |
|
|
Temperature below ( -4℉~ 140℉) |
||
|
Humidity over |
||
|
Humidity below |
||
| Human Presence Sensor | Presence detected/detected for a while | |
| Absence detected/detected for a while | ||
| Ambient light is low(10 lux)/High(100 lux) | ||
| Illuminance above/below | ||
| Temperature over/below | ||
| Humidity over/below | ||
|
Robot Vacuum |
Start Cleaning |
|
|
Something Goes Wrong |
||
|
Doorlock (varies by models) |
Unlocked |
|
|
Unlocked by |
||
|
Locked |
||
|
Doorbell is pressed |
||
| Alarm Triggered | ||
|
Pin Code |
||
Action List
*Actions may vary by product models. More devices will be supported soon.
|
Action* (Then) |
||
|
Control One Device |
Tapo Hub |
Become Silent |
|
Ring |
||
|
Basic Plug/Switch |
Turn On |
|
|
Turn Off |
||
|
Turn On/Off |
||
|
Remain on for a set time |
||
|
Fan Switch |
Turn On |
|
|
Turn Off |
||
|
Turn On/Off |
||
|
Turn on to specified level |
||
|
Remain on for a set time |
||
|
Speed level + |
||
|
Speed level - |
||
|
Set to sleep mode |
||
|
Dimmer Switch/ |
Turn On |
|
|
Turn Off |
||
|
Turn On/Off |
||
|
Turn on and customize lighting |
||
|
Remain on for a set time |
||
|
Brightness + |
||
|
Brightness - |
||
|
Multicolor Lighting |
Turn On |
|
|
Turn Off |
||
|
Turn On/Off |
||
|
Turn on and customize lighting |
||
|
Remain on for a set time |
||
|
Brightness + |
||
|
Brightness - |
||
|
Color Temperature + |
||
|
Color Temperature - |
||
|
Random Color |
||
|
Smart Camera |
Enable Privacy Mode |
|
|
Disable Privacy Mode |
||
|
Enable/Disable Privacy Mode |
||
|
Play Sound (Default or Custom)* |
||
|
Enable Motion Tracking* |
||
|
Disable Motion Tracking* |
||
|
Enable/Disable Motion Tracking* |
||
|
Rotate to Marked Position* |
||
|
Turn On Patrol Mode* |
||
|
Turn Off Patrol Mode* |
||
|
Turn On/Off Patrol Mode* |
||
| Baby Cameras Lullaby Control |
Play Lullaby |
|
|
Pause Lullaby |
||
|
Play and Customize Lullaby |
||
| Baby Cameras Lighting Control | Turn On | |
|
Turn Off |
||
|
Turn On/Off |
||
|
Turn on and customize lighting |
||
|
Remain on for a set time |
||
|
Brightness + |
||
|
Brightness - |
||
|
Smart Floodlight Camera |
Turn On* |
|
|
Turn Off* |
||
|
Turn on/Off* |
||
|
Turn on and customize lighting* |
||
|
Remain on for a set time* |
||
|
Brightness +* |
||
|
Brightness -* |
||
|
Robot Vacuum |
Start Cleaning (with Cleaning preference) |
|
|
Head Home |
||
|
Doorlock |
Lock the Door* |
|
|
Turn on locking notifications |
||
|
Turn off locking notifications |
||
|
Turn on unlocking notifications |
||
|
Turn off unlocking notifications |
||
|
IR Remotes (Air Conditioner) |
Turn On |
|
|
Turn Off |
||
|
Turn On to Custom State |
||
|
IR Remotes (Others) |
Customize Buttons (Vary By Device Type) |
|
|
Group |
Turn On |
|
|
Turn Off |
||
|
Turn On/Off |
||
|
Remain on for a set time |
||
|
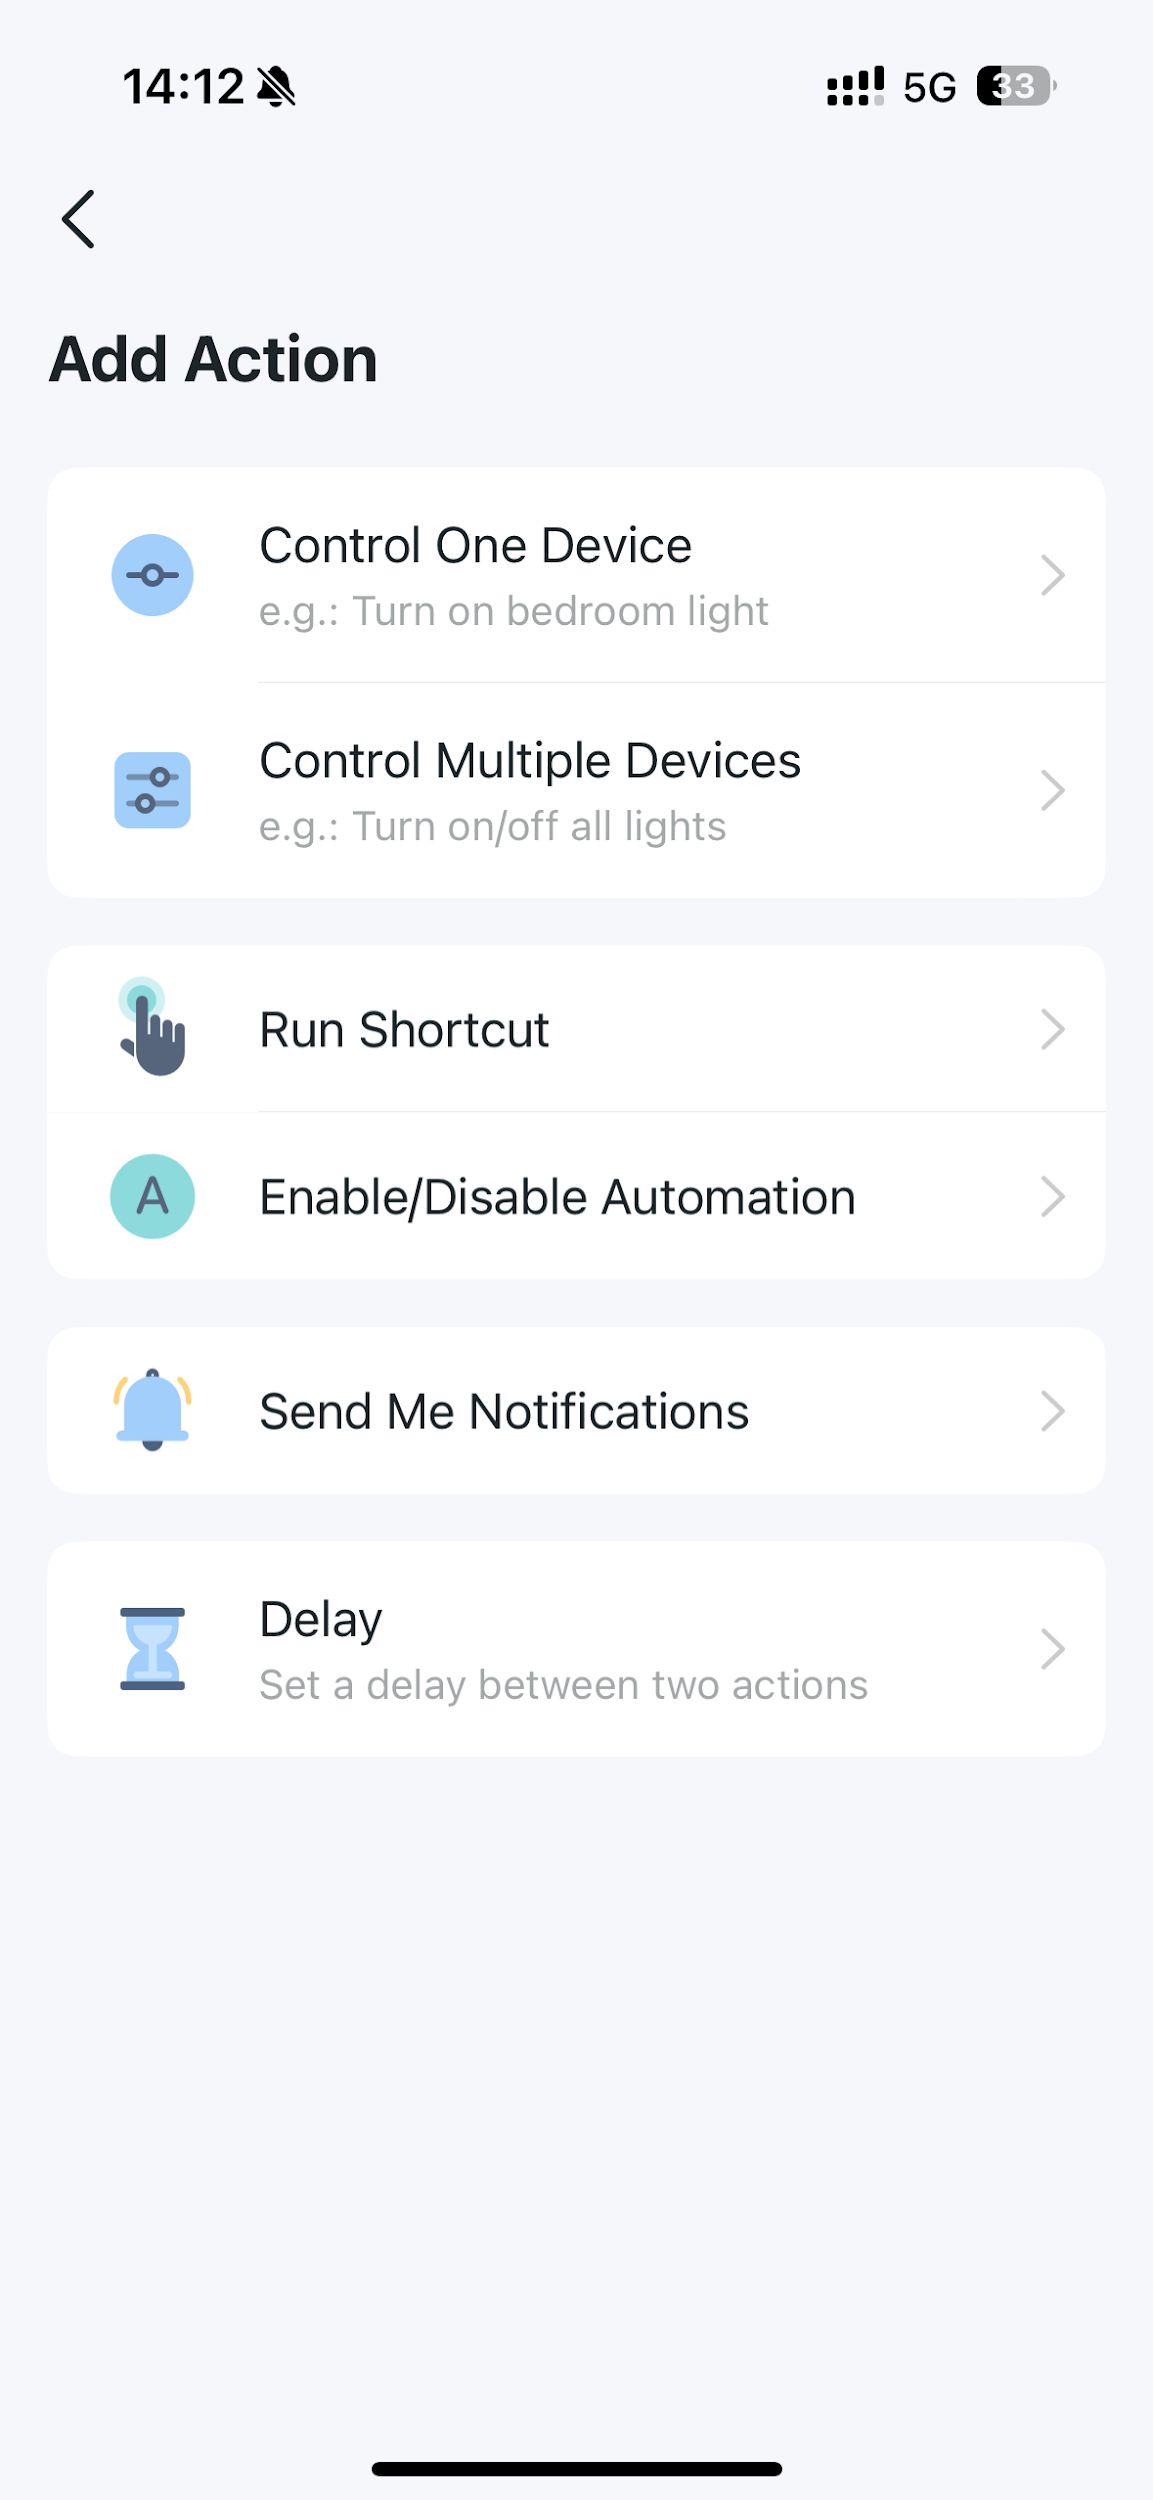
Control Multiple Devices |
Turn On |
Turn on multiple devices at the same time |
|
Turn Off |
Turn off multiple devices at the same time |
|
|
Run Shortcut |
Run the shortcuts you've set up |
|
|
Enable/Disable Automation |
Enable or disable the Automations you've set up |
|
|
Send Me Notifications |
Enter the message for your notification |
|
|
Delay |
Set a delay between two actions |
|
Condition List
|
Condition(If) |
|
|
Type/Model |
Device Status |
|
Plug/Switch/Lighting |
Device On |
|
Device Off |
|
|
Fan Switch |
Device On |
|
Device Off |
|
|
Contact Sensor (Tapo T110) |
Open |
|
Close |
|
|
Temperature and humidity sensors /Room Thermostat |
Temperature over X |
|
Temperature below X |
|
|
Temperature in a specified range |
|
|
Humidity over X |
|
|
Humidity below X |
|
|
Humidity in a specified range |
|
|
Camera |
Privacy Mode is On |
|
Privacy Mode is Off |
|
|
Floodlight is On |
|
|
Floodlight is Off |
|
|
Doorlock |
Locked |
|
Unlocked |
|
How to Create a Smart Action in the Tapo App
In this section, we introduce how to create a smart action on the Tapo APP.
Option 1: Use a Template
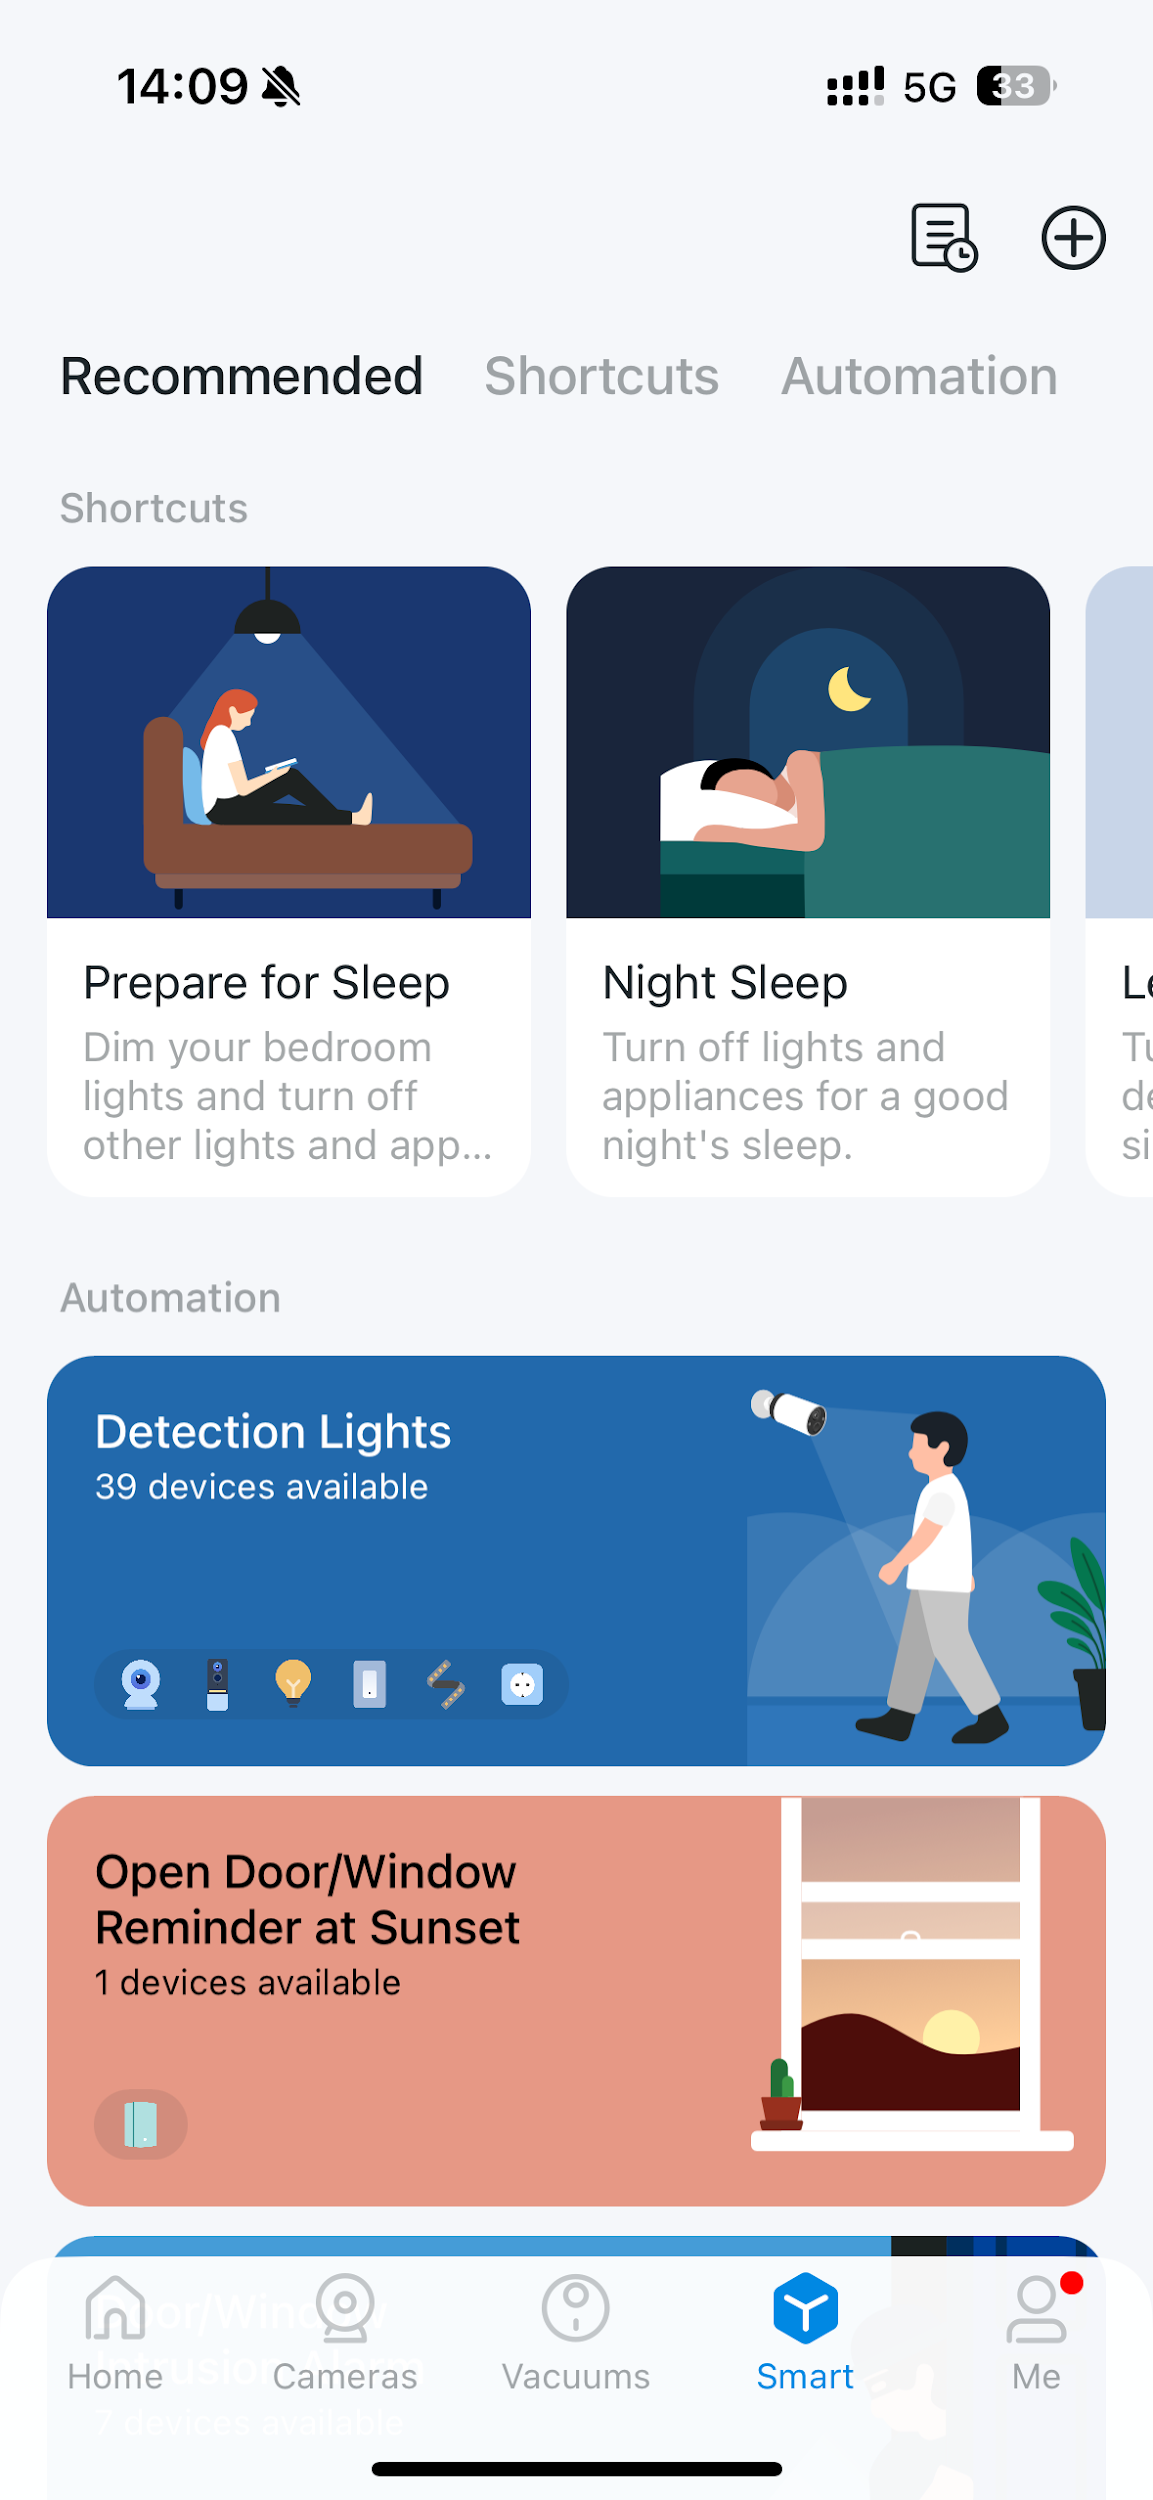
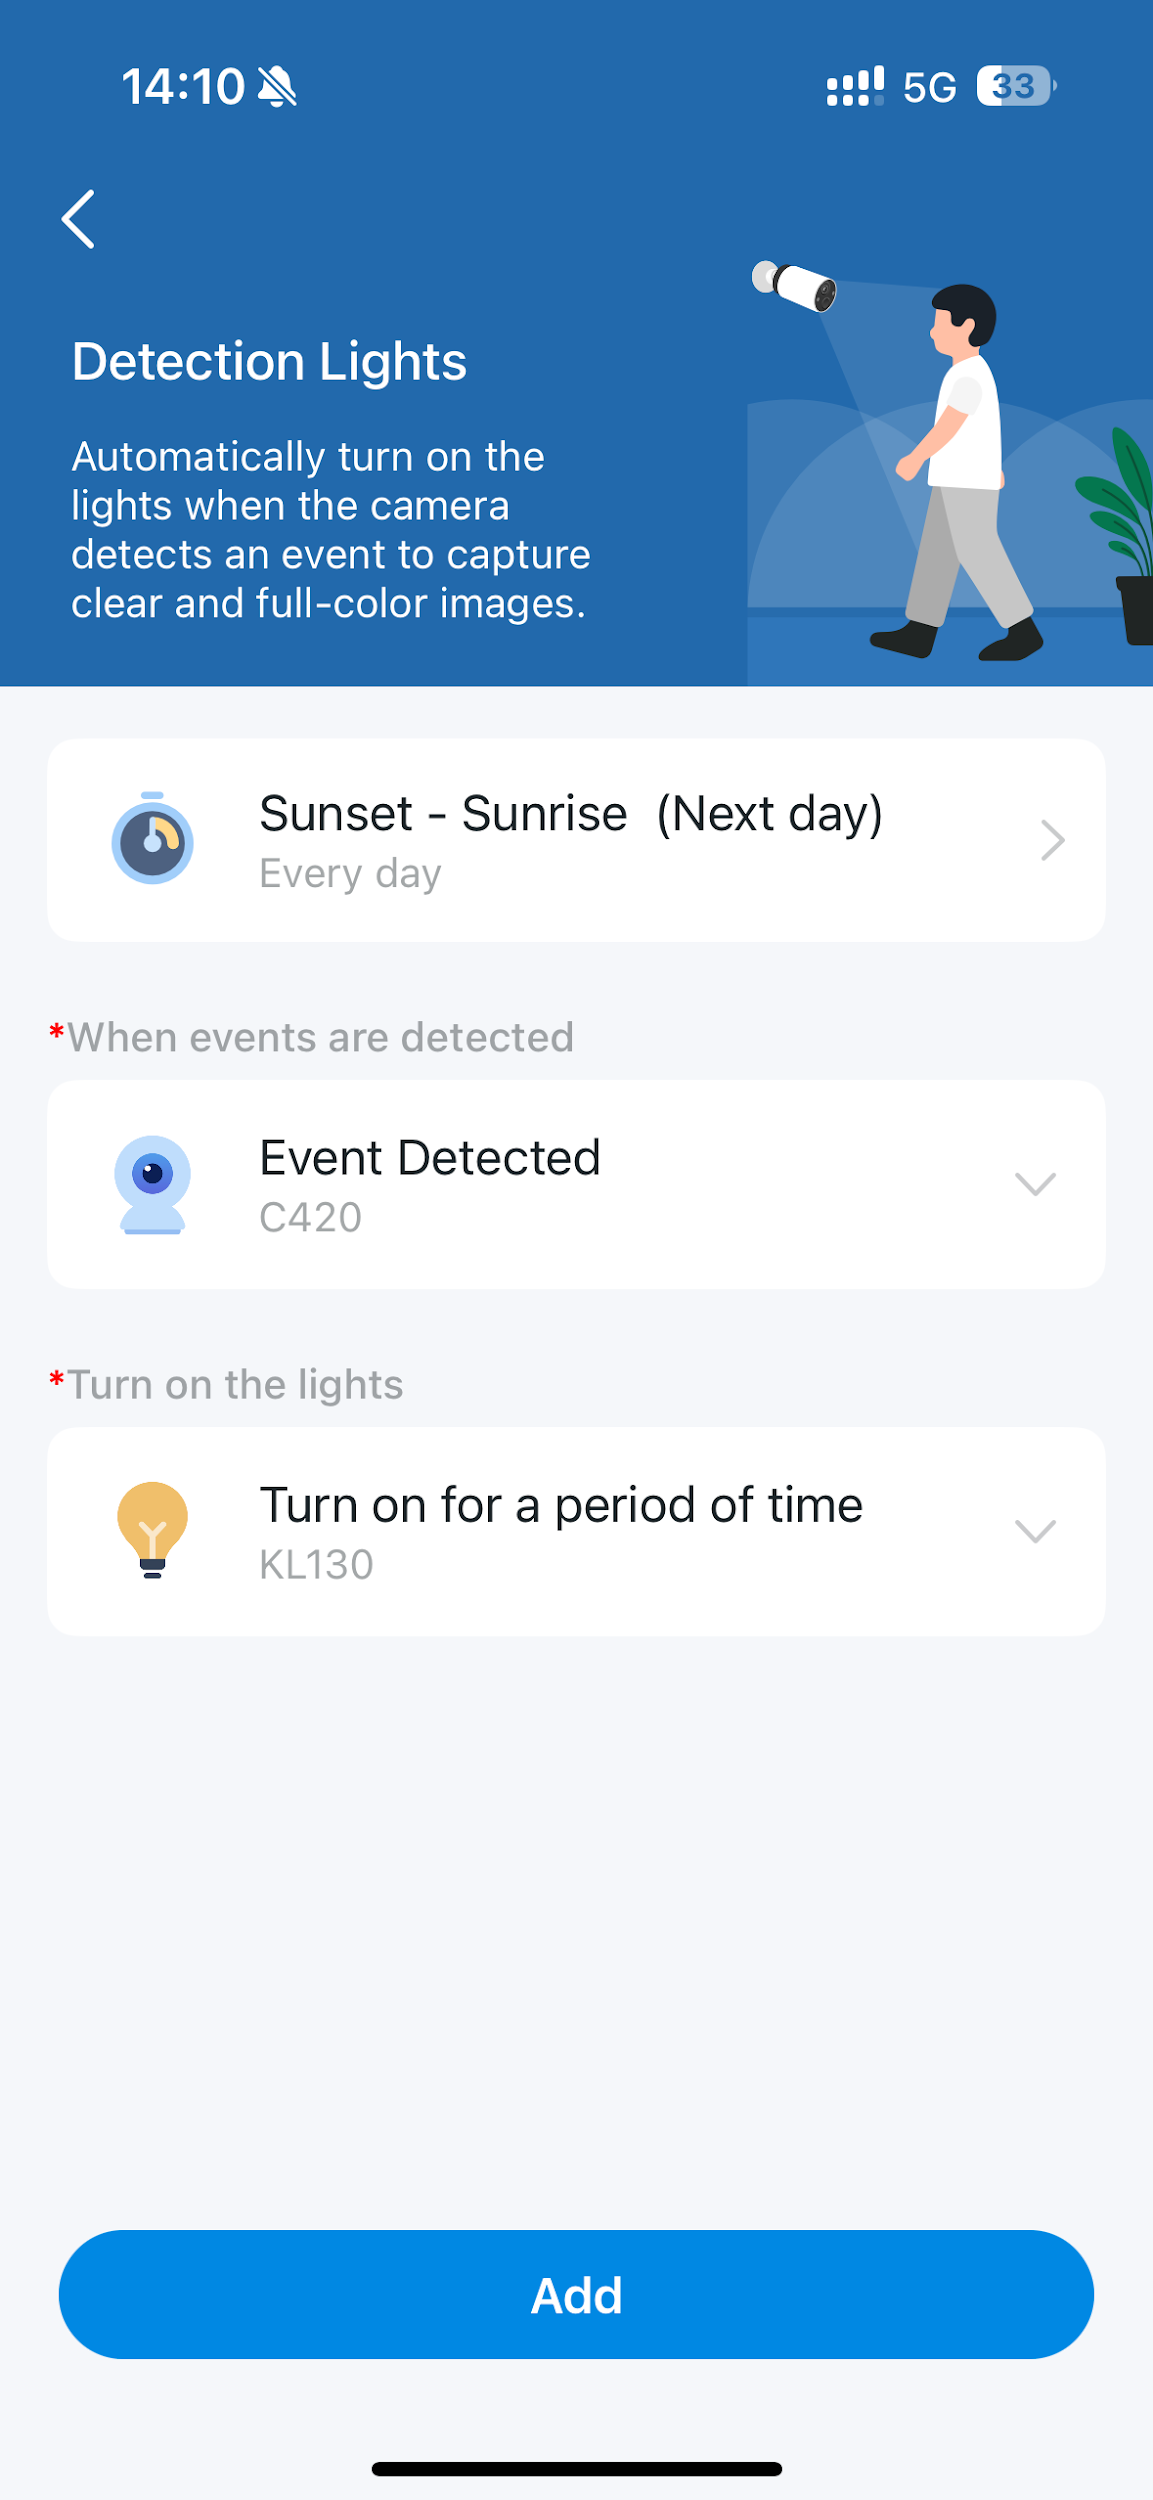
Step 1. Go to the Smart page, and you will see the Recommended Smart Actions (Shortcut and Automation).
Step 2. Tap a template, select your devices as prompted, then tap Add to save.
Note: Triggers and Actions vary by models.
Option 2: Build Your Own Smart Action
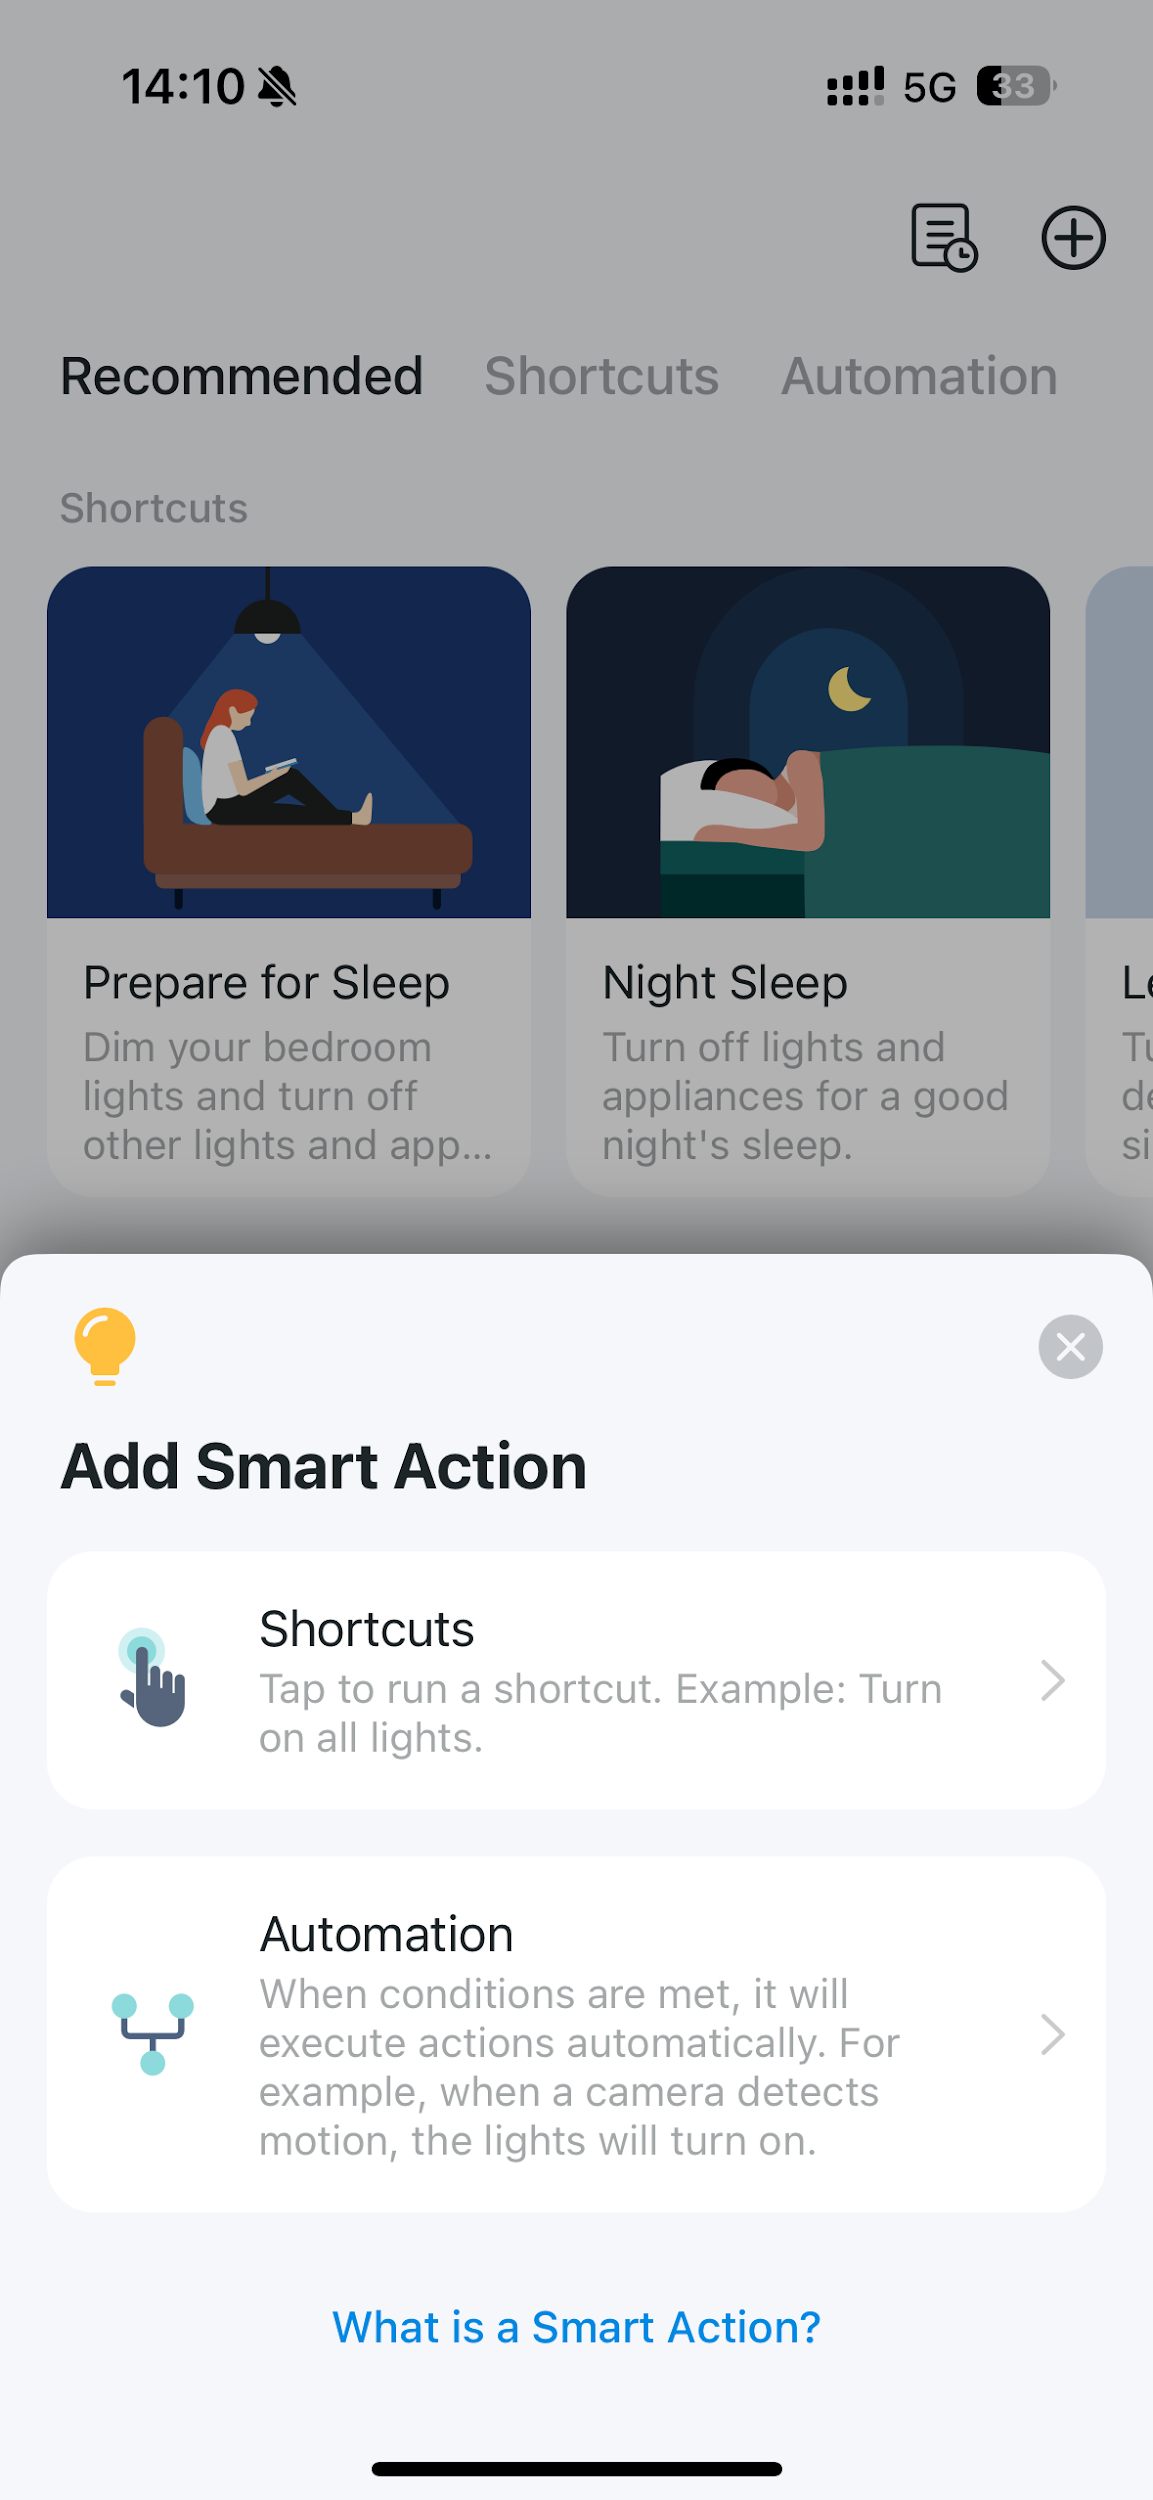
Step 1. Go to the Smart page and tap the + icon in the top-right corner to add a Shortcut or an Automation.
Step 2. Customize your smart action.
- Shortcuts
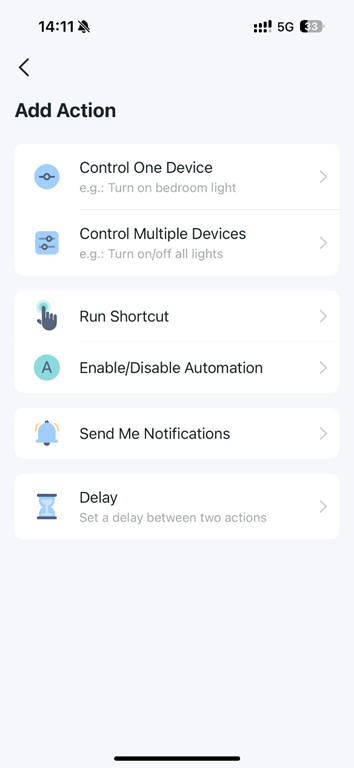
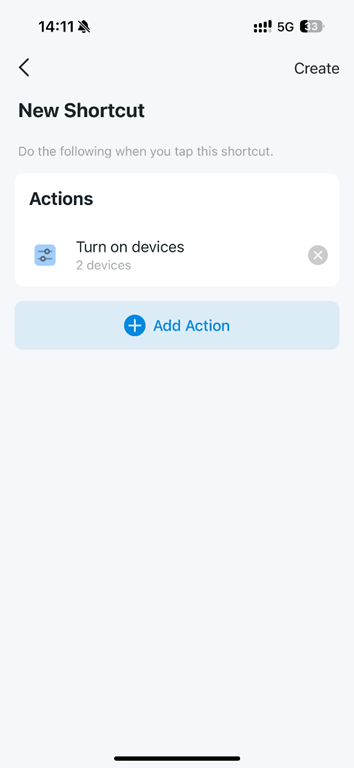
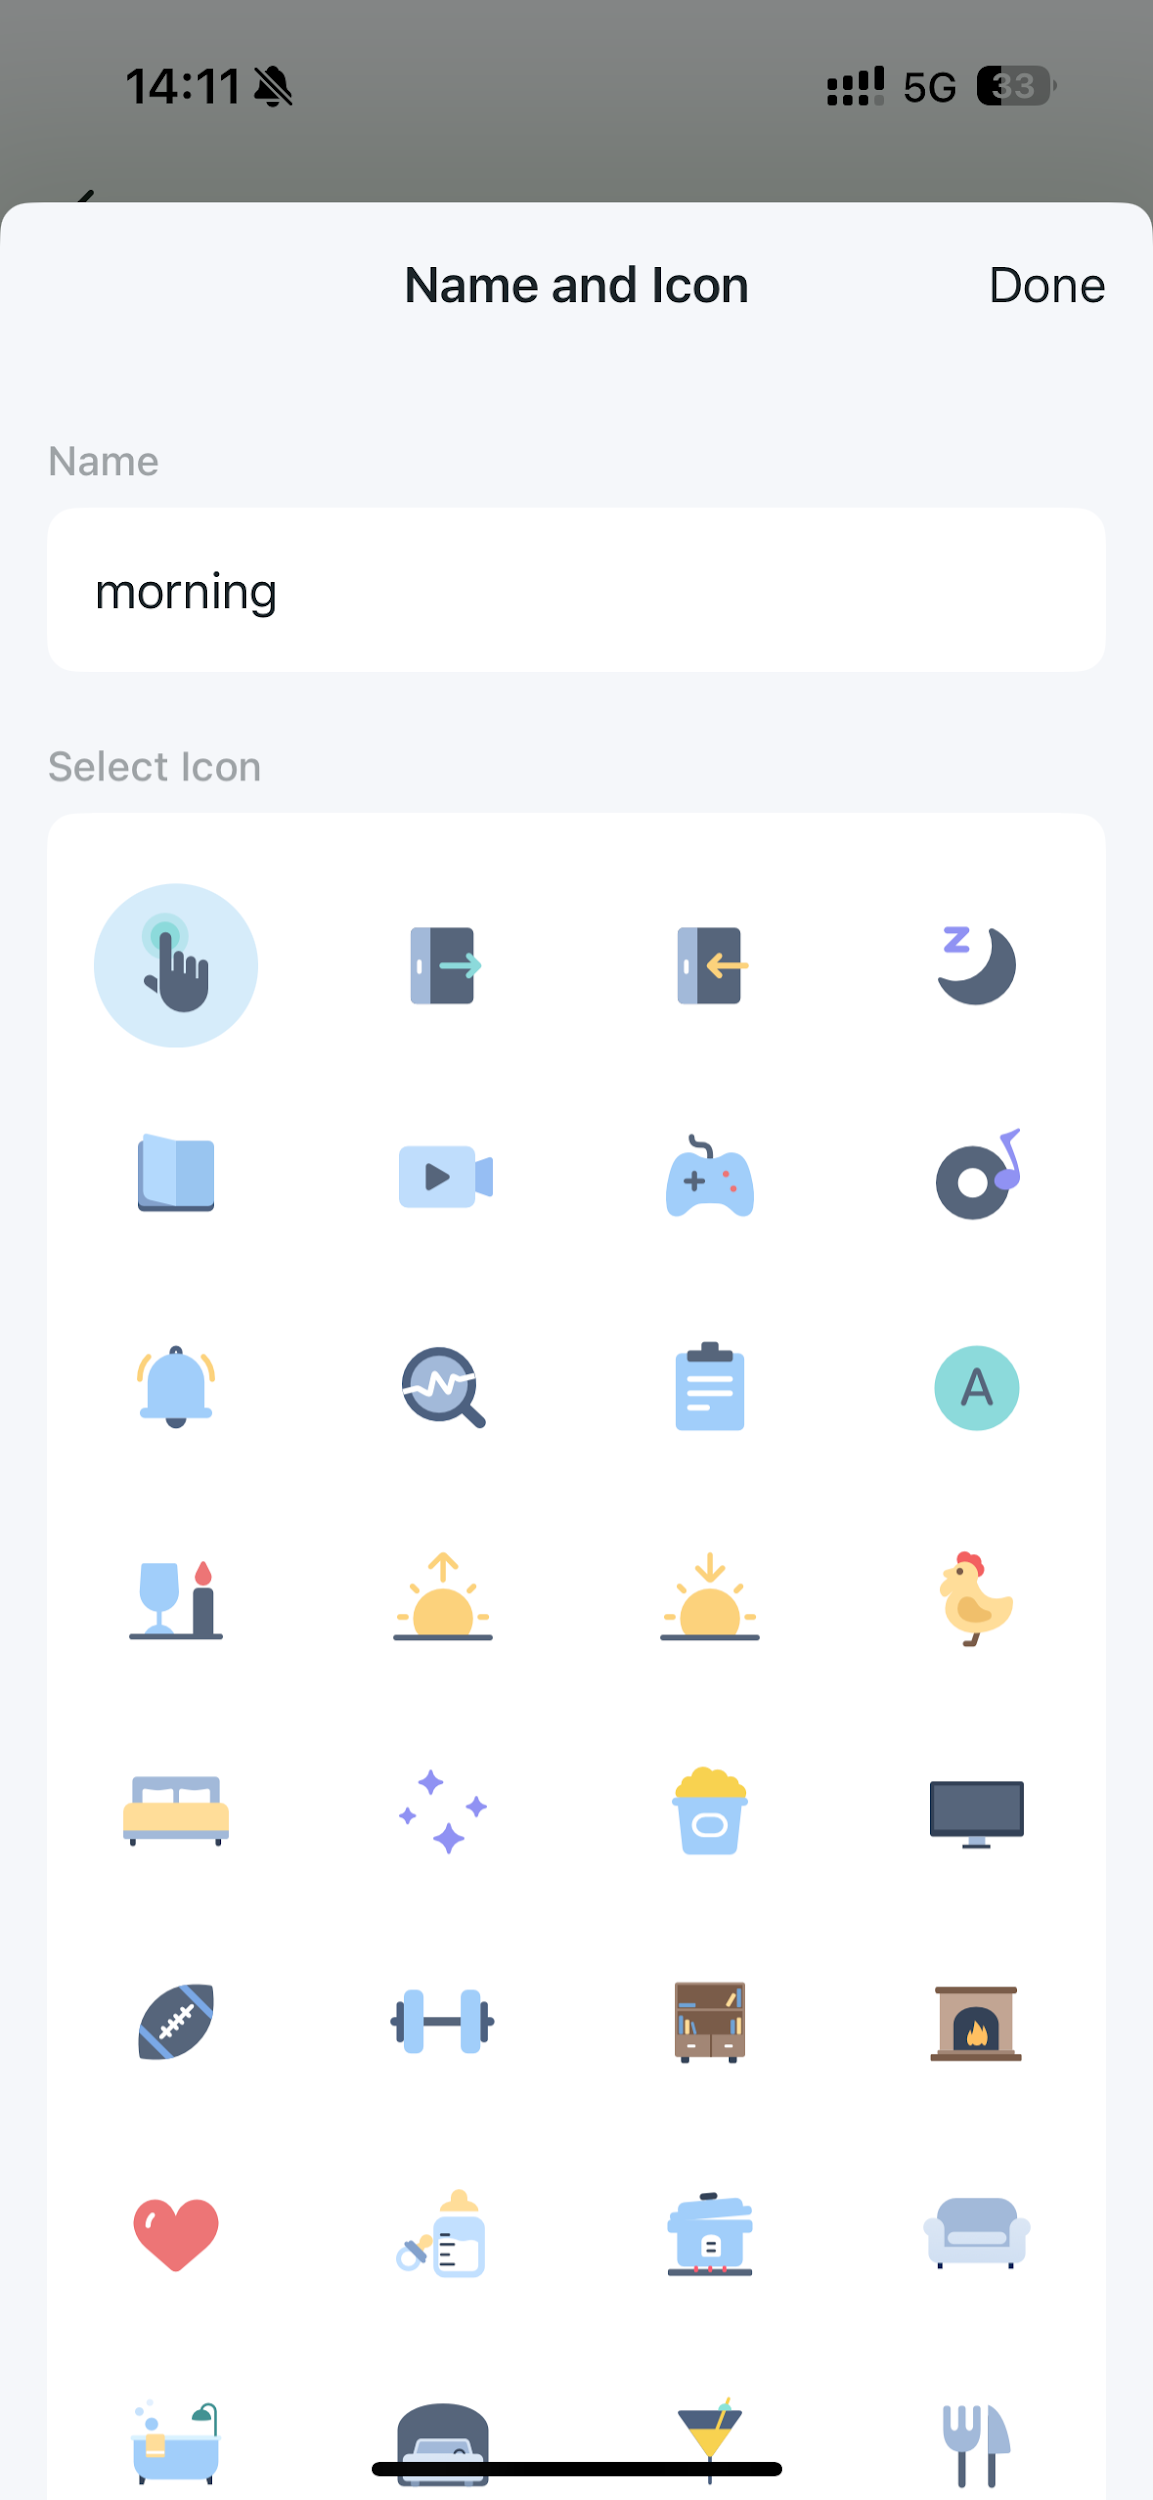
Tap + to add actions and set any delays as needed. Name your Shortcut, choose an icon, and tap Done.
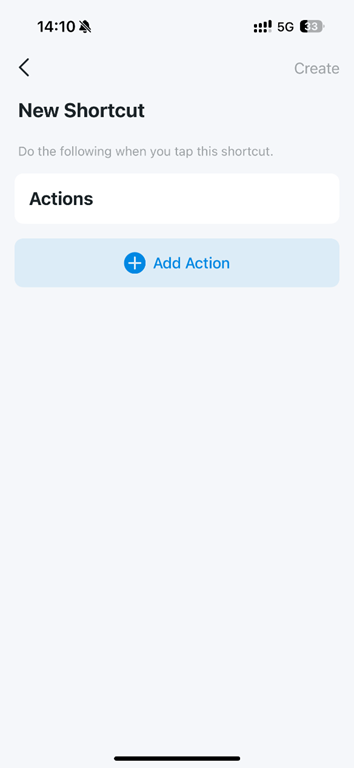
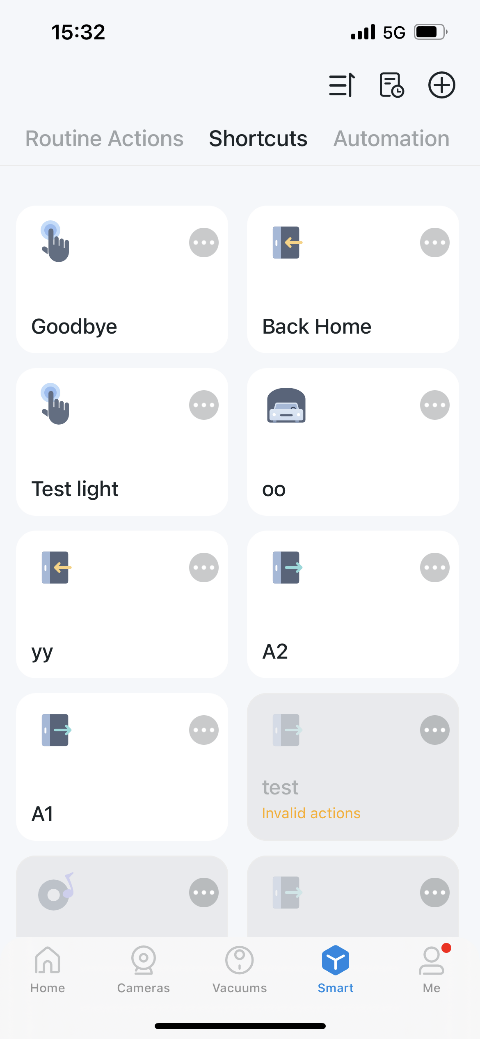
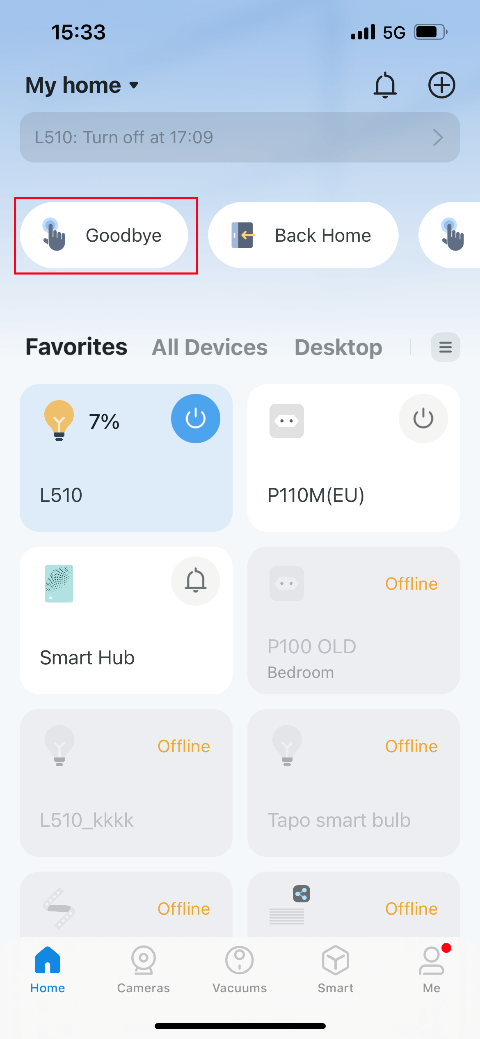
You can run the shortcut with a single tap on the Smart > Shortcuts page or the Home page.
- Automation
Tap + to add triggers (When) and actions (Then). To trigger only under specific conditions, add a condition (If).
Note: If two or more triggers are added, any one of them will activate the Automation.
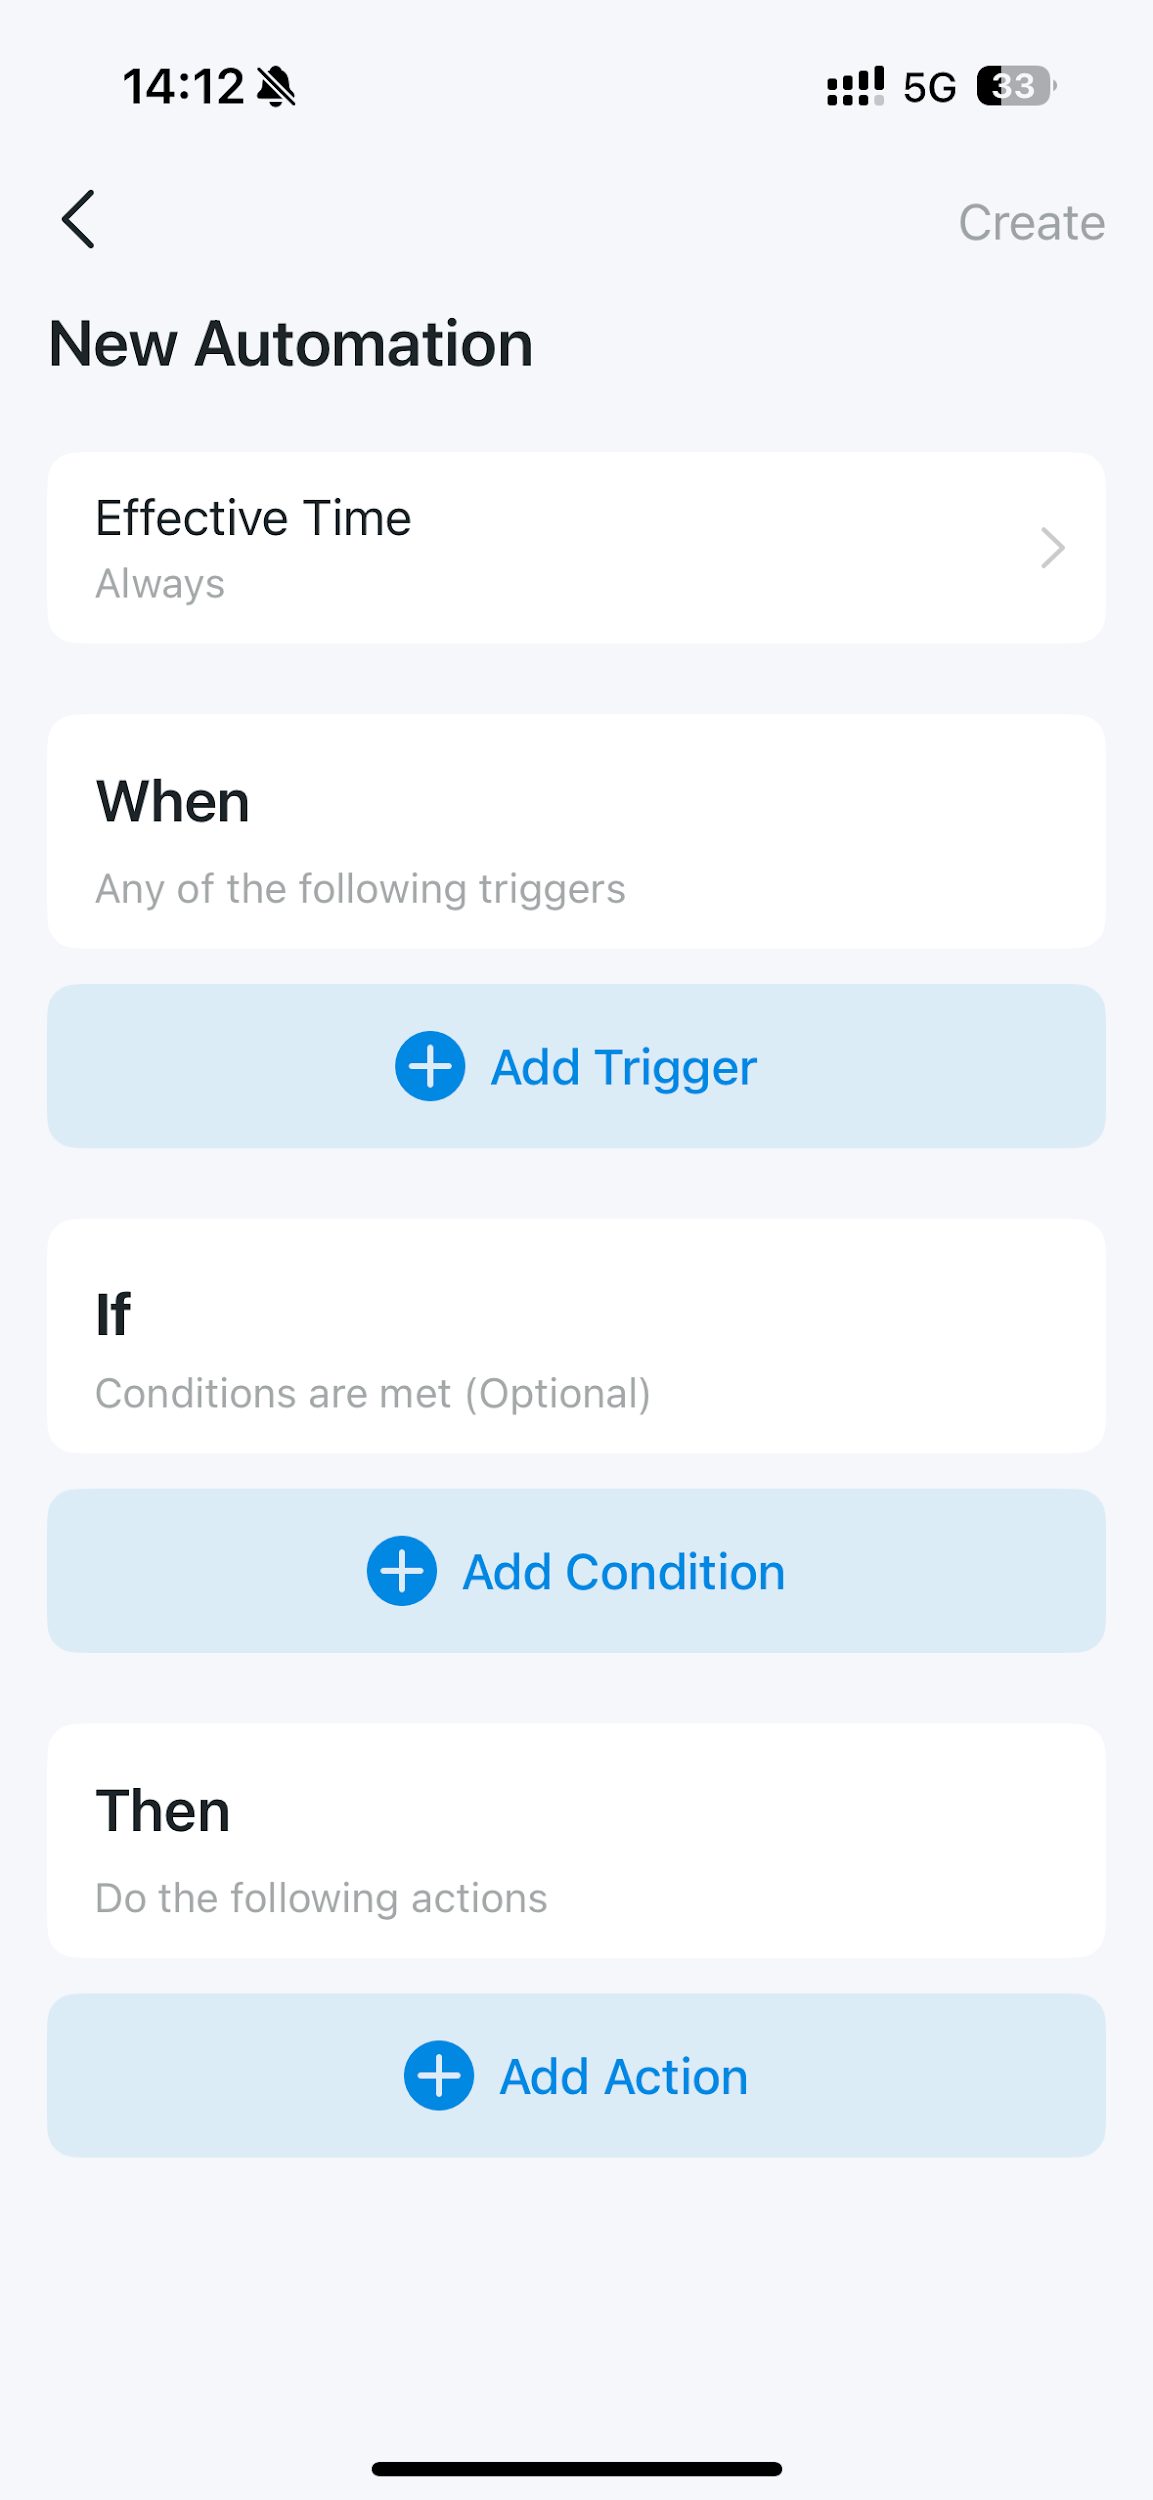
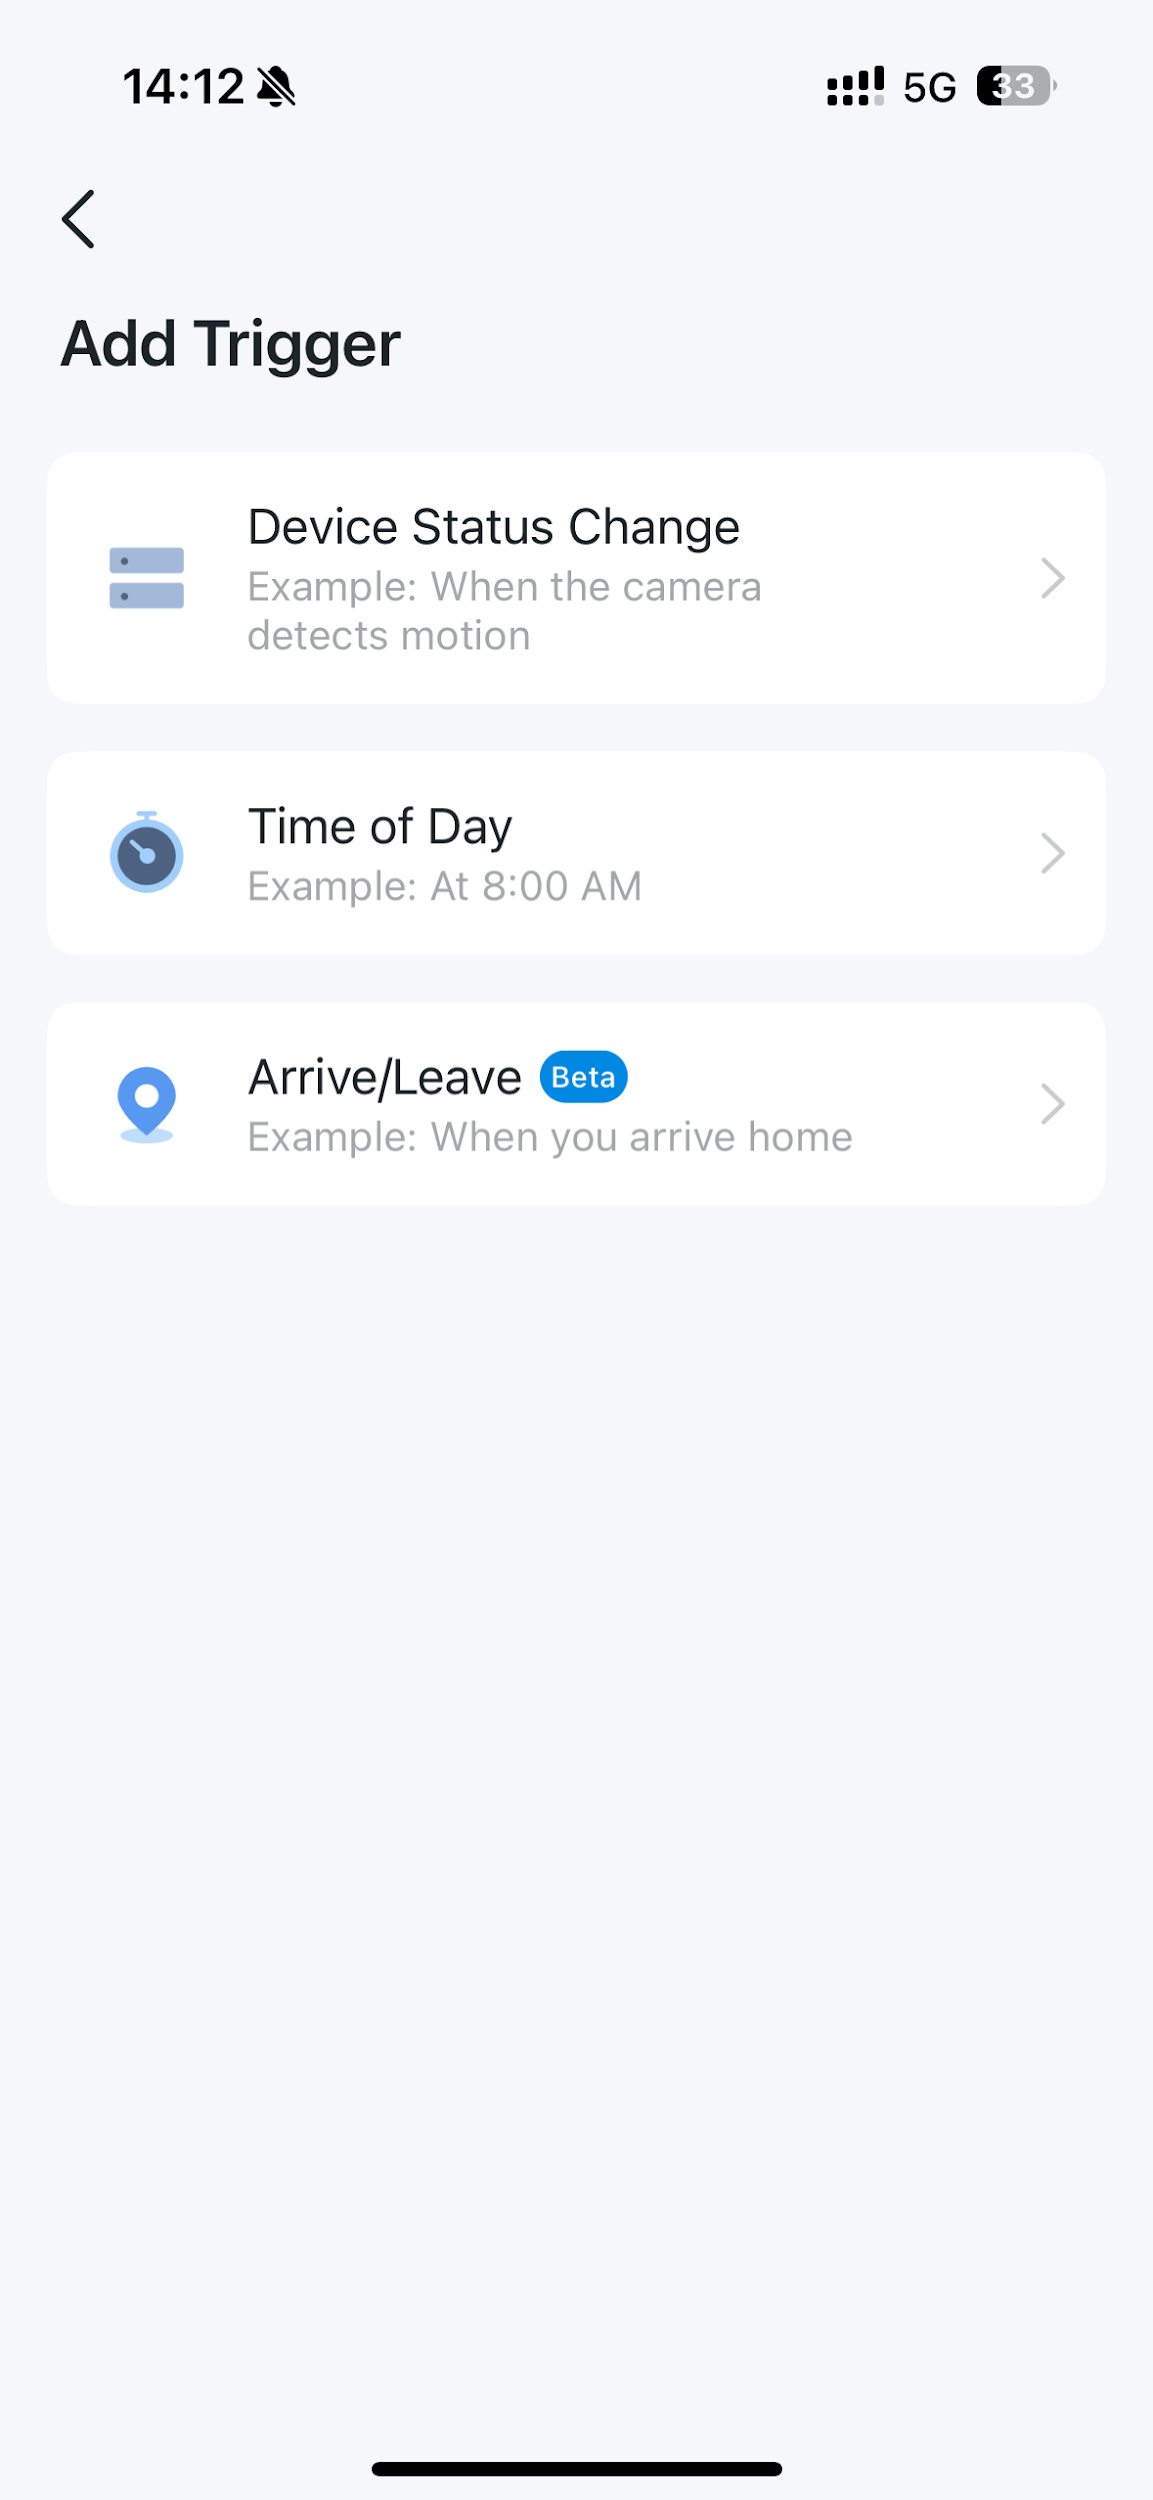
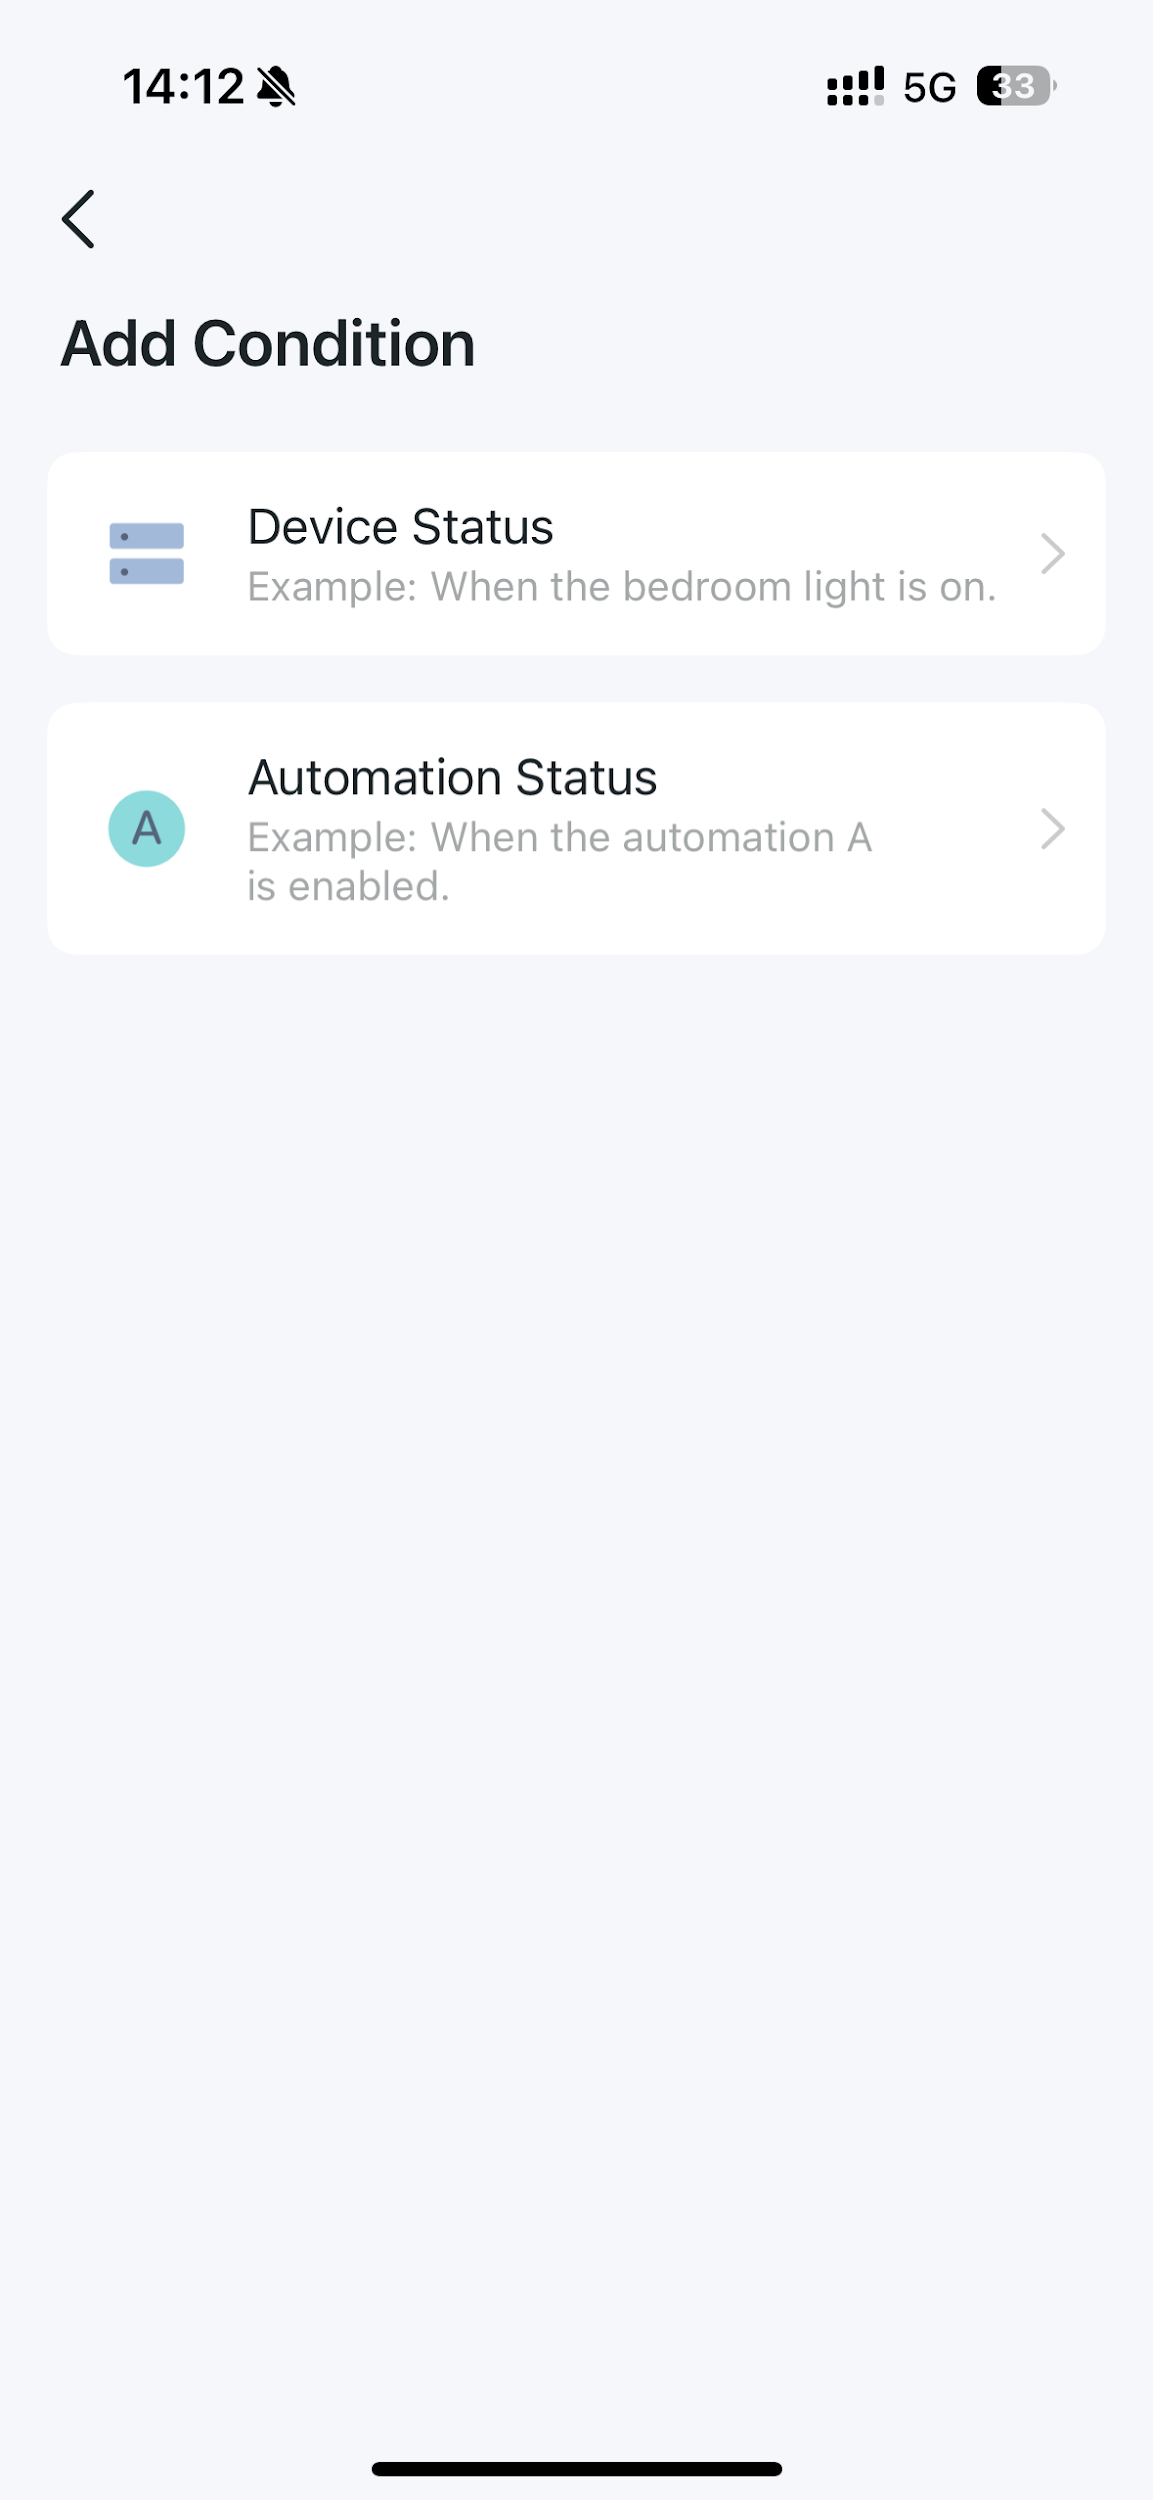
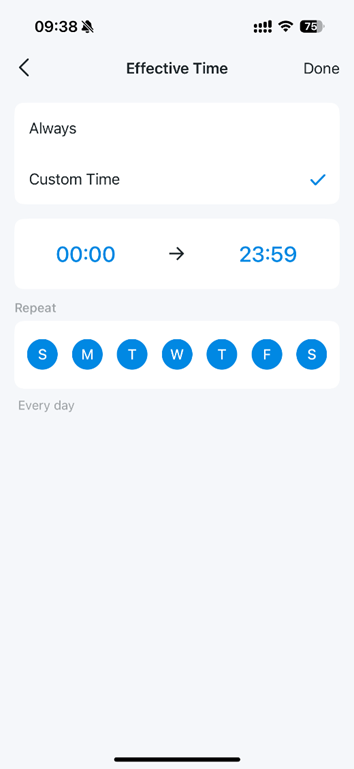
Set the Effective Time, then tap Create to save. The Automation will run whenever it's triggered within that time window.
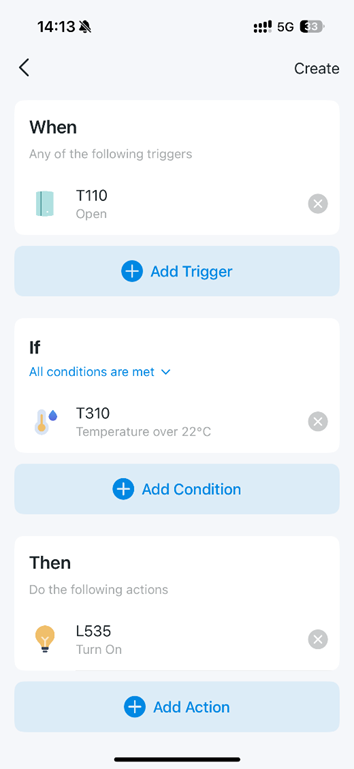
For more details, visit the Download Center to download your product's manual.
Looking For More
Is this faq useful?
Your feedback helps improve this site.



TP-Link Community
Still need help? Search for answers, ask questions, and get help from TP-Link experts and other users around the world.