How to install Tapo Smart Switch Module (Tapo S112)
*Note:
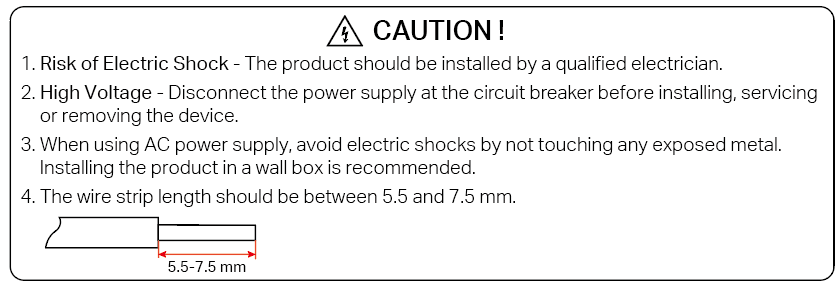
1. Before installing the S112, please remember that you will be working with your home’s electricity. This can be dangerous, so if you are not comfortable with basic electrical wiring, do not attempt to install it. Contact a licensed electrician for assistance.
2. In this article, AC stands for alternating current, and DC stands for direct current.
Tapo S112 is a 2-channel relay module that can be connected and controlled via Wi-Fi and Bluetooth. It is ideal for controlling bidirectional motors and lights.
Work Mode
Tapo S112 supports dual modes, allowing you to integrate various devices.
In Roller Mode (default mode), it's ideal for connecting a bidirectional control motor for operating roller shutters and awnings. The relays never close simultaneously, ensuring circuit safety.
In Switch Mode, you can seamlessly control lights, sockets, and electric floor heating without replacing your traditional switch. The two-channel relays operate independently in this mode to control the connected load.
Appreance

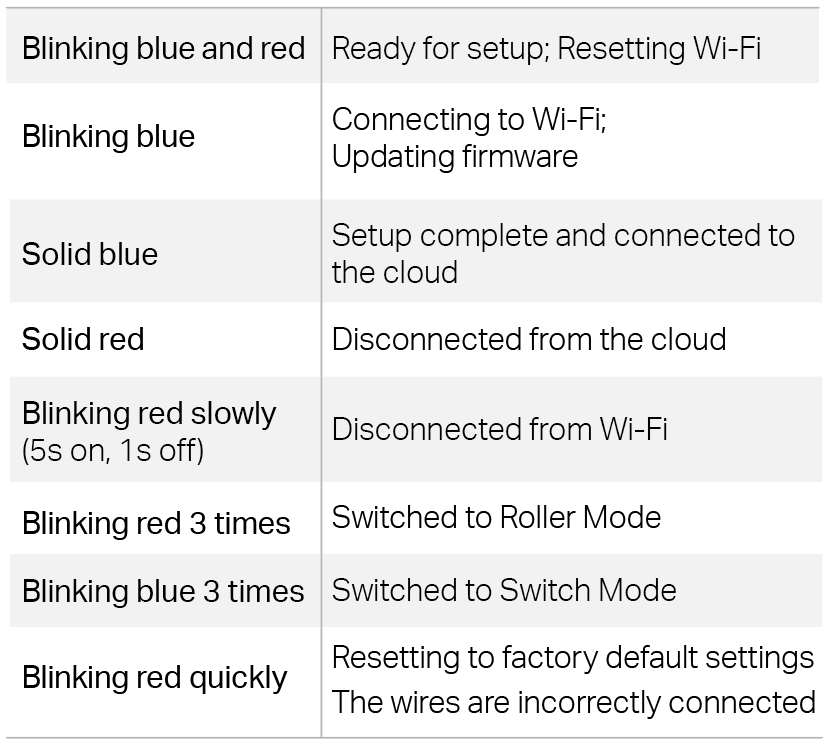
LED Status
Button Explanations
To prevent electric shocks, avoid touching the device after wiring. Use the device button only when powered by DC.
- Turn on/ off the device: Press once. In switch mode, the button can control two lights at the same time.
- Reset Wi-fi while keeping the previous settings: Press and hold for 5s.
- Restore factory settings: Press and hold for 10s until the LED blinks red, then release it.
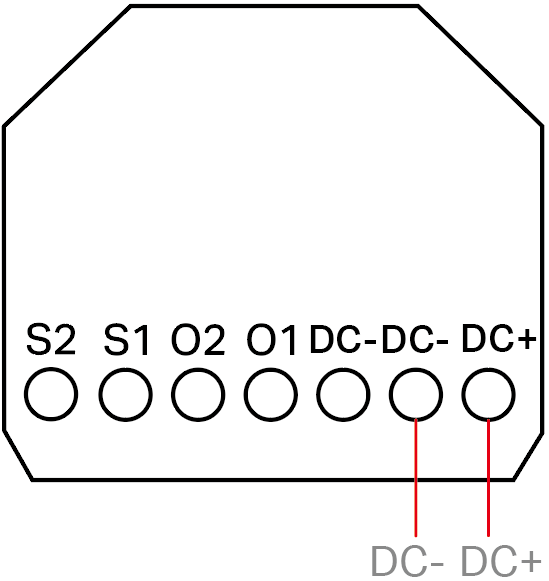
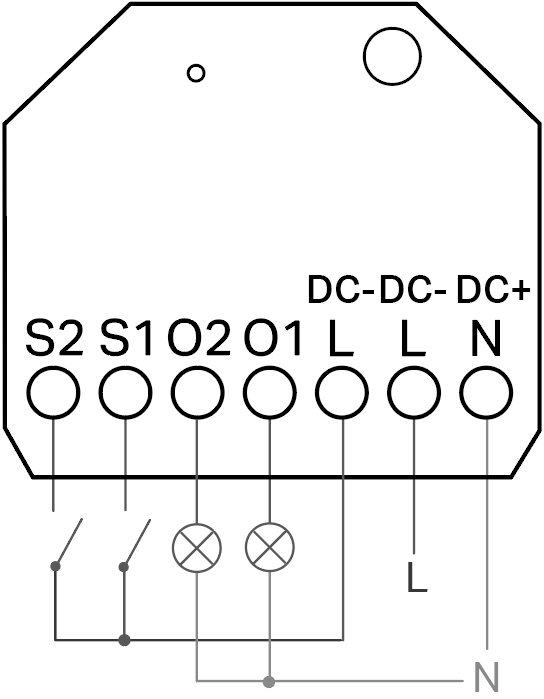
Terminals
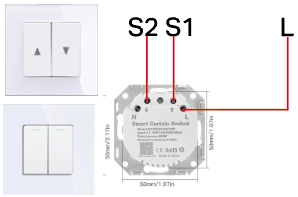
- S1/S2: Connect to the traditional switch. The other end of the switch is connected to the L (DC-) terminal. For details about the switch type, see Get to Know the Switch Type.
S1 controls O1 and S2 controls O2. You can swap them in the app if they are connected in reverse. Both push button switches and rocker switches are supported.
- O1/O2: In roller mode, connect to the motor. In switch mode, connect to devices such as lights or sockets.
- L: For AC input, connect to the Line wire.
- N: For AC input, connect to the Neutral wire.
- DC-: For DC input, connect to the Negative terminal.
- DC+: For DC input, connect to the Positive terminal.
Wiring Video
Before You Start
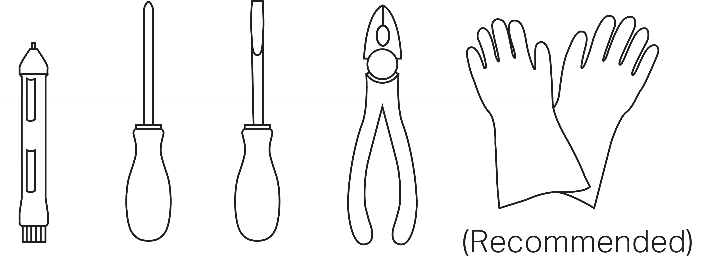
- Tools You’ll Need
|
|
|
|
- Get to Know the Wires
Different countries have different color codes for their electric wires. Please refer to local regulations for wire color requirements.
For wire color requirements in European countries, you can refer to Wiring Color Codes in Europe, including the UK (IEC).
- Get to Know the Switch Type
Rocker Switch: A rocker switch, also known as a toggle switch, locks into position once it is changed. It remains in either the "on" or "off" position until it is operated again.
Push Button Switch: A push button switch returns to its original position when released. Its current status cannot be identified based on its appearance.
If you still can't tell the switch type, you can change the switch type on the Tapo App to try which one meets your needs.
Wiring Instructions
Here, we will introduce how to wire the S112 terminals.
L (DC-), N (DC+)
Connect L(DC-) and N(DC+) to the power supply.
- For AC Input
L Terminal: Connects to the Line wire.
N Terminal: Connects to the Neutral wire.
- For DC Input
DC- Terminal: Connects to the Negative terminal of the DC power supply.
DC+ Terminal: Connects to the Positive terminal of the DC power supply.
O1, O2
For Roller Mode, connect O1/O2 to the motor. For Switch Mode, connect O1/O2 to the load device (light/socket).
- Roller Mode (AC power supply)

O1/ O2 Terminal: Connects to the two input terminals of the motor, respectively.
- Roller Mode (DC power supply)
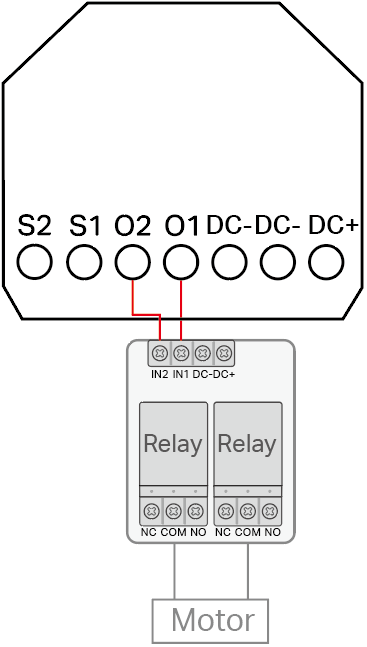
An additional current control module must be connected between the S112 outputs (O1, O2) and the DC motor input to control forward/reverse rotation.
- Switch Mode
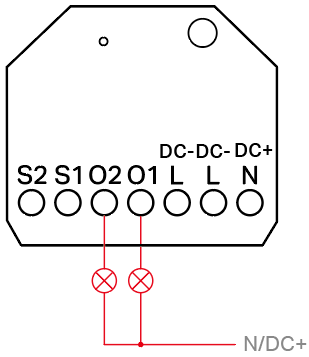
You can connect O1/O2 to one or two load devices (light/socket).
S1, S2, L
Connect S1/S2/L to push button switches or rocker switches using the 3 jumper wires provided in the package.
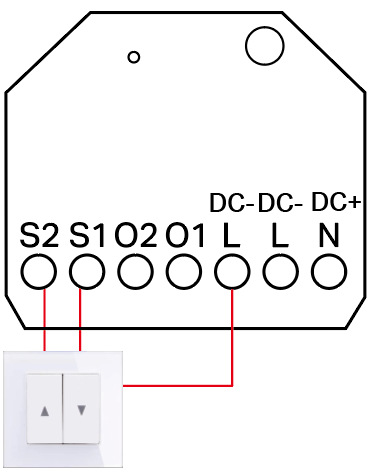
S1/S2/L Terminal: Connects to the switch.
1. Get the Tapo app from the App Store or Google Play and log in.

2. Open the Tapo App.
3. Tap the “+” button in the app and select Add Device.
4. Select Switches/Buttons and then Tapo S112.
5. Set the Work Mode to Roller Mode or Switch Mode as needed.
6. Turn on the circuit breaker. The LED indicator’s status should blink blue and red.
7. Turn on Bluetooth on your phone or tablet, then follow the app instructions to complete the setup.
Due to compatibility issues with third-party applications, adding S112 via Matter may result in some features not being supported. For details, please refer to Unsupported features when adding the S112 device via Matter.
If you still need to control S112 via Matter, ensure you have completed the following basic configurations in the Tapo APP. It is recommended to add the device via the Tapo APP.
Device Settings Page: Work Mode, Switch Type, Button Configuration, Position Calibration (Roller Mode)
To know more information about Matter, visit Q&A for TP-Link Matter-enabled devices.
Unsupported features when adding the S112 device via Matter
Switch Mode
|
Features |
Support of Tapo |
Support of Matter |
|||
|
Alexa |
Google Home |
Apple Home |
SmartThings |
||
|
Schedule/ Timer/ Auto-Off/ Away Mode |
√ |
× |
× |
× |
× |
|
Change Wi-Fi |
√ |
× |
× |
× |
× |
|
Change Work Mode |
√ |
× |
× |
× |
× |
|
Set Switch Type (Rocker /Push button) |
√ |
× |
× |
× |
× |
|
Physical Button Configuration |
√ |
× |
× |
× |
× |
|
Convert Unused Switch to Wireless Switch (The wireless switch acts as a trigger for the smart action) |
√ |
× |
× |
× |
× |
|
LED OFF |
√ |
× |
× |
× |
× |
|
Set the light status (on/off) when power returns after an outage |
√ |
× |
× |
× |
× |
|
Power Protection |
√ |
× |
× |
× |
× |
|
Energy Usage |
√ |
× |
× |
× |
There are issues, it is not recommended to use. |
Roller Mode
|
Features |
Support of Tapo |
Support of Matter |
|||
|
Alexa |
Google Home |
Apple Home |
SmartThings |
||
|
Open/Close/Percentage Control |
√ |
√ |
√ |
√ |
√ |
|
Schedule/ Timer/ Auto-Off /Away Mode |
√ |
× |
× |
× |
× |
|
Position Calibration |
√ |
× |
× |
× |
× |
|
Obstacle Detection Alarm |
√ |
× |
× |
× |
× |
|
Set Switch Type (Rocker /Push button) |
√ |
× |
× |
× |
× |
|
Physical Button Configuration |
√ |
× |
× |
× |
× |
Reset your device
Note: To prevent electric shocks, avoid touching the device after wiring. Use the device button only when powered by DC.
Please use the Tapo app to set up, configure, or reset your device.
If you are unable to connect to the device, please try the following steps:
• Turn the external switch S1 or S2 on and off 5 times within 4 seconds to reset the Wi-Fi while keeping the previous settings. For a rocker switch, toggle it quickly 10 times.
• Press and hold the device button for 5 seconds to reset the Wi-Fi while keeping the previous settings.
• Press and hold the device button for 10 seconds until the LED blinks red, then release it to restore factory settings.
Convert your unused switch to a wireless switch
In switch mode, the redundant and unused channel can be converted into the wireless switch mode.
For example, you can go to “Device Settings > Switch to Wireless Switch” on the Tapo app and convert S2 to a wireless switch. Then S2 will no longer directly control the on/off of O2. S2 can be a scene trigger, enabling you to activate the “Leave Mode” with just one click.
Set the switch type
After setting up the S112, on the Device Settings page of the Tapo App, select Switch Type and set the switch type to Rocker Switch or Push Button Switch according to the actual situation.
Reverse the switch control direction
Roller Mode: If the motorized covering moves in the opposite direction of the physical button, you can go to "Device Settings > Button Configuration > Physical/App Button Configuration " and tap "Switch Direction" to change the open/close order.
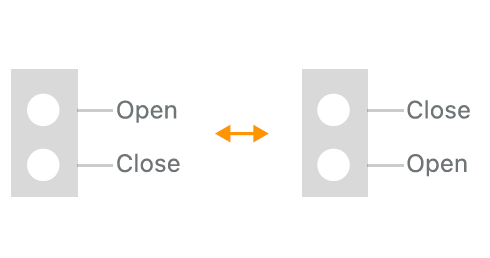
Switch Mode: If the button does not operate the correct device, you can go to "Device Settings > Button Configuration" and tap "Swap Connected Devices" to switch the controlled device.

1. What should I do if the roller cannot be controlled normally?
A: Please calibrate the motor again to see if the roller can be controlled normally. If the issue persists, please get in touch with technical support.
To calibrate the motor, go to the "Device Settings > Position Calibration" page of the Tapo app. You can choose Automatic Calibration or Manual Calibration.
2. What should I do if the position percentage in the app does not match the actual position after manually adjusting the motor direction or rotating the motor?
A: If you modify the motor direction, trying position calibration once more in the Tapo app is recommended to ensure accurate operation.
Note: After the calibration, avoid rapidly starting/stopping the motor in quick succession to ensure accurate position percentage control.
3. Why can’t I see the energy monitoring feature when using S112 in Roller Mode in the Tapo app?
A: To ensure function stability and accuracy, energy monitoring is only supported in Switch Mode for the time being.
4. Why is the opening/closing percentage of S112 displayed in Alexa reversed to the actual status in Roller Mode?
A: This is a compatibility issue with Alexa. For accurate control, we recommend you use the Tapo app or other Matter-enabled apps.
5. Why does the device details show as "Unknown" sometimes after adding S112 to Apple Home?
A: Apple Home currently has limited compatibility with such a type of device. You can check the full details in the Tapo app.
6. What should I do if Google Home only shows the On/Off button but no position percentage controls?
A: This issue has something to do with specific versions of the Google Home App. Ensure your phone’s OS and Google Home app versions are updated. If the issue persists, for full functionality, using the Tapo app or other Matter-enabled apps is recommended.
7. Why can't I remove the S112 on the third-party app?
A: S112 is designed to be added as a Bridge device or a Hub device. If you want to completely remove the S112 device, you need to remove the corresponding Bridge Device or Hub device.
Is this faq useful?
Your feedback helps improve this site.

TP-Link Community
Still need help? Search for answers, ask questions, and get help from TP-Link experts and other users around the world.