Как настроить и подключить сетевой адаптер Powerline TP-Link
Сеть адаптеров Powerline TP-Link позволяет расширить домашнюю сеть в любую комнату с розеткой, используя существующую электропроводку — без необходимости прокладывать длинные Ethernet-кабели. После настройки адаптеры Powerline обеспечивают надежное подключение со скоростью проводной сети по всему дому. Сопряжение — это ключевой шаг при настройке адаптеров Powerline TP-Link: когда два адаптера сопряжены, они устанавливают соединение в сети Powerline. Это руководство охватывает три метода сопряжения и настройки вашей сети. Обратите внимание, что оба адаптера должны быть подключены к одной электрической цепи для работы сети.
Основные выводы
- Адаптеры Powerline TP-Link являются plug-and-play устройствами. Во многих случаях достаточно включить оба устройства в розетки в одной комнате и подождать две-три минуты, чтобы они автоматически сопряглись.
- Если автоматическое сопряжение не работает, вы можете сопрячь адаптеры вручную, нажав и удерживая кнопку Pair на каждом устройстве в течение двух минут друг после друга.
- Для сети Powerline требуется как минимум два устройства, подключенных к одной электрической цепи. Адаптеры на разных цепях не будут взаимодействовать друг с другом.
- Если светодиод Powerline горит красным, адаптер испытывает плохой уровень сигнала и должен быть перемещен в другую розетку.
- Адаптеры Powerline TP-Link также можно настраивать с помощью мобильного приложения tpPLC или настольной утилиты tpPLC, для чего требуется ввести 16-значный ключ Powerline, указанный на наклейке устройства.
Что такое Powerline
Адаптеры Powerline TP-Link используют существующую электропроводку дома для передачи сетевых сигналов в любую комнату с розеткой. Вы можете создать сеть Powerline везде, где есть розетки, что избавляет от необходимости прокладывать дорогие и сложные Ethernet-кабели.
Для создания базовой сети Powerline необходимо как минимум два устройства, подключенных к одной электрической цепи.
Адаптеры Powerline являются plug-and-play устройствами, поэтому включите оба адаптера в розетки в одной комнате. Подождите 2-3 минуты; когда светодиод Powerline загорится, подключите один адаптер к LAN-порту маршрутизатора через Ethernet-кабель, затем переместите другой адаптер в нужное место и пользуйтесь расширенной сетью.
Если адаптеры Powerline не сопрягаются автоматически, выполните шаги ниже.
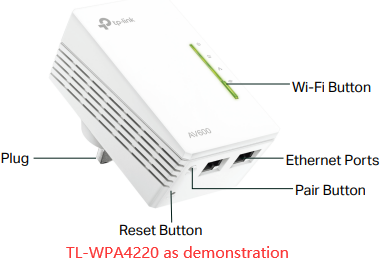
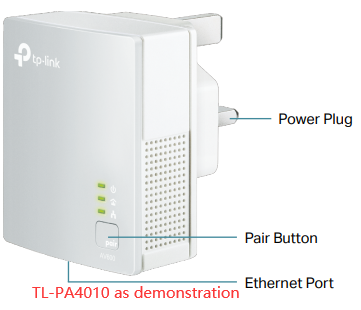
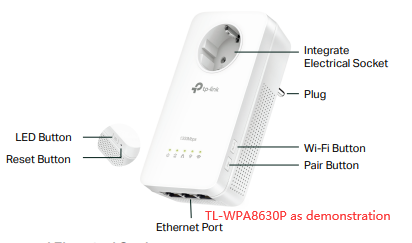
Примечание: Модели, начинающиеся с TL-WPAxxxx, транслируют Wi-Fi сигнал ("W" означает "Wireless" — беспроводной). Модели, начинающиеся с TL-PAxxxx, поддерживают только Ethernet-подключение.
Пошаговые инструкции ниже охватывают три метода сопряжения и настройки сети адаптеров Powerline TP-Link.
Как настроить адаптер Powerline TP-Link
Метод 1: Настройка адаптера Powerline TP-Link с помощью сопряжения
Шаг 1: Включите адаптеры Powerline.
Включите адаптер Powerline в розетку рядом с одним из существующих адаптеров.
Рекомендуется размещать устройства Powerline как можно ближе друг к другу при сопряжении. Затем, после завершения сопряжения, их можно переместить в нужные места.
Один адаптер Powerline должен быть подключен к маршрутизатору через Ethernet-кабель.
Шаг 2: Сопряжение адаптеров Powerline.
a. Нажмите и удерживайте кнопку Pair на первом адаптере Powerline в течение одной секунды. Индикатор питания начнет быстро мигать.
Примечание: Если индикатор питания не мигает, удерживайте кнопку Pair дольше.
b. В течение двух минут нажмите и удерживайте кнопку Pair на втором адаптере Powerline в течение одной секунды. Индикаторы питания на обоих устройствах начнут быстро мигать.
c. Когда светодиод Powerline загорится постоянным светом, устройство успешно добавлено в вашу сеть Powerline.
Примечания:
1. Для TL-PA201/TL-PA211 V1/TL-PA210 V1/TL-PA251 V1 необходимо удерживать кнопку Pair в течение 3-8 секунд для запуска процедуры сопряжения.
2. Если вы хотите добавить больше адаптеров, нажмите кнопку Pair на одном из существующих устройств в сети, затем нажмите кнопку Pair на адаптере, который нужно добавить в существующую сеть. Просто добавляйте их по одному, следуя инструкциям выше.
Шаг 3: Переместите адаптеры Powerline.
После того как индикаторы Powerline на обоих адаптерах загорятся, подключите один адаптер к маршрутизатору через Ethernet-кабель, а второй включите в нужном месте.
Примечания:
1. Если индикатор Powerline горит красным, адаптер испытывает низкий уровень сигнала. Попробуйте включить его в другую розетку.
2. Если у вас есть усилитель Powerline, имя и пароль Wi-Fi по умолчанию напечатаны на Wi-Fi Info Card и на нижней наклейке устройства.
Шаг 4: Подключите устройство к адаптерам Powerline и пользуйтесь интернетом.
Если вы хотите изменить имя Wi-Fi усилителя Powerline, обратитесь к статье Как изменить беспроводные настройки с помощью приложения tpPLC (смартфон).
Метод 2: Настройка адаптера Powerline TP-Link с помощью приложения tpPLC
Шаг 1: Подключитесь к адаптеру по Wi-Fi.
Примечание: Для работы этого метода адаптер должен иметь доступ в интернет.
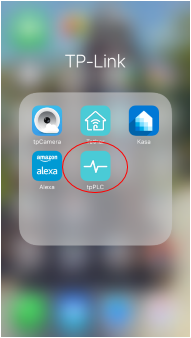
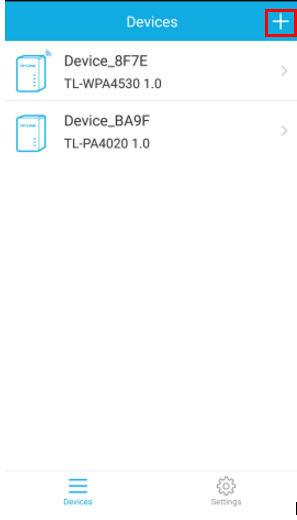
Шаг 2: Запустите приложение tpPLC.
Шаг 3: Нажмите на кнопку добавления.
Шаг 4: Введите ключ Powerline устройства.
Примечание: Ключ Powerline находится на задней стороне устройства. Не забудьте снова включить его в розетку после этого.
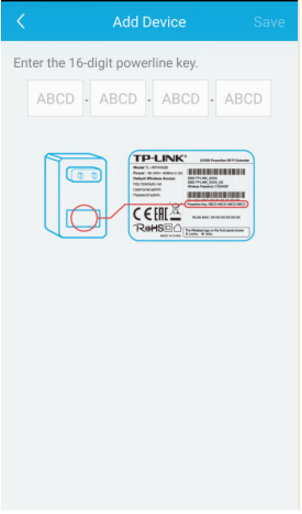
Шаг 5: Нажмите Сохранить.
Метод 3: Настройка адаптера Powerline TP-Link с помощью утилиты
Шаг 1: Запишите 16-значный ключ Powerline, напечатанный на наклейке устройства.
Шаг 2: Включите устройство в розетку и подождите, пока индикаторы не стабилизируются.
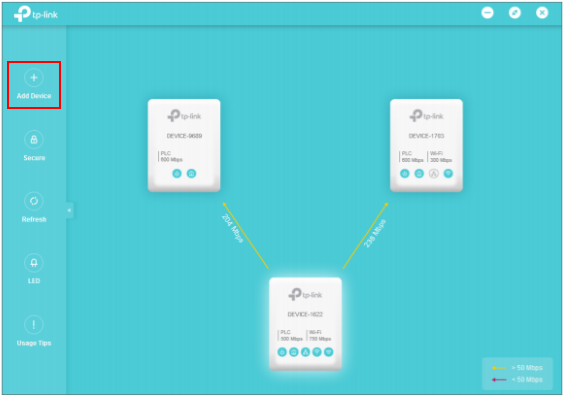
Шаг 3: Откройте утилиту и нажмите Add Device в левом меню.
Примечание: Если утилита еще не установлена, обратитесь к статье Как настроить новое имя сети Powerline с помощью tpPLC Utility.
Шаг 4: На странице добавления устройства введите записанный ключ Powerline и нажмите Сохранить.
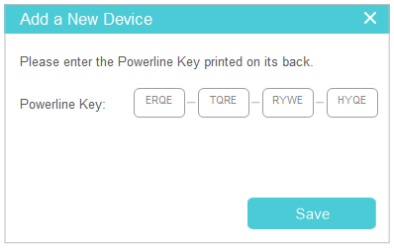
Теперь новое устройство появится в утилите.
Чтобы узнать больше о функциях и настройках, перейдите в Центр загрузок, чтобы скачать руководство для вашего продукта.
Ищете больше информации?
Полезен ли этот FAQ?
Ваши отзывы помогают улучшить этот сайт.
3.0_1532428956469j.jpg)


TP-Link Community
Still need help? Search for answers, ask questions, and get help from TP-Link experts and other users around the world.
From United States?
Получайте информацию о продуктах, событиях и услугах для вашего региона.