
How to Set Up a TP-Link Router (New Interface)
TP-Link routers come with two types of setup interfaces: Classic and New. This guide walks you through a complete setup using the Tether app or the web management page for routers with the new interface.
If this interface doesn’t match your router, refer to these guides instead:
How to Set Up Your TP-Link Wi-Fi Router on the Web Management Page (Classic Interface)
How to Set Up TP-Link Wi-Fi Routers on Tether APP (Classic Interface)
Key Takeaways
- TP-Link routers with the new interface can be set up via the Tether app or web management page.
- Before you start, have your ISP connection type and VLAN ID (if required) ready.
- The setup wizard guides you through the Internet port, connection type, Wi-Fi settings, and more.
- Enable Smart Connect to use the same Wi-Fi name for both 2.4GHz and 5GHz bands.
- If connected to another router, consider switching to Access Point mode to avoid Double NAT issues.
Before You Start
1. Gather information from your ISP (Internet Service Provider)
Connection Type: Essential for Internet access. Common types include:
Dynamic IP: No extra info needed. Used by most cable Internet ISPs.
PPPoE: Requires a username and password.
VLAN ID: (If required) Your ISP should provide a VLAN ID number.
2. Prepare your router
Connect the power adapter to the router and turn it on.
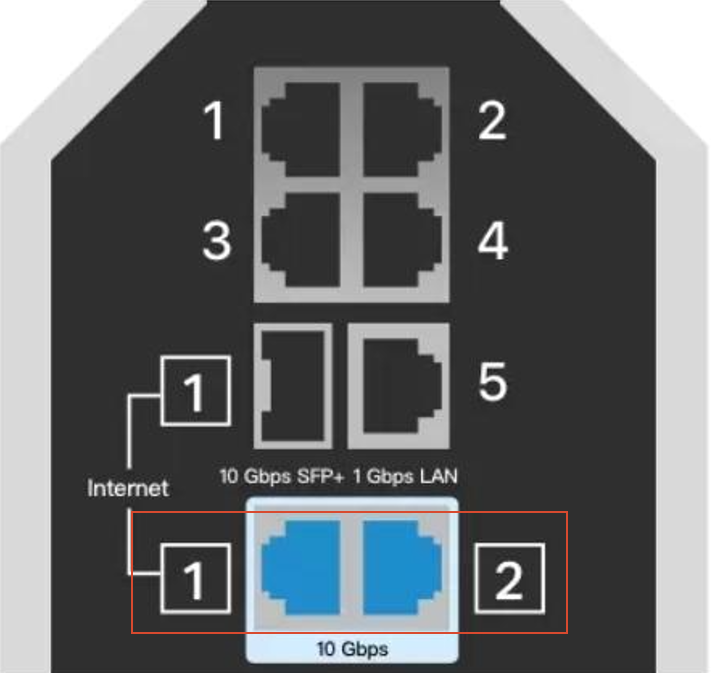
Connect one of the router’s blue (Internet) ports to your Internet source (e.g., modem, another router, or wall jack).
If you have a modem:
- Unplug it from power.
- Remove the backup battery if it has one.
- Plug the modem back in and wait for it to fully power on.
Step-by-Step Guide
Scenario 1: Using the Tether App
Step 1: Access the Router
Connect your phone to the router’s Wi-Fi. You can find the default Wi-Fi name (e.g., TP-Link_xxxx) on the router’s label.
Open the Tether app.
Tap your router under Devices.
Create a local password to log in. (If you’ve set one before, log in with it directly)
Step 2: Set Your Internet Port
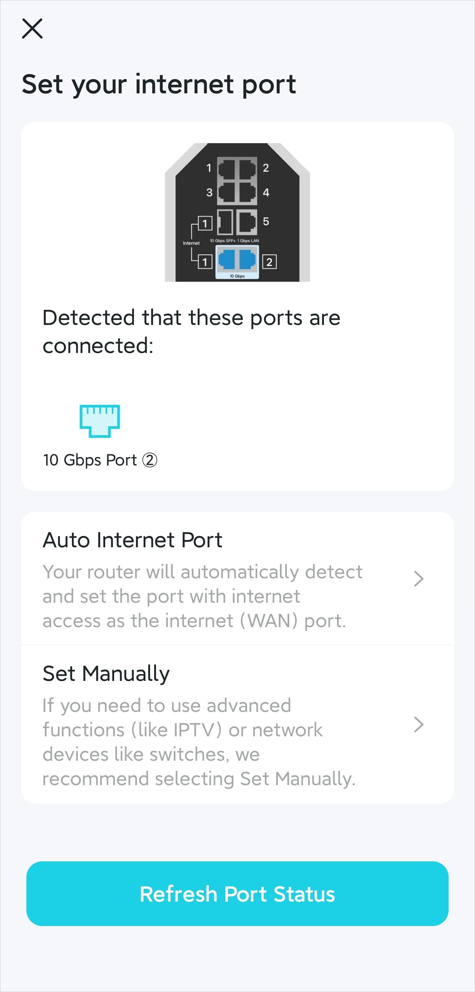
The router will automatically detect the connected port.
If your ISP doesn’t require a VLAN ID and the detected port is correct, click Auto Internet Port.
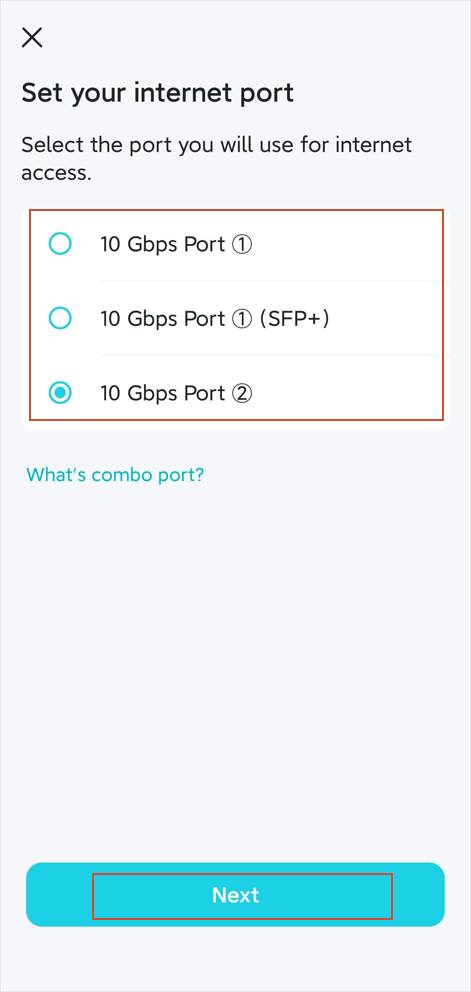
Otherwise, click Set Manually, select the port, and click Next.
Step 3: Set Up Your Internet Connection
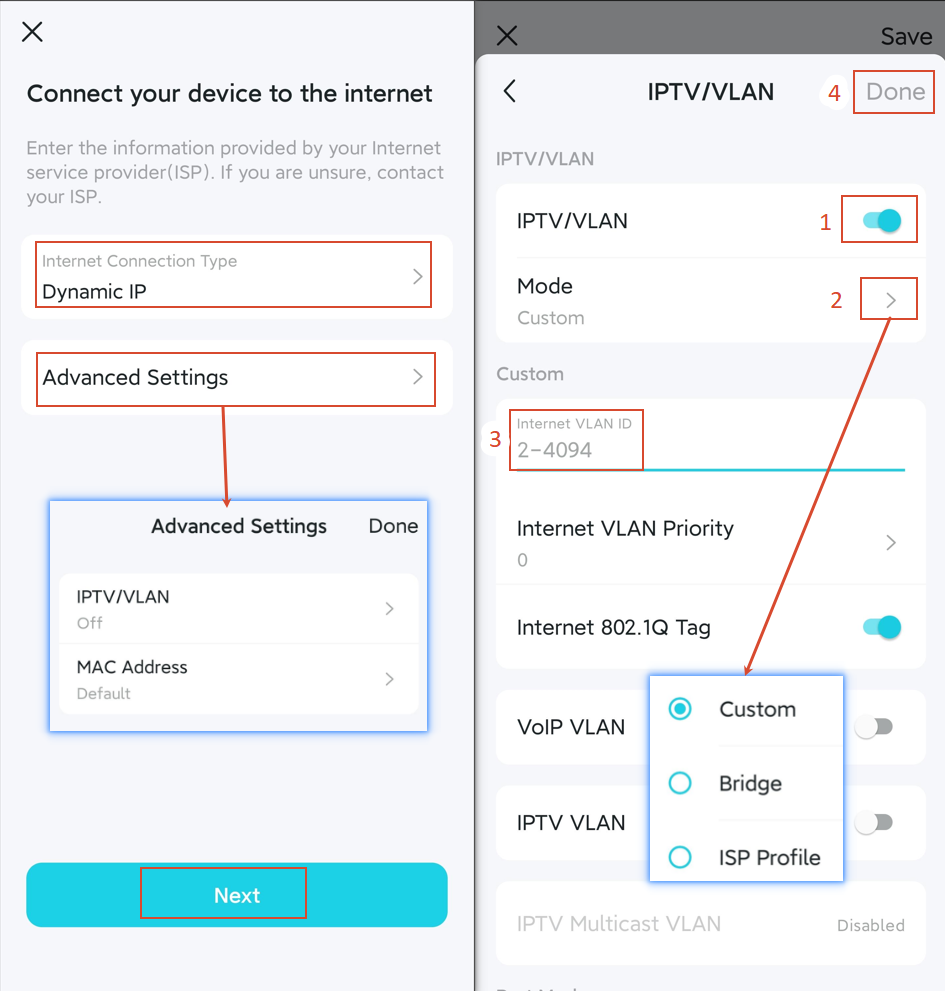
The router will automatically detect your Connection Type.
If the detected type doesn’t match your ISP’s info, switch to the correct Connection Type your ISP provides.
If your ISP doesn’t require a VLAN ID, click Next.
If your ISP requires a VLAN ID, click Advanced Settings (IPTV/VLAN) and follow these steps:
- Select Custom if your ISP is not in the ISP Profile list.
- Enter the VLAN ID provided by your ISP.
- Do not change other settings unless necessary; then click Done.
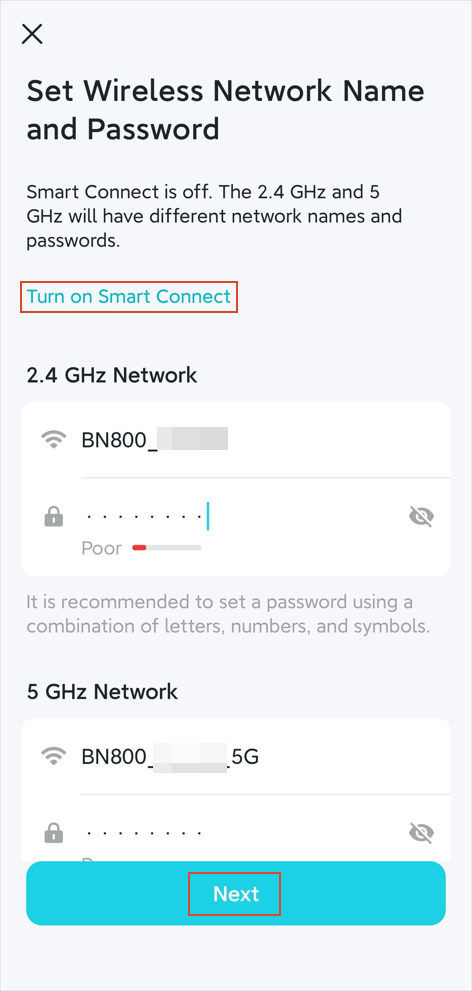
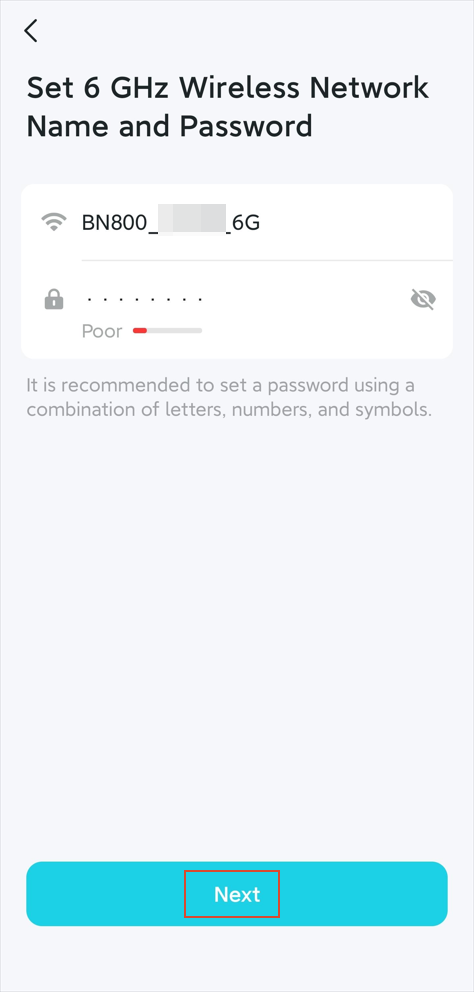
Step 4: Set Your Wi-Fi Settings
If you want the 2.4G & 5G Wi-Fi names to be the same, enable Smart Connect.
Once all set, click Next.
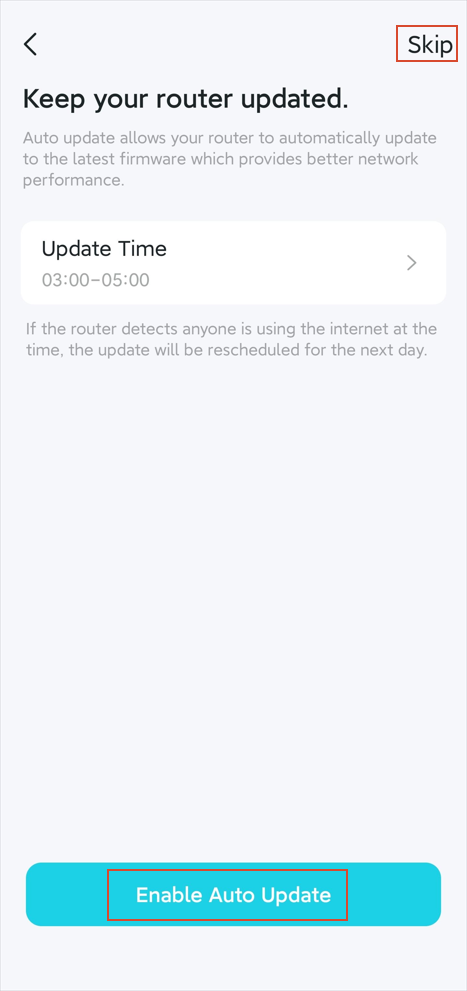
Step 5: Enable Auto Update (Optional)
Tap Enable Auto Update so you won’t miss important firmware updates.
If you’d prefer to update manually, click Skip.
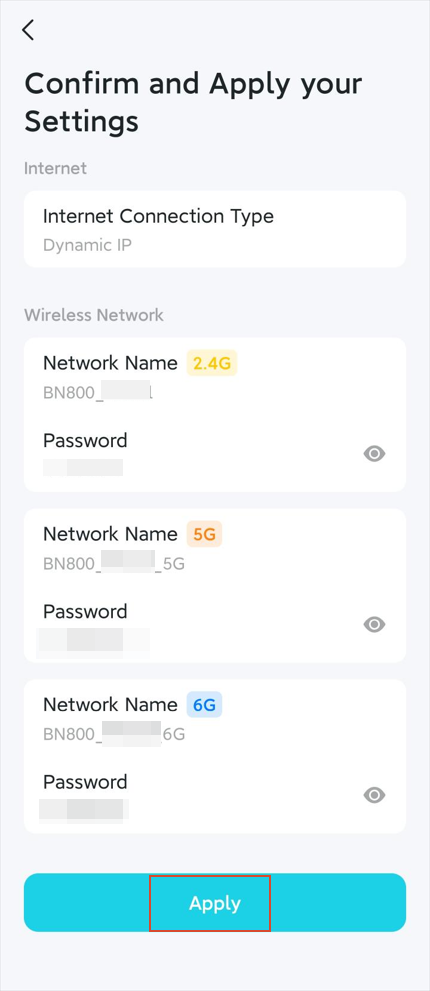
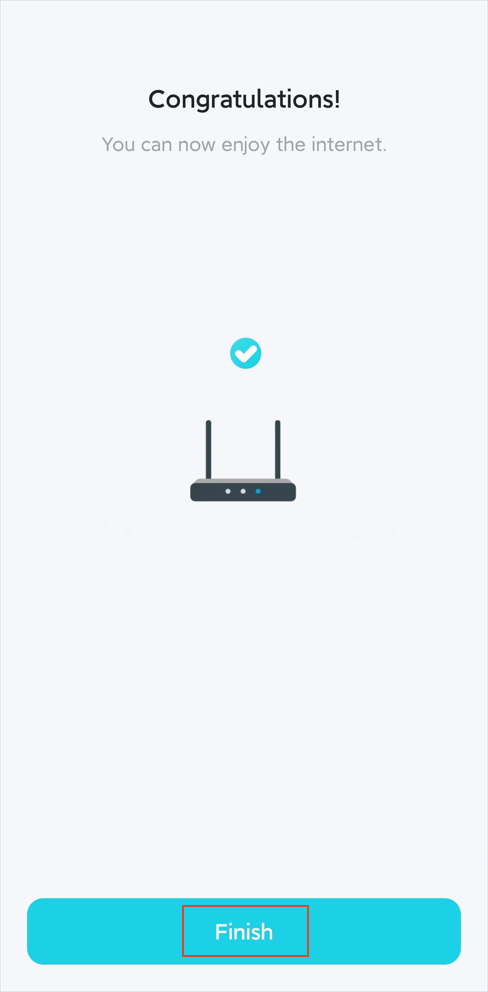
Step 6: Summary
The setup is complete.
Review your settings, click Apply, and then Finish.
Step 7: Double NAT Warning (Optional)
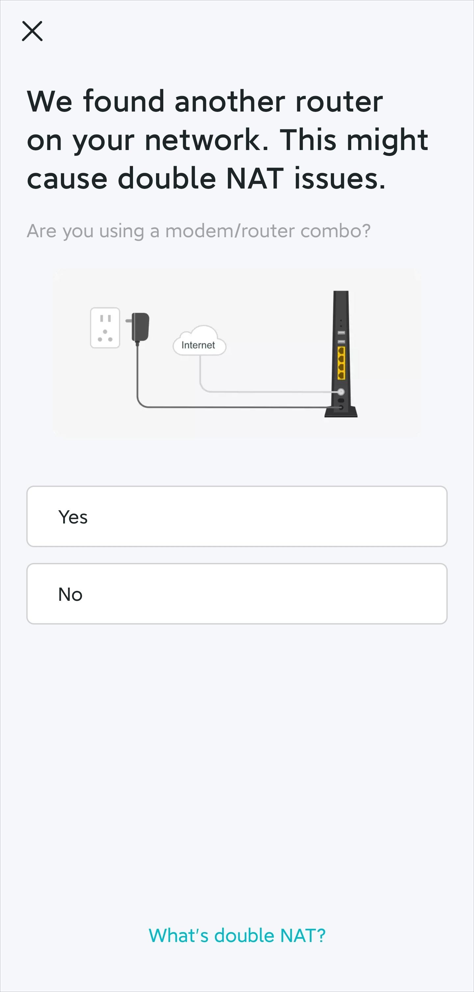
If your TP-Link router is connected to another router for Internet access, your network has two NATs. This may block outside requests to devices behind the TP-Link router.
To fix this:
Option 1: Remove the other router and connect your TP-Link router directly to your Internet source.
Option 2: Switch your TP-Link router to Access Point mode.
Scenario 2: Using the Web Management Page
Step 1: Access the Router Web Interface
Connect your phone or computer to the router via Wi-Fi or an Ethernet port.
Open Chrome, Firefox, or Edge for the best compatibility with the web management page.
Type one of the following addresses into your browser's top address bar and press Enter:
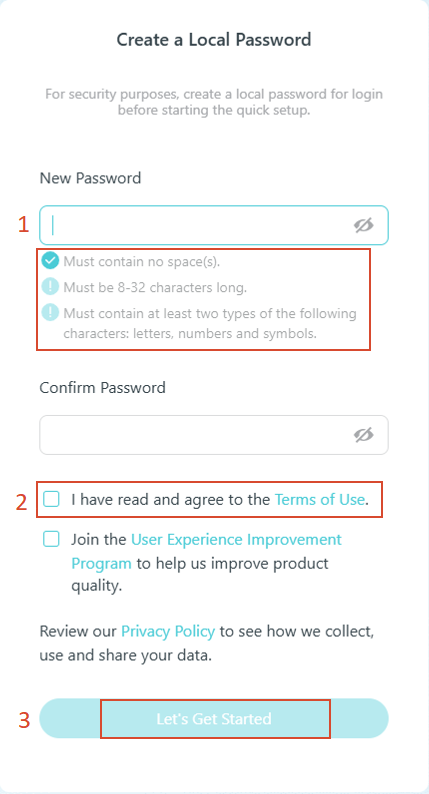
Create a local password to log in. (If you’ve set one before, log in with it directly)
Tick the Terms of Use box and click Let’s Get Started.
Step 2: Confirm the Internet Port on the Router (Optional)
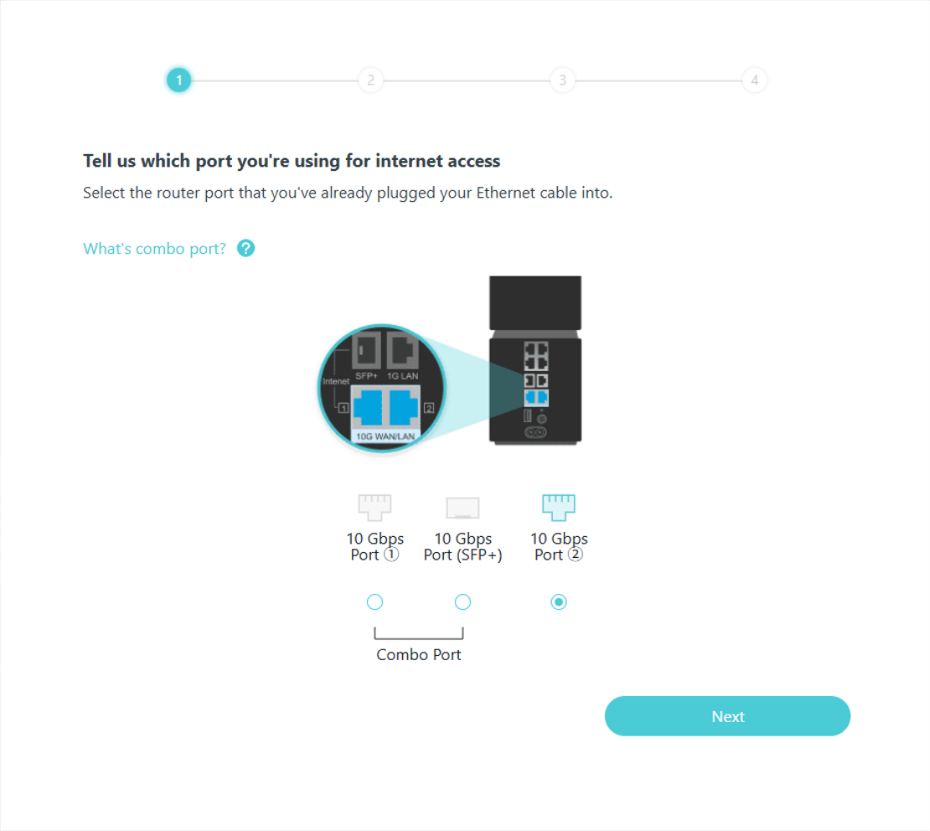
Ensure your modem is connected to one of the blue Internet ports.
Confirm the correct port is selected, and click Next.
Note: This page appears only if the router isn't sure whether the Internet port is connected properly.
Step 3: Set Up Your Internet Connection (Optional)
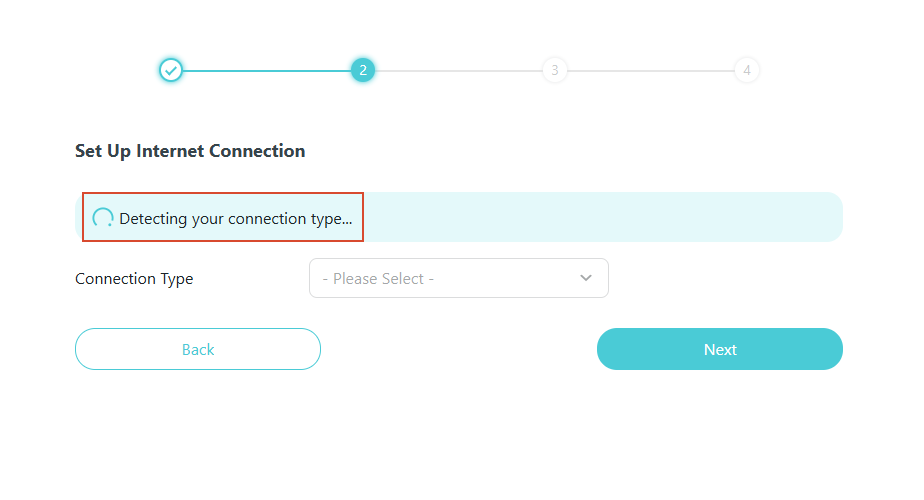
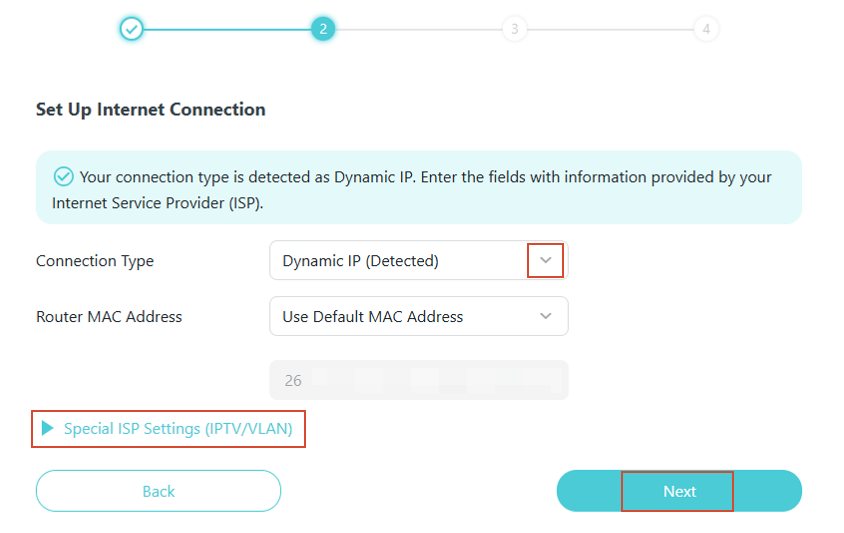
The router will automatically detect your Connection Type.
If the detected type doesn’t match your ISP’s info, switch to the correct Connection Type.
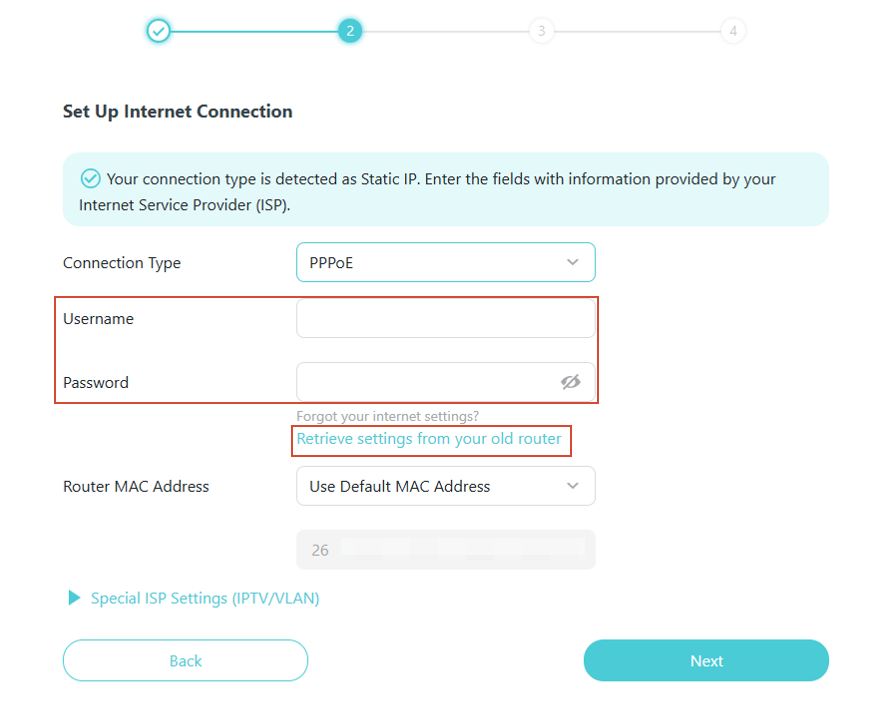
For PPPoE connections:
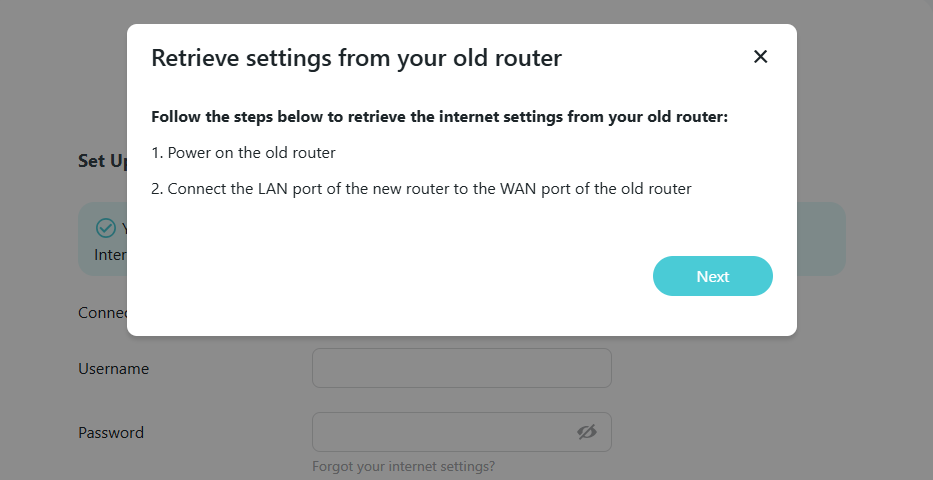
If your old router is working and you don’t remember the PPPoE details, click Retrieve settings from your old router and follow the on-screen instructions.
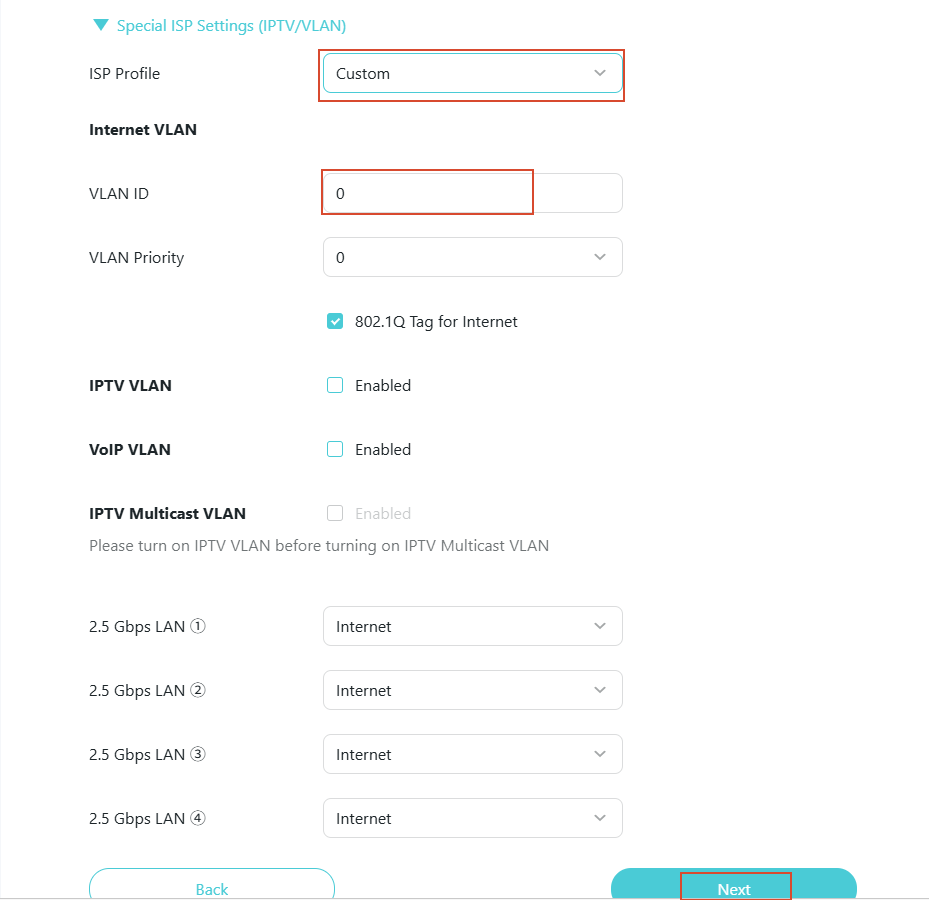
If your ISP requires a VLAN ID:
- Click Special ISP Settings (IPTV/VLAN)
- Select Custom if your ISP is not in the list.
- Enter the VLAN ID provided by your ISP
- Do not change other settings unless necessary; then click Next
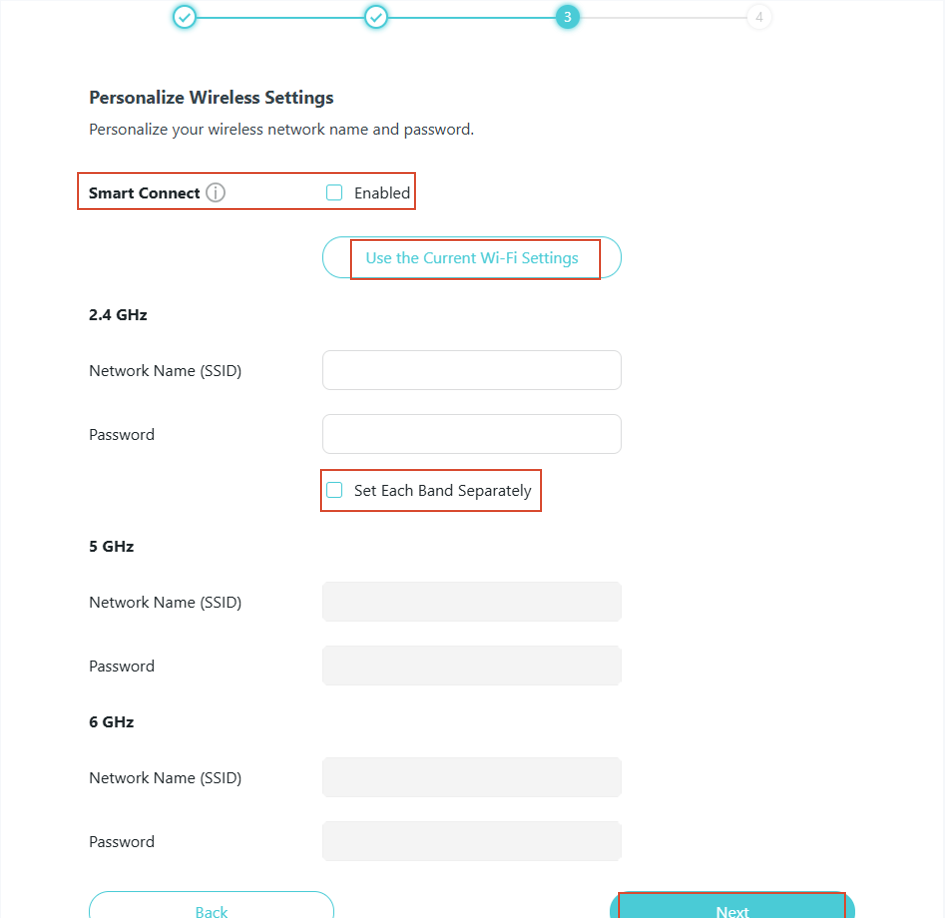
Step 4: Set Your Wi-Fi Settings
If you want the 2.4G & 5G Wi-Fi names to be the same, enable Smart Connect.
If you configured Wi-Fi before and want to keep the same settings, click Use the Current Wi-Fi Settings.
If you want different passwords for 2.4GHz, 5GHz, and 6GHz, tick Set Each Band Separately.
Once all set, click Next.
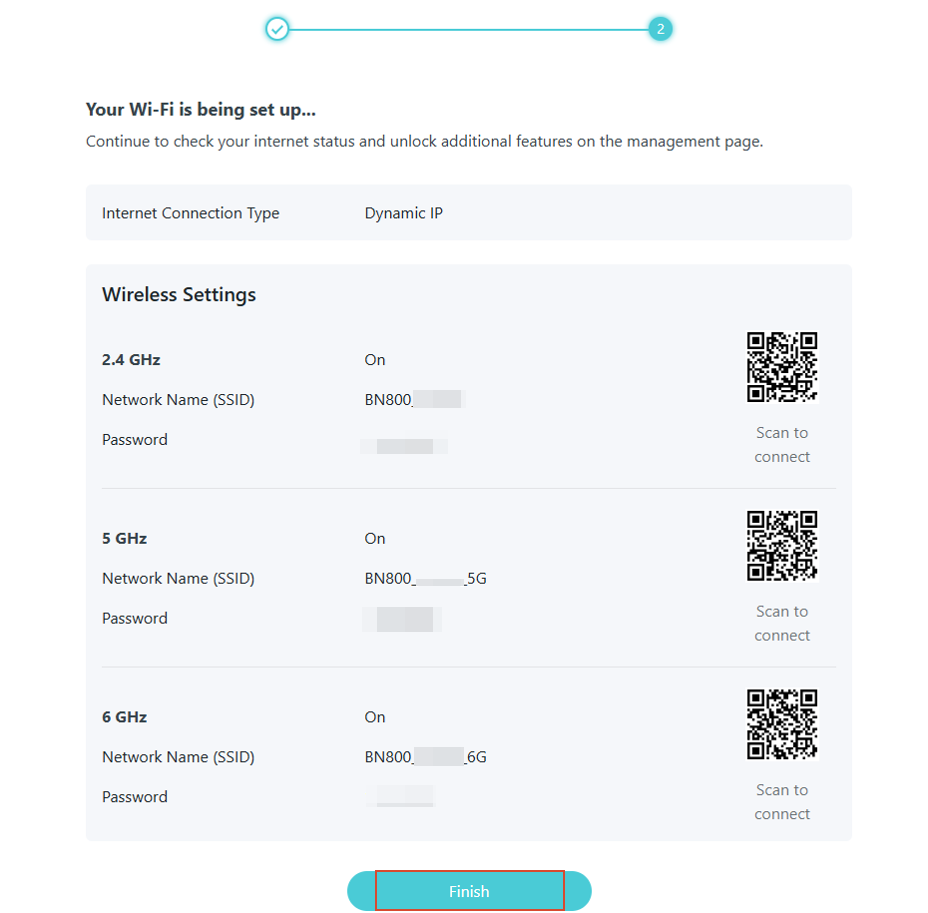
Step 5: Summary
Congratulations! The setup is complete.
Review your settings and click Finish.
Q&A
Q1. What should I do if my router’s interface looks different from this guide?
This guide is for routers with the new interface. If your router’s interface looks different, please refer to the classic interface guides linked at the top of this article.
Q2: I don’t know my ISP connection type or VLAN ID. Where can I find them?
Contact your ISP directly. They should be able to provide your connection type, username/password (if PPPoE), and VLAN ID (if required).
Q3: What is Double NAT, and should I worry about it?
Double NAT happens when your TP-Link router is connected behind another router. It may cause issues with online gaming, VPNs, or remote access. We recommend either removing the first router or switching your TP-Link router to Access Point mode.
Q4: Can I change my Wi-Fi settings after setup?
Yes. After setup, you can log in to the web management page or Tether app anytime to change your Wi-Fi name, password, or other wireless settings.
To get to know more details of each function and configuration, please go to the Download Center to download the manual for your product.
Looking For More
Is this faq useful?
Your feedback helps improve this site.

TP-Link Community
Still need help? Search for answers, ask questions, and get help from TP-Link experts and other users around the world.