How to replace side brush of Tapo Robot Vacuum
You may refer to either this video or the steps below:
Replace the side brush every 3-6 months.
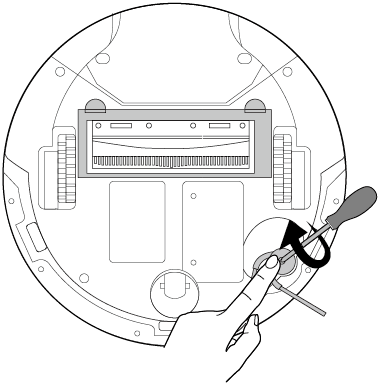
Step 1. Press and hold the side brush, use a screwdriver to unscrew the side brush clockwise to remove.
Step 2. Replace with a new one. Turn the side brush anticlockwise to secure it tightly and ensure it is properly installed.

Replace the side brush every 3-6 months.
Step 1. Press and hold the side brush, use a screwdriver to unscrew the side brush clockwise to remove.
Step 2. Replace with a new one. Turn the side brush anticlockwise to secure it tightly and ensure it is properly installed.
Replace the side brush every 3-6 months.
Step 1. Use a screwdriver to unscrew the side brush clockwise.
Step 2. Turn the new side brush anticlockwise to secure it tightly and ensure it's properly installed.

Replace the side brush every 3-6 months.
Step 1. Pull firmly to remove the side brush.
Step 2. Install the new side brush and press it tightly to ensure it is installed in place.

Replace the side brush every 3-6 months.
Step 1. Pull firmly to remove the side brushes
Step 2. Identify the colors on the side brushes and the slots of the robot vacuum (black-black; white-white).
Step 3. Install the new side brushes according to the colors and press them tightly to ensure they are installed in place.

Replace the side brush every 3-6 months.
Step 1. Pull firmly to remove the side brush.
Step 2. Install the new side brush and press it tightly to ensure it is installed in place.

Looking For More
Is this faq useful?
Your feedback helps improve this site.


TP-Link Community
Still need help? Search for answers, ask questions, and get help from TP-Link experts and other users around the world.