How to configure OneMesh range extender via web browser
Follow the steps below to configure OneMesh range extender via web browser. Here takes RE300 for demonstration.
1. Plug the extender into an electrical outlet next to your router, and then wait until the Power LED turns solid on.
2. Connect your computer to the extender wirelessly as follows:
For Windows Users
Unplug the Ethernet cable from your computer (if any).
Click the Wi-Fi icon on the taskbar and connect to the extender’s wireless network: TP-Link_Extender.

For Mac OS X Users
Unplug the Ethernet cable from your computer (if any).
Click the Wi-Fi icon in the top right corner of the screen, and connect to the extender’s network: TP-Link_Extender.

3. Follow the instructions of the Quick Setup Wizard to connect the extender to your host router which supports OneMesh/EasyMesh function.
4. Launch a web browser, enter http://tplinkrepeater.net or http://192.168.0.254 in the address bar, and then create a password to log in. Please refer to How to log into the Web GUI of my Range Extender?
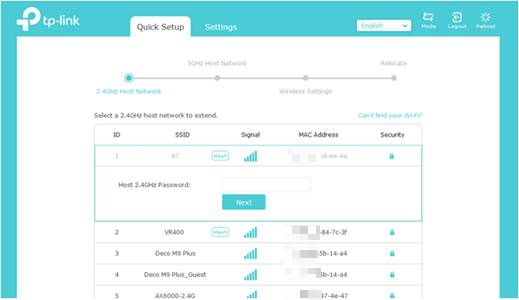
5. Select your host router’s 2.4GHz SSID (network name) which can support OneMesh/EasyMesh function and marks as OneMesh/EasyMesh, enter its password (NOT the password you just created for management), and click Next.
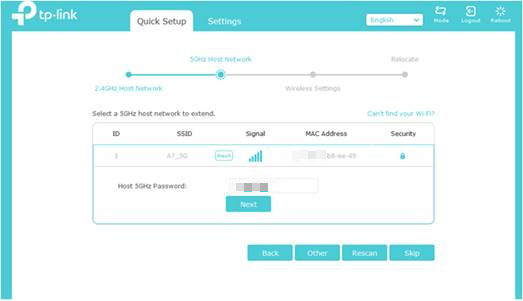
6. Select your host router’s 5GHz SSID (network name) which can support OneMesh/EasyMesh function and marks as OneMesh/EasyMesh, enter its password (NOT the password you just created for management), and click Next.
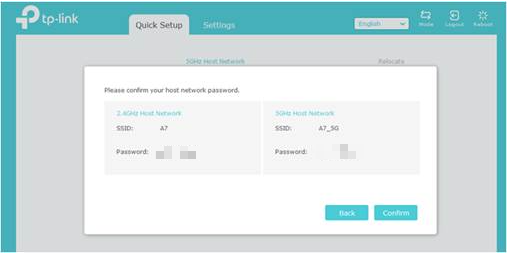
7. Confirm your host network password.
NOTE:
Some models support automatic Wi-Fi password detection. If the configuration is unsuccessful due to an incorrect password, a clear notification will be presented to indicate the issue.
For supported models and more details, please click on the following link to visit our forum:
https://community.tp-link.com/en/home/forum/topic/624060
8. If you connect the extender to a TP-Link OneMesh/EasyMesh router, the extender will automatically join the router’s OneMesh/EasyMesh network and copy the router’s wireless settings.
9. Follow web instructions to relocate your extender for optimal Wi-Fi coverage and performance, and then click Done.

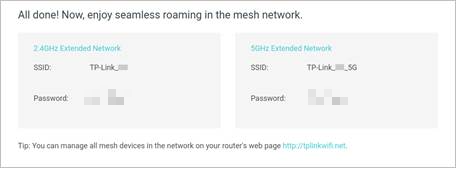
10. A success screen as below appears at the end of the setup, the extender has successfully joined the router’s OneMesh/EasyMesh network and copied the router’s wireless settings.
For more information about OneMesh, refer to https://www.tp-link.com/onemesh/.
TIP:
It is recommended to enable Smart Connect on your host router to enjoy a seamless connection between dual-band networks. With Smart Connect enabled, your host router’s 2.4GHz and 5GHz share the same SSID (network name) and password. Refer to your host router’s user guide to enable Smart Connect.
Get to know more details of each function and configuration please go to Download Center to download the manual of your product.
Is this faq useful?
Your feedback helps improve this site.


TP-Link Community
Still need help? Search for answers, ask questions, and get help from TP-Link experts and other users around the world.