How to customize Wi-Fi Extender+ via Kasa
You can personalize your Wi-Fi Extender+ with a descriptive name and a custom icon that represents the connected device or household appliance from the extender’s details screen.
Here takes RE270K as demonstration.
1. On the Devices screen, tap on the row of the Wi-Fi Extender+ to go to its controls.
2. Tap the (Settings) icon at the top-right corner.
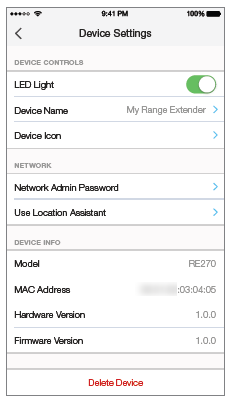
3. On the Device Settings screen, you can personalize the following settings:
• Remote Control – Tap the toggle to turn ON the Remote Control feature that allows you to control the Wi-Fi Extender+ outside of your home. You will be prompted to sign in to your Kasa account first. This feature is set to OFF by default.
• LED Light – Tap the toggle to turn ON or OFF all LED Indicators.
• Device Name – Enter a unique name for your Wi-Fi Extender+.
• Device Icon – Choose one of the available icons or from your device’s albums or camera.
• Network Admin Password – Set a unique password (up to 15 characters) to protect your Wi-Fi Extender+ and its settings from unauthorized access. The default Admin Password is “admin”.
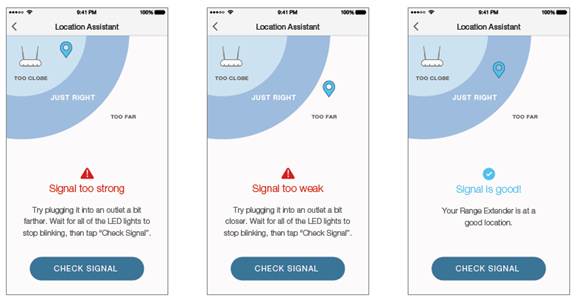
• Use Location Assistant – Use this feature to find a location within your home or office that maximizes the performance of the Wi-Fi Extender+. It is important to make sure that you wait until the Wi-Fi Extender+ is fully powered up (for instance, by waiting for the Power and Status LEDs to stop blinking) before tapping Check Again.
The Location Assistant can be accessed anytime from the Device Settings page.
Get to know more details of each function and configuration please go to Download Center to download the manual of your product.
Is this faq useful?
Your feedback helps improve this site.
TP-Link Community
Still need help? Search for answers, ask questions, and get help from TP-Link experts and other users around the world.