How to Update Firmware on TP-Link Wi-Fi Routers
This guide covers the TP-Link firmware update process for Wi-Fi routers. The steps differ depending on whether your router supports TP-Link Cloud service. Routers without Cloud support require a manual update, while Cloud-enabled routers can update automatically through the web management page or the Tether app.
Key Takeaways
- Always verify the hardware version of your device before updating. Using the wrong firmware file can damage the device and void the warranty.
- Download firmware only from the TP-Link official website matching your purchase region. EU and US firmware files are different and are not interchangeable.
- Do not turn off the router or disconnect the Ethernet cable at any point during the firmware upgrade.
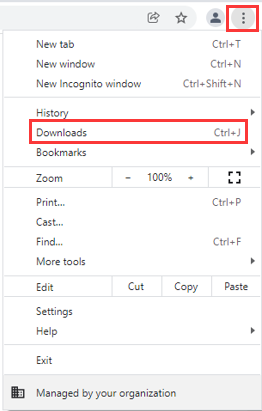
- Routers that do not support TP-Link Cloud must be updated manually: log in to tplinkwifi.net, navigate to Advanced > System > Firmware Upgrade, and upload the extracted BIN file.
- Routers that support TP-Link Cloud can update automatically, either by clicking the Update icon in the upper right corner of the web management page or via the Tether app under More > System > Firmware Update. No manual file download is needed.
This article will guide you to upgrade the firmware on TP-Link Wi-Fi routers step by step.
First of all, please check whether your TP-Link router supports the TP-Link Cloud service or not via the Cloud Compatibility list.
Case 1: Manual Firmware Update for Routers Without TP-Link Cloud
Before upgrading:
- Please verify the hardware version of your device for the firmware version. Wrong firmware upgrading may damage your device and void the warranty. Refer to How to check over the hardware version of a TP-Link device?
- Please upgrade the firmware from the local TP-Link official website of the purchase location for your TP-Link device, otherwise it will be against the warranty. (The firmware of EU and US are different.)
- Back up the configuration in order to restore it after upgrading. Or, write down all the settings you changed from the default values, as you may need to re-enter them manually.
- It’s recommended that users stop all Internet Applications on the computer or simply disconnect the Internet line from the device before upgrading.
During upgrading:
- DO NOT upgrade the firmware via a wireless connection unless your TP-Link device has no LAN/Ethernet port.
- DO NOT turn off the power or disconnect the Ethernet cable during the firmware upgrade.
Steps for upgrading:
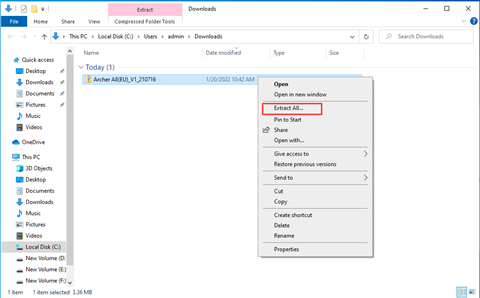
Step 1. Find and open the zip file from which you want to extract the contents. Right-click on the file and select Extract All from the context menu. (Google Chrome & Windows system as an example)

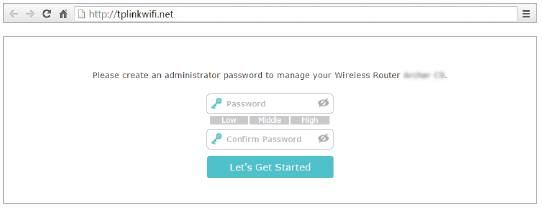
Step 2. Log into the TP-Link device by typing http://tplinkwifi.net in the address bar of any web browser (such as Chrome, Firefox). The default username and password are both admin in lowercase, or you need to create a new local password by yourself.
How do I log into the web-based Utility (Management Page) of TP-Link wireless router?
Step 3. Click Advanced > System > Firmware Upgrade, then click BROWSE to select the firmware you already extracted from the folder. The firmware type is usually a BIN File.
Note: Please double-check the firmware and hardware version.

Step 4. Click Upgrade. The pop-up window will ask you to confirm the operation. Please double-check that all previous steps are correct.
Step 5. The device will reboot automatically after upgrading. Please wait about 3 minutes.
Step 6. Verify that the router’s firmware has been upgraded successfully or not on the same page.
Case 2: Automatic Firmware Upgrade for TP-Link Cloud Routers
Note:
- During the online upgrade, please DON’T power off the router, unplug the Ethernet or disconnect from the wireless.
- If you fail to download the firmware online, you can download it directly from the TP-Link official website. And manually upgrade the firmware as Case 1.
Online upgrade through the web management page
Step 1. Connect your device to the TP-Link wireless router either via Ethernet or wirelessly. Then open a browser and type http://tplinkwifi.net in the address bar. Press Enter and log in to the router.
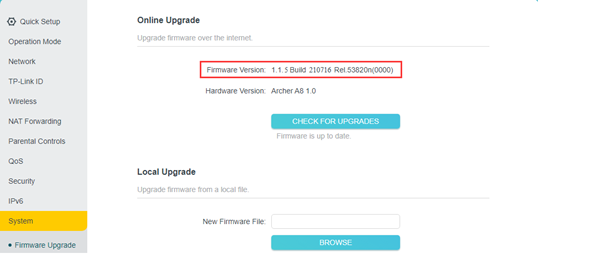
Step 2. If an update is available, you will be notified by the Update icon in the upper right corner (if there is no update, the icon will not appear). Click Update, and you will be redirected to the Firmware Upgrade page, on which you can check the latest firmware version and release notes.

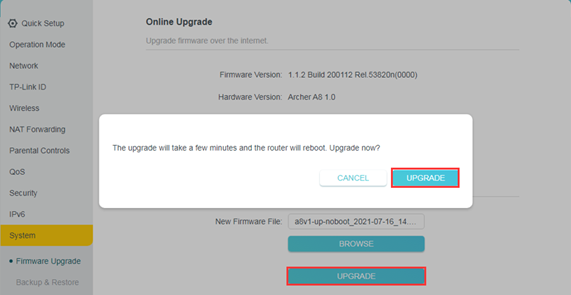
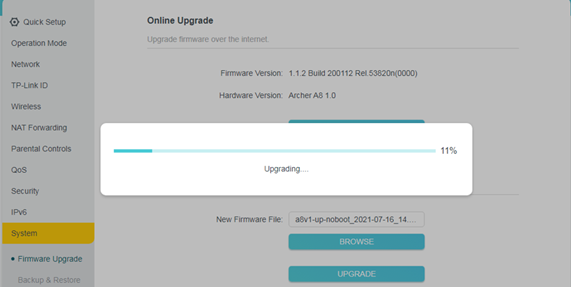
Step 3. Click on the Upgrade button to begin the upgrade. Then wait until the router finishes the upgrade process, which will include a router reboot at the end.
Note: Ensure you have a stable internet connection during the download. Loss of connection during the process can damage the router.
Online upgrade through the Tether APP
Step 1. Connect your smartphone to the router's Wi-Fi. Then open the Tether APP and log in to the router. Please tap the management icon in the bottom-right corner, and you will see a red dot in the System area, indicating that there is new firmware for the router.
Step 2. Tap More > System > Firmware Update to find the new firmware version.

Tap Learn More to learn the release logs of the new firmware (recommended).

Note: Pay attention to the release logs. If it mentions a reset after the upgrade, your previous configuration on the router, including internet access and wireless settings, will be reset to factory defaults, and you will need to connect your smartphone to the router with the default SSID and password printed on the bottom label and configure the device again.
Step 3. Tap Update to begin the upgrade process.
How to check the hardware version of a TP-Link device
1. Check from the management page
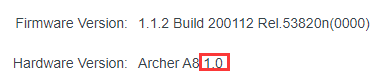
Log in to the device, and at the bottom of the interface, the firmware and hardware version will be shown as the following picture:
(As an example, in the following picture, the hardware version is "V2"). Or go to the Advanced >System >Firmware Upgrade, you can see them too.

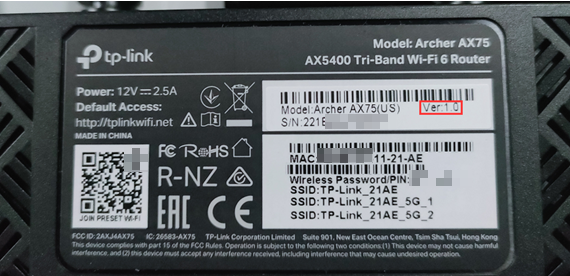
2. Check from the bottom label
Turn over the device, and you can see a label on the back of the device. There is a character string "Ver: X.Y" (for example, Ver:1.0), and the number X.Y is the hardware version of the device. If the string is "Ver: 1.2", it means that the hardware version is V1.2. (Normally V1.x=V1).
How to Back Up & Restore the configuration of TP-Link Wireless Router
Log in to the device, click Advanced >System > Backup & Restore. Click BACK UP and save the file. The default file name is config.bin.
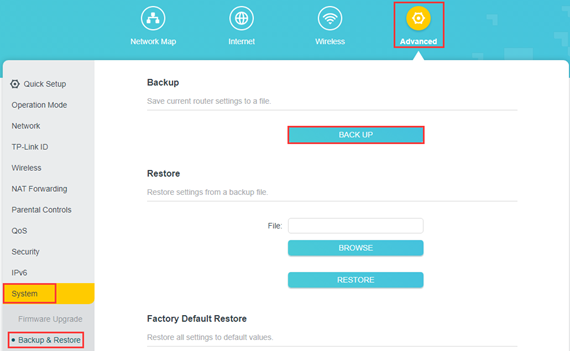
If the release note for the firmware version you want to upgrade says it will reset your settings. After firmware upgrading, click BROWSE to upload the previous backup configuration file.
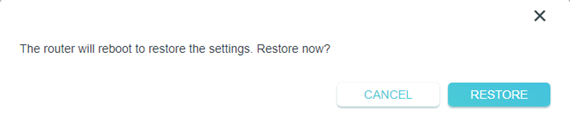
Finally, click RESTORE and confirm, wait 3 minute you can see the configuration uploaded successfully. Then the device will reboot automatically.

Learn more about each function and its configuration. Please go to Download Center to download the manual for your product.
ค้นหาเพิ่มเติม
คำถามที่พบบ่อยนี้มีประโยชน์หรือไม่?
ความคิดเห็นของคุณช่วยปรับปรุงเว็บไซต์นี้


TP-Link Community
Still need help? Search for answers, ask questions, and get help from TP-Link experts and other users around the world.