How to Install the Deco X50-Outdoor: Setup and Mounting Guide
The Deco X50-Outdoor is a weatherproof Wi-Fi unit designed to extend coverage to outdoor spaces. It supports two power methods — Power over Ethernet (PoE) and AC power — and can be used as a satellite unit or a Main Deco. This guide focuses on the most common setup: adding the Deco X50-Outdoor as a satellite to an existing Deco network. It covers the full process: initial setup via the Deco app, choosing an installation location, and mounting the unit.
Key Takeaways
- If using the Deco X50-Outdoor as a satellite unit, configure it indoors first — place it near an existing indoor Deco unit, then power it on and add it to the network via the Deco app.
- The Deco X50-Outdoor can be powered via an IEEE 802.3at PoE switch or adapter, or a 100–240V AC power supply. If using AC power outdoors, a waterproof outdoor socket is required near the installation location.
- If connecting the Deco X50-Outdoor wirelessly to the front-end Deco, keep the distance within 33 feet (10 meters) for optimal signal, and no more than 50 feet (15 meters). A wired connection removes this restriction.
- The recommended installation height is 0–8 meters (0–25 feet), with a clear line of sight between the unit and the area to be covered.
- The Deco X50-Outdoor supports two mounting methods: pole mounting (using the included strap) and wall mounting (using the included bracket and screws). The unit must always be mounted upright — inverted or side-standing mounting may compromise its waterproof status.
Setting Up the Deco X50-Outdoor
Here is also a video demonstration:
1. Take Deco X50-Outdoor Near Any Indoor Deco Unit First
This ensures the Deco X50-Outdoor can be discovered by the network and added successfully before being moved to its outdoor location.
2. Power Deco X50-Outdoor
Step 1. Remove the base plate from Deco X50-Outdoor (store carefully to avoid losing the base plate and screws).
Video:
Step 2. Power on the Deco X50-Outdoor using one of the two methods below.
- Through an IEEE 802.3at PoE switch or an IEEE 802.3at PoE adapter
- To power the Deco X50-Outdoor outdoors using AC power, there needs to be an outdoor waterproof socket near the Deco X50-Outdoor installation location. And please protect the AC outlet and power cord from rain.
At the indoor configuration stage, power up X50-outdoor either way. Afterward, based on your personal situation, choose between PoE and AC power for outdoor use.
3. Set Up the Deco X50-Outdoor with the Deco App
You can refer to the following FAQ for instructions on adding Deco X50-Outdoor to the existing network.
How to add an additional unit to your Deco network
During configuration, keep the Deco X50-Outdoor near your existing Deco devices so it can be quickly discovered and added to the network. There is no need to reinstall the base plate at this stage.
After configuration is complete, unplug the power supply and bring the Deco X50-Outdoor, base plate, installation accessories, and tools to your desired outdoor location.
4. Decide Where to Install the Deco X50-Outdoor
The installation location significantly impacts performance and coverage. Consider the following when selecting a spot:
1) Ensure a stable and secure power supply at the installation location. If using PoE, consider the reach of the Ethernet cable. If using AC power, check for nearby outdoor waterproof outlets that can provide power.
2) If X50-Outdoor and the front-end Deco are connected wirelessly, it is recommended to keep the distance between X50-Outdoor and the front-end Deco within 33 feet (or 10 meters) to ensure X50-Outdoor receives a good signal from the front-end Deco, no more than 50 feet (or 15 meters). It is preferable to place the front-end Deco near a window to minimize obstacles between it and the X50-Outdoor outdoors. If X50-Outdoor and the front-end Deco are connected via wire, then there is no such restriction.
3) It is recommended to install X50-Outdoor at the center of the target area where you want to expand the WiFi coverage to evenly cover the entire area.
4) The recommended installation height is 0 ~ 8m (0~25feet).
5) There should be a clear line of sight between X50-Outdoor and the area to be covered. Buildings, trees, or walls can weaken the signal strength and limit the coverage range.
6) Try to stay away from potential sources of WiFi interference, such as neighboring WiFi networks, high-voltage power lines, electronic devices, and appliances.
7) It is recommended to install X50-Outdoor in a location where it receives less rainwater or direct sunlight.
All installations will vary depending on the environment. So it's always good to perform pre- and post-installation site surveys, measured to your desired data rates, as is the case when configuring any wireless extender or Access Point.
5. How to Mount the Deco X50-Outdoor
1) After selecting the installation location, please insert the Ethernet cable and power cord according to your own situation.
- PoE-powered: Ethernet cable only
- AC-powered: Wireless: Power cord only ;Wired: Ethernet cable + Power cord
2) Reinstall the base plate to restore the X50-Outdoor's waterproof seal.
Currently, we recommend two methods:
Pole Mounting
Step 1. Lead the end of the pole mounting strap through the back of the Deco.
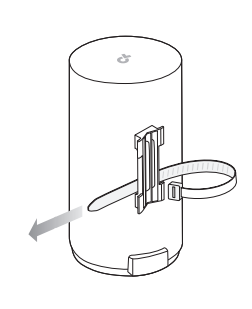
Step 2. Position the Deco, then wrap the pole-mounting strap around the pole. Feed the end through the screw-block and tighten the strap until the Deco is secure.
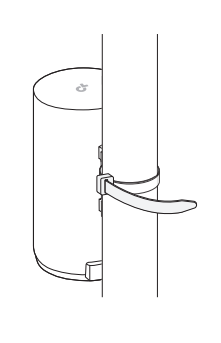
Note: The Deco can only be used upright. Please do not mount the Deco X50–Outdoor inverted or in a side-standing position. Incorrect mounting may cause the device to fail to maintain its waterproof status.
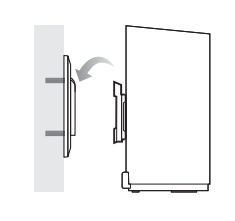
Wall Mounting
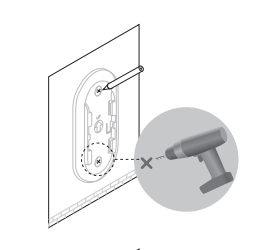
Step 1. Place the mounting bracket in the right position. Mark two positions for the screw holes. Drill two 6-mm-diameter holes for the screws at the marked positions.
Step 2. Insert the plastic wall anchors into the 6-mm-diameter holes. Align the mounting bracket with the anchors and drive the self-tapping screws through the bracket and into the anchors.
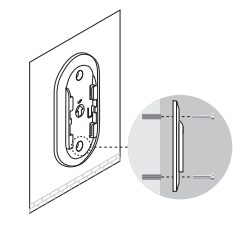
Step 3. Align the mounting tabs on the back of the Deco with the slot of the mounting bracket. Push and slide the Deco downward until it locks into place.
Note: The Deco can only be used upright. Please do not mount the Deco X50–Outdoor inverted or in a side-standing position. Incorrect mounting may cause the device to fail to maintain its waterproof status.
You have now finished installing X50-Outdoor.
For full configuration details, visit the Download Center to find the manual for your product.
Looking For More
Is this faq useful?
Your feedback helps improve this site.
_US_1.0_F_normal_20231213092414n.png)
_US_1.26_overview_normal_20240827102538r.png)

TP-Link Community
Still need help? Search for answers, ask questions, and get help from TP-Link experts and other users around the world.