How to configure Wireless MAC Filtering on Archer C50/C20/A5 (new logo)
Wireless MAC Filtering is used to deny or allow specific wireless client devices to access your network by their MAC addresses.
I want to: Deny or allow specific wireless client devices to access my network by their MAC addresses.
For example, you want the wireless client A with the MAC address 00-0A-EB-B0-00-0B and the wireless client B with the MAC address 00-0A-EB-00-07-5F to access the router, but other wireless clients cannot access the router.
How can I do that?
Here takes Archer C20_V4 as demonstration:
1. Log in the router’s management interface. If you don’t know how to do that, please refer toHow do I log into the web-based Utility (Management Page) of TP-Link wireless router?
2. Go to Wireless > Wireless MAC Filtering.
3. Click Enable to enable the Wireless MAC Filtering function.
4. Select Allow the stations specified by any enabled entries in the list to access as the filtering rule.
5. Delete all or disable all entries if there are any entries already.
6. Click Add New and fill in the blank.
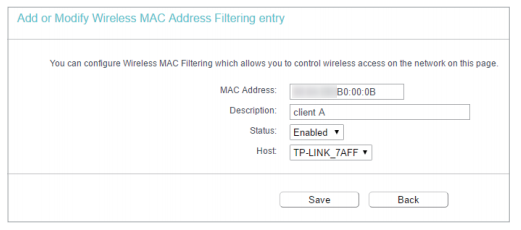
1) Enter the MAC address XX-XX-XX-B0-00-0B/XX-XX-XX- 00-07-5F in the MAC Address field.
2) Enter wireless client A/B in the Description field.
3) Select Enabled in the Status drop-down list.
4) Click Save and click Back.
7. The configured filtering rules should be listed as the picture shows below.
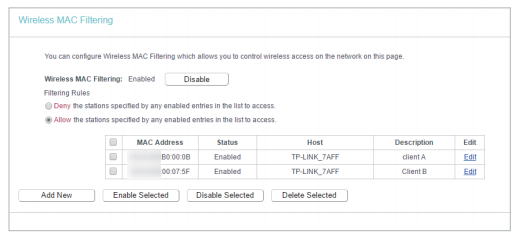
Now only client A and client B can access your network.
Get to know more details of each function and configuration please go to Download Center to download the manual of your product.
Finden Sie diese FAQ hilfreich?
Mit Ihrer Rückmeldung tragen Sie dazu bei, dass wir unsere Webpräsenz verbessern.

4.0-F_normal_1591236294102s.png)
3.0&4.0-F_normal_1584493102128p.png)
Von United States?
Erhalten Sie Produkte, Events und Leistungen speziell für Ihre Region