How to configure my range extender via web GUI (new logo)

RE500 , RE300 , RE505X , RE715X , RE305( V1 V3 ) , RE205 , RE600X , RE365(FR)( V1 ) , RE653BE , RE190 , RE360(FR)( V1 V2 ) , RE705X , RE650 , RE450( V2 V3 ) , RE603X , RE605X , RE455( V1 ) , RE500X , RE700X , RE1500X , RE580X , RE1750X , RE780X , RE500XD , RE750C , RE2700X , RE360( V1 V2 ) , RE365( V1 ) , RE200( V2 V3 V4 ) , RE220( V1 V2 )
Recent updates may have expanded access to feature(s) discussed in this FAQ. Visit your product's support page, select the correct hardware version for your device, and check either the Datasheet or the firmware section for the latest improvements added to your product. Please note that product availability varies by region, and certain models may not be available in your region.
Before start:
1. Factory Reset Your Extender. With the extender powered on, use a pin to press the RESET button (pinhole) until all the LEDs flash once.
2. Ensure the correct Wi-Fi password of your main router. Forget router Wi-Fi on your mobile phone and manually input the Wi-Fi password to verify the router’s Wi-Fi password is correct. ( Phone Settings > Wi-Fi >tap router's Wi-Fi SSID to forget network or Long press wifi name to delete the Wi-Fi profile). Or check the Wi-Fi password on the router Wireless settings management page.
Follow the steps below, here takes RE305 as a demonstration:
1. log in to the web management page of the range extender. If you don’t know how to do that, please refer to How to login the web management page of the range extender?
2. Select your host router’s 2.4GHz SSID (network name), enter its password (NOT the password you just created for management), and click Next.
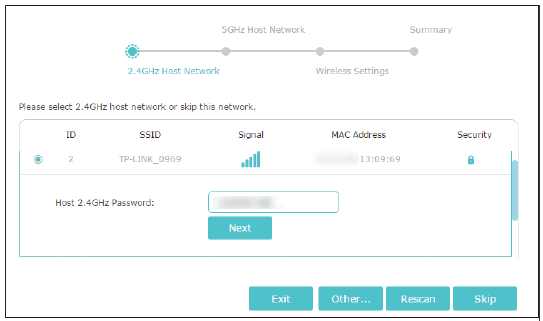
3. Select your host router’s 5GHz SSID (network name), enter its password (NOT the password you just created for management), and click Next.
Tips:
- If your host router does not support a 5GHz wireless network, please click Skip to continue.
- During the configuration of the range extender, if you cannot find your host Wi-Fi network, refer here to do troubleshooting
4. Either keep the default SSIDs (network names) or customize them for the extended networks, and then click Next.
If your web GUI is different please click here.
5. Verify your wireless settings and click Save. The corresponding LED(s) (2.4GHz or 5GHz) should be on.
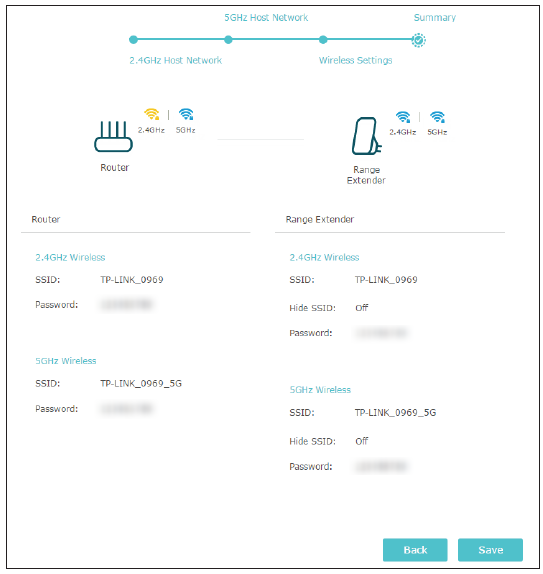
6. Enjoy! Connect to the extended network and enjoy the Internet. Both extended networks share the same wireless passwords as those of your host networks, but may have different network names if you have customized the SSIDs during the configuration.
Get to know more details of each function and configuration please go to Download Center to download the manual of your product.
คำถามที่พบบ่อยที่เกี่ยวข้อง
ค้นหาเพิ่มเติม
คำถามที่พบบ่อยนี้มีประโยชน์หรือไม่?
ความคิดเห็นของคุณช่วยปรับปรุงเว็บไซต์นี้
คุณกังวลอะไรเกี่ยวกับบทความนี้?
- ไม่พอใจกับผลิตภัณฑ์
- ยุ่งยากเกินไป
- มีชื่อเรื่องที่สับสน
- ใช้ไม่ได้กับฉัน
- คลุมเครือเกินไป
- อื่น ๆ
ขอบคุณ
เราขอขอบคุณสำหรับคำติชมของคุณ
คลิกที่นี่ เพื่อติดต่อฝ่ายสนับสนุนด้านเทคนิคของ TP-Link
เว็บไซต์นี้ใช้คุกกี้เพื่อปรับปรุงการนำทางเว็บไซต์ วิเคราะห์กิจกรรมออนไลน์ และมอบประสบการณ์การใช้งานที่ดีที่สุดแก่ผู้ใช้บนเว็บไซต์ของเรา คุณสามารถปฏิเสธการใช้คุกกี้ได้ตลอดเวลา คุณสามารถดูข้อมูลเพิ่มเติมได้ใน นโยบายความเป็นส่วนตัว ของเรา อย่าแสดงอีก
Your Privacy Choices
เว็บไซต์นี้ใช้คุกกี้เพื่อปรับปรุงการนำทางเว็บไซต์ วิเคราะห์กิจกรรมออนไลน์ และมอบประสบการณ์การใช้งานที่ดีที่สุดแก่ผู้ใช้บนเว็บไซต์ของเรา คุณสามารถปฏิเสธการใช้คุกกี้ได้ตลอดเวลา คุณสามารถดูข้อมูลเพิ่มเติมได้ใน นโยบายความเป็นส่วนตัว ของเรา อย่าแสดงอีก
คุกกี้พื้นฐาน
คุกกี้เหล่านี้จำเป็นต่อการทำงานของเว็บไซต์และไม่สามารถปิดการใช้งานในระบบของคุณได้
TP-Link
accepted_local_switcher, tp_privacy_banner, tp_privacy_base, tp_privacy_marketing, tp_top-banner, tp_popup-bottom, tp_popup-center, tp_popup-right-middle, tp_popup-right-bottom, tp_productCategoryType
Youtube
id, VISITOR_INFO1_LIVE, LOGIN_INFO, SIDCC, SAPISID, APISID, SSID, SID, YSC, __Secure-1PSID, __Secure-1PAPISID, __Secure-1PSIDCC, __Secure-3PSID, __Secure-3PAPISID, __Secure-3PSIDCC, 1P_JAR, AEC, NID, OTZ
คุกกี้การวิเคราะห์และการตลาด
คุกกี้การวิเคราะห์ช่วยให้เราวิเคราะห์กิจกรรมของคุณบนเว็บไซต์ของเราเพื่อปรับปรุงและปรับการทำงานของเว็บไซต์ของเรา
คุกกี้การตลาดสามารถตั้งค่าผ่านเว็บไซต์ของเราโดยพันธมิตรโฆษณาของเราเพื่อสร้างโปรไฟล์ความสนใจของคุณและแสดงโฆษณาที่เกี่ยวข้องกับคุณบนเว็บไซต์อื่นๆ
Google Analytics, Google Tag Manager
_gid, _ga_<container-id>, _ga, _gat_gtag_<container-id>
Google Ads และ DoubleClick
test_cookie, _gcl_au
Meta Pixel
_fbp
Crazy Egg
cebsp_, _ce.s, _ce.clock_data, _ce.clock_event, cebs
lidc, AnalyticsSyncHistory, UserMatchHistory, bcookie, li_sugr, ln_or