How to setup TL-WA5110G,TL-WA901NDv1&v2,TL-WA801NDv1,TL-WA701ND v1 as Client
This Article Applies to:
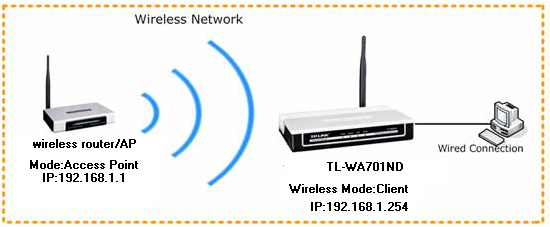
Definition: Different from Access Point mode, wireless Client mode is able to connect itself to the wireless access point/router wirelessly and act as a wireless adapter for your client.
The topology below shows how the client mode works,
Note:
Here we take TL-WA701ND V1 and the information below as a reference.The article is applied to the old versions of the APs like TL-WA5110G,TL-WA901NDv1v2,TL-WA801NDv1,TL-WA701ND v1. If the detailed information for your case is different, please use the corresponding information to configure it according to the instructions below.
Information of root router/AP:
- LAN IP: 192.168.1.1
- SSID: tplinktest
- Encryption Type: WPA2-PSK,AES
- Passphrase: tplinktest
Preparation
- Since the DHCP Server on the AP is disabled by default, we have to manually assign an IP address as 192.168.1.x(1<x<254) for the computer to match the default IP address (192.168.1.254) of the Repeater. Please click here for detailed instructions.
- Connect the computer to the AP with an Ethernet cable.
Configuration on the 11n AP:
Step 1
Log onto the AP’s management page. Please click here for the detailed instruction;
Step 2
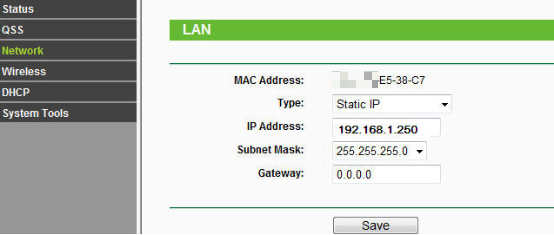
Click Network. Please make sure the AP’s IP address is in the same IP segment with the Root Router and avoid the IP conflict. If they are not in the same segment, you can change the AP’s IP address into the same segment here.
Step 3
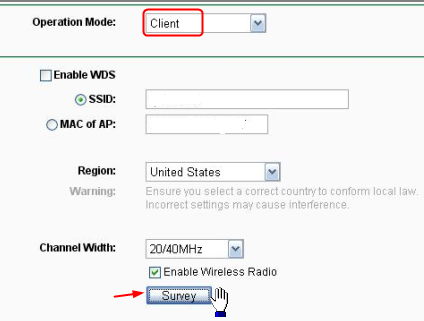
Configure AP to wireless Client mode and input wireless security settings.
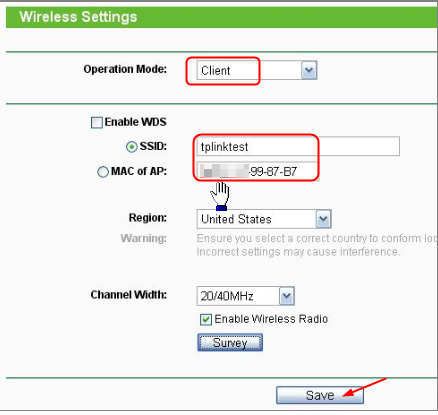
1. Click Wireless -> Wireless Settings on the left, select Client. Click on Survey/Search button to view the available wireless networks.
2. Find the root router/AP’s SSID on the AP list, and then click Connect.
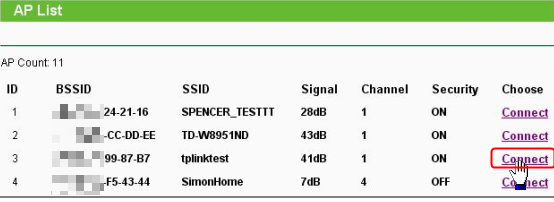
3. After clicking on Connect, the SSID and the MAC address of the root router/AP will be shown in the box automatically. Please Save the settings.
Note:
If the wireless router or Access Point which you want to connect does not support WDS, please do not enable WDS option.
If you know the SSID or MAC address of the root router/AP, you can also manually enter them into the corresponding box, and Click on Save.
4. Select Wireless Security on the left menu, type in the same wireless security settings as those on your root router/ AP. (Check this out on your root router if you have no idea about what’s the security type.)

5. Go to System Tools ->Reboot on left menu, press Reboot button, all the settings will take effect after the device rebooted.

Step 4
Please refer to the following methods to make certain whether the device is set in Client mode successfully.
Note: There are two methods to test it.
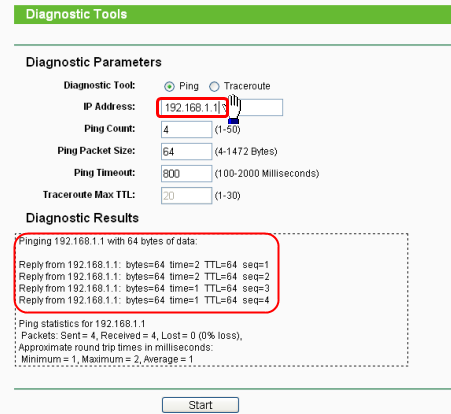
a) Test from AP configuration page:
Go to System Tools->Diagnostic, and try to ping 192.168.1.1 (IP of your root AP). It should be successful if you get Diagnostics Results as follows:
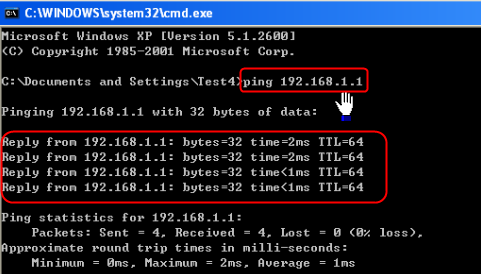
b) Change the IP address on your computer back to Obtain automatically, click here for detailed instructions. Then you can check the connectivity by using Ping in command prompt on that computer. For how to use Ping, please refer to how to use Ping command.
If the Ping is not successful, please check all above settings carefully, or contact TP-Link support for help.
Get to know more details of each function and configuration please go to Download Center to download the manual of your product.
Is this faq useful?
Your feedback helps improve this site.
TP-Link Community
Still need help? Search for answers, ask questions, and get help from TP-Link experts and other users around the world.