How to create a network for guests on the Wi-Fi Routers (new logo)
1. Log in to the web-based interface of the router. If you don’t know how to do that, please refer to
How do I log into the web-based Utility (Management Page) of TP-Link wireless router?
2. Go to Advanced > Guest Network. Locate the Wireless section.
3. Create a guest network as needed.
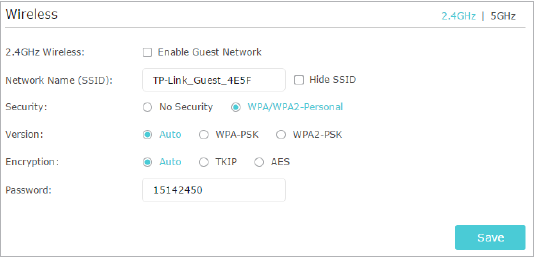
1) Select 2.4GHz or 5GHz network and tick the Enable Guest Network checkbox.
2) Customize the SSID. Don‘t select Hide SSID unless you want your guests to manually input the SSID for guest network access.
3) Set Security to WPA/WPA2 Personal, keep the default Version and Encryption values, and customize your own password.

4. Click Save. Now your guests can access your guest network using the SSID and password you set!
Tips:
To view guest network information, go to Advanced > Status and locate the Guest Network section.
Get to know more details of each function and configuration please go to Download Center to download the manual of your product.
Finden Sie diese FAQ hilfreich?
Mit Ihrer Rückmeldung tragen Sie dazu bei, dass wir unsere Webpräsenz verbessern.
3.0_A_RGB_normal_1584493572647x.png)

Von United States?
Erhalten Sie Produkte, Events und Leistungen speziell für Ihre Region