Table of Contents
Tapo RV50 Pro Omni Installation and User Guide
SAFETY INSTRUCTIONS
IMPORTANT SAFETY INSTRUCTIONS
READ ALL INSTRUCTIONS
BEFORE USING THIS APPLIANCE
WARNING – To reduce the risk of fire, electric shock, or injury:
• Do not leave the appliance when plugged in. Unplug from the outlet when not in use and before servicing.
• Do not use outdoors or on wet surfaces.
• Do not allow to be used as a toy. Close attention is necessary when used by or near children.
• Use only as described in this manual. Use only the manufacturer’s recommended attachments.
• Do not use with a damaged cord or plug. If appliance is not working as it should, has been dropped, damaged, left outdoors, or dropped into water, return it to a service center.
• Do not pull or carry by cord, use cord as a handle, close a door on cord, or pull cord around sharp edges or corners. Do not run appliance over cord. Keep cord away from heated surfaces.
• Do not unplug by pulling on cord. To unplug, grasp the plug, not the cord.
• Do not handle plug or appliance with wet hands.
• Do not use to pick up flammable or combustible liquids, such as gasoline, or use in areas where they may be present.
• Keep hair, loose clothing, fingers, and all parts of body away from openings and moving parts.
• Turn off all controls before unplugging.
• Do not put any object into openings. Do not use with any opening blocked; keep free of dust, lint, hair, and anything that may reduce air flow.
• Do not pick up anything that is burning or smoking, such as cigarettes, matches, or hot ashes.
• Do not use without dust bag and/or filters in place.
• Use extra care when cleaning on stairs.
WARNING: Do not charge non-rechargeable batteries.
WARNING: Read all safety warnings and instructions. Failure to follow the warnings and instructions may result in electric shock, fire and/or serious injury.
Risk of explosion. Floor sanding can result in an explosive mixture of fine dust and air. Use floor-sanding machine only in a well-ventilated area free from any flame or match.
• Prevent unintentional starting. Ensure the switch is in the off-position before connecting to battery pack, picking up or carrying the appliance. Carrying the appliance with your finger on the switch or energizing appliance that have the switch on invites accidents.
• Recharge only with the charger specified by the manufacturer. A charger that is suitable for one type of battery pack may create a risk of fire when used with another battery pack.
• Use appliances only with specifically designated battery packs. Use of any other battery packs may create a risk of injury and fire.
• Under abusive conditions, liquid may be ejected from the battery; avoid contact. If contact accidentally occurs, flush with water. If liquid contacts eyes, additionally seek medical help. Liquid ejected from the battery may cause irritation or burns.
• When battery pack is not in use, keep it away from other metal objects, like paper clips, coins, keys, nails, screws or other small metal objects, that can make a connection from one terminal to another. Shorting the battery terminals together may cause burns or a fire.
• Do not use a battery pack or appliance that is damaged or modified. Damaged or modified batteries may exhibit unpredictable behavior resulting in fire, explosion or risk of injury.
• Do not expose a battery pack or appliance to fire or excessive temperature. Exposure to fire or temperature above 130°C may cause explosion.
• Follow all charging instructions and do not charge the battery pack or appliance outside of the temperature range specified in the instructions. Charging improperly or at temperatures outside of the specified range may damage the battery and increase the risk of fire.
• Do not charge the battery at ambient temperature below 39°F (4°C) or above 104 °F (40°C). Also keeping the temperature range of between 39-104°F when storing unit or during use.
• Have servicing performed by a qualified repair person using only identical replacement parts. This will ensure that the safety of the product is maintained.
• Do not modify or attempt to repair the appliance except as indicated in the instructions for use and care.
• Place the cords from other appliances out of the area to be cleaned.
• Do not operate the vacuum in a room where an infant or child is sleeping.
• Do not operate the vacuum in an area where there are lit candles or fragile objects on the floor to be cleaned.
• Do not operate the vacuum in a room that has lit candles on furniture that the vacuum may accidentally hit or bump into.
• Do not allow children to sit on the vacuum.
• Do not use the vacuum on a wet surface.
• Connect to a properly grounded outlet only. See Grounding Instructions.
• Household use only
• The charging dock must only be supplied at safety extra-low voltage defined in the standard of EN 60335-1 corresponding to the marking on the charging dock. (for EU region)
• This charging dock can only charge lithium batteries and can only charge one battery at a time. The capacity of the battery does not exceed 5200mAh.
• The robot vacuum takes about 4 hours to fully charge.
WARNING: Do not charge non-rechargeable batteries.
SAVE THESE INSTRUCTIONS
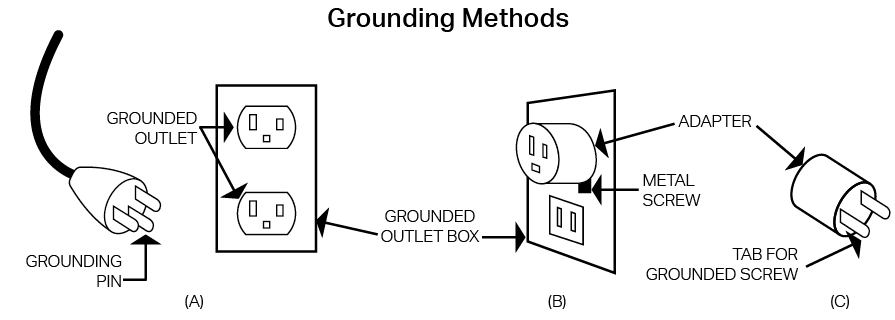
GROUNDING INSTRUCTIONS
This appliance must be grounded. If it should malfunction or breakdown, grounding provides a path of least resistance for electric current to reduce the risk of electric shock. This appliance is equipped with a cord having an equipment-grounding conductor and grounding plug. The plug must be inserted into an appropriate outlet that is properly installed and grounded in accordance with all local codes and ordinances.
WARNING – Improper connection of the equipment-grounding conductor can result in a risk of electric shock. Check with a qualified electrician or service person if you are in doubt as to whether the outlet is properly grounded. Do not modify the plug provided with the appliance – if it will not fit the outlet, have a proper outlet installed by a qualified electrician.
(For US version) This appliance is for use on a nominal 120-V circuit and has a grounding attachment plug that looks like the plug illustrated in sketch A in the figure below. Make sure that the appliance is connected to an outlet having the same configuration as the plug. No adapter should be used with this appliance.
About This Guide
This guide provides a brief introduction to the Tapo robot vacuum and the Tapo app, as well as regulatory information. Please note that features available in Tapo may vary by model and software version. Tapo availability may also vary by region. All images, steps, and descriptions in this guide are only examples and may not reflect your actual Tapo robot vacuum experience.
Conventions
In this guide, the following convention is used:
| Convention | Description |
|---|---|
| Blue | Key information appears in blue, including management page text such as menus, items, buttons and so on. |
| Underline | Hyperlinks are in blue and underlined. You can click to redirect to a website. |
| Note |
Ignoring this type of note might result in a malfunction or damage to the device. |
More Info
Specifications can be found on the product page at https://www.tapo.com.
Our Technical Support and troubleshooting information can be found at https://www.tapo.com/support/.
The setup video can be found at https://www.tp-link.com/support/setup-video/.
Introduction
The Tapo RV50 Pro Omni combining 15000Pa suction power with advanced self-cleaning docking station, effectively remove debris and dust from hard floors and carpets, offering users a smarter and easier cleaning experience.
· 15,000Pa Superb Suction - Easily removes embedded dirt. Picks up everything in one pass.
· Tangle-Free Cutting Brush - Cuts away wrapped hair only when at the base station – protecting carpets and pets while vacuuming.
· Carpets Stay Clean with Auto Mop Removal - Completely removes mops when cleaning high pile carpets.
· DeepEdge Adaptive Mopping - The robotic mop arm automatically extends to clean where others miss—tight spaces, edges, and beyond.
· Dual-Laser Precision Avoidance - Uses both front and side lasers to detect obstacles in real time—minimizing bumps, protecting furniture.
· 60°C/140°F Hot Water Mop Washing - Cleans stubborn stains from mop pads with hot water—no scrubbing required.
· 50°C/122°F Warm Air Drying - Dries mops automatically to speed up maintenance and prevent odors.
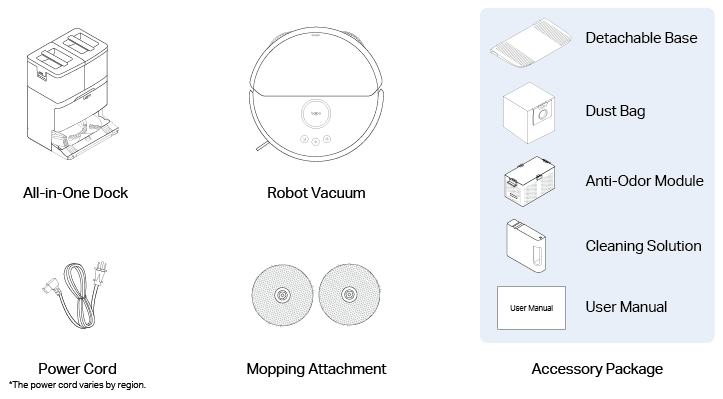
Package Contents
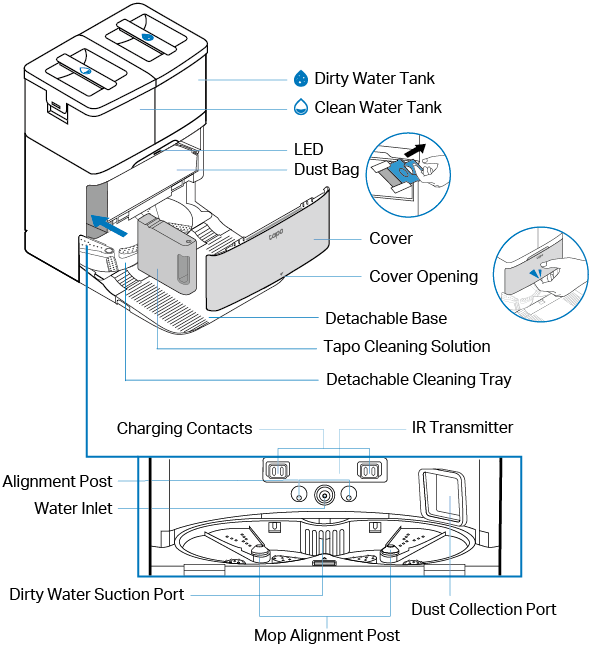
Overview
Robot Vacuum
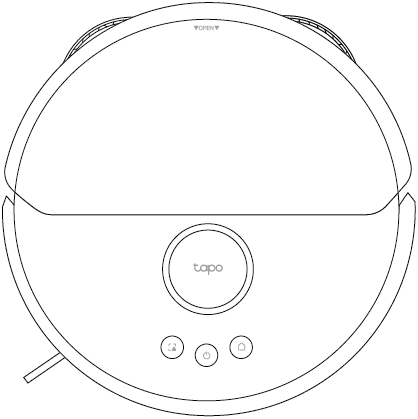
| Buttons | Indication | Status |
|---|---|---|
|
|
Power/Clean | • Press and hold for 3 seconds: Turn on/off the robot vacuum. • Press once: Start/pause cleaning. |
 |
Dock | • Return to the dock to charge. • Empty the dustbin when docked. |
 |
Spot Cleaning/Child Lock | • Press once: Start spot cleaning. • Press and hold for 5 seconds: Turn on/off the child lock. |
 |
Combo Button | • Press and hold for 5 seconds: Enter setup mode; reset Wi-Fi. • Press and hold for 10 seconds: Restore to factory default settings. |
|
LED Status | • Pulse/Flash Red: Battery level < 15%; Error • Pulse Orange: Battery level between 15% and 80% (Charging) • Pulse Green : Battery level > 80% (Charging); Turning on • Solid Green: Fully charged |

Appearance

All-in-One Dock
| LED | • Off: Powered off; charging; collecting dust • White: Powered on but robot vacuum not on the dock • Blinking White 3 Times: Charging starts; dust collection starts/ends • Red: Low clean water level; dirty water tank full/missing; cleaning tray overflow |
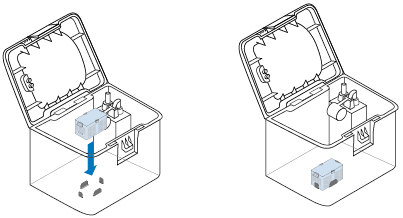
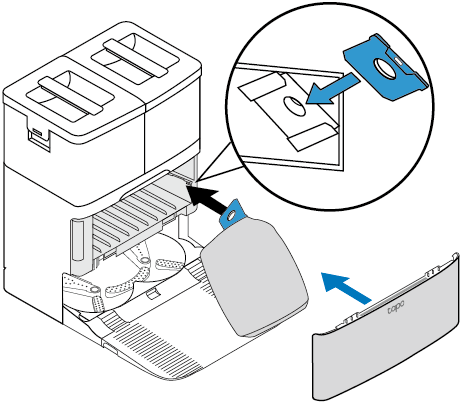
Install the Anti-Odor Module for the Dirty Water Tank
Set Up Your Robot Vacuum
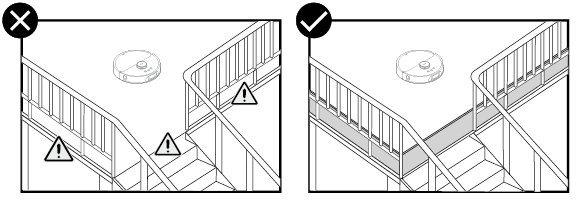
Important Tips
Install a physical barrier when using the robot vacuum on elevated surfaces (e.g., lofts or split-level floors) to prevent accidental falls and avoid injury or damage.
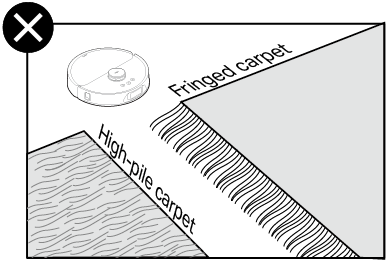
Do not use on high-pile or fringed carpets.
Remove power cords and small objects from the floor.
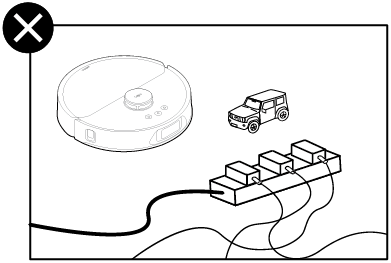
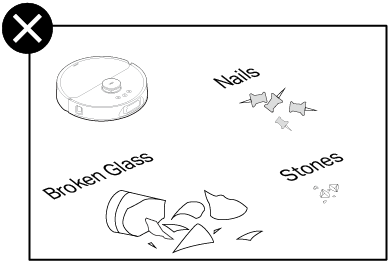
Do not clean hard or sharp objects such as nails, paper clips, broken glass, or small stones, as this may scratch the floor.
Step 1 Install the Base
Install the detachable base by pressing down both sides of it firmly.
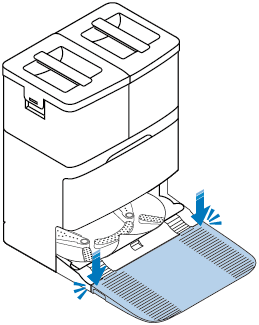
Note: Make sure the detachable base is flush with the bottom of the dock and the bottom surface is even. If there is any installation jamming during assembly, please make sure to press it in place. Otherwise, the robot vacuum will not be able to return to the dock.
Step 2 Position the Dock
1. Position the dock on a hard, level surface against a wall, ensuring 1.5 m (4.9 ft) of clear space in front and 5 cm (2 in) to the left and right.
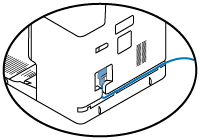
2. Connect the power cord to the dock and power source. Keep the cable tidy.
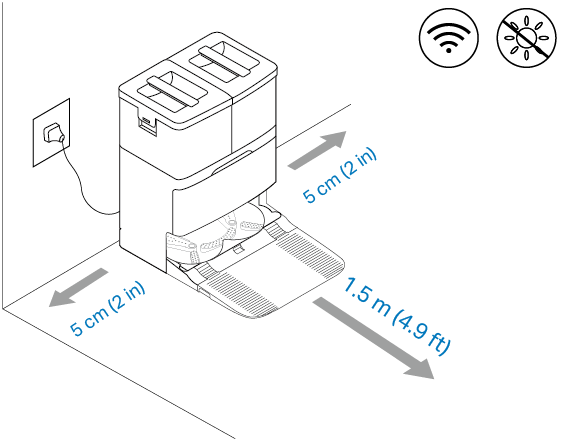
Notes:
• Route the power cable on the back of the dock.
• Peel off the protective film for optimal performance.
• Ensure the area has a strong Wi-Fi signal and is not exposed to direct sunlight.
• Always keep the dock powered on; otherwise, the robot vacuum will not automatically return. Do not move the dock frequently.
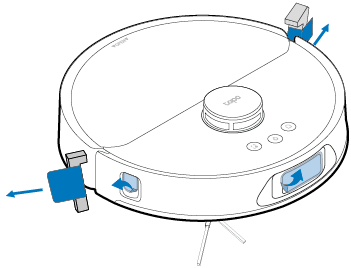
Step 3 Remove the Protective Strips and Films
Remove the protective strips on both sides of the front bumper and all protective films.
Step 4 Install the Mop Cloth Mount
Align the loop side to the hook side and press together. Attach the mop cloth mounts to the mopping rollers.

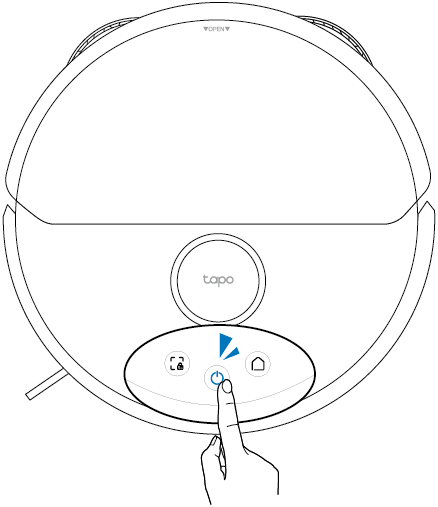
Step 5 Turn On the Robot Vacuum
Press and hold  for 3 seconds to turn on the robot vacuum. You will hear either "Turning On" or a beep, indicating a successful power-on.
Step 6 Charge the Robot Vacuum
Place the robot vacuum on the charging dock or tap  to send it back to the dock to charge. It will return to the dock at the end of a cleaning job and whenever it needs to recharge.
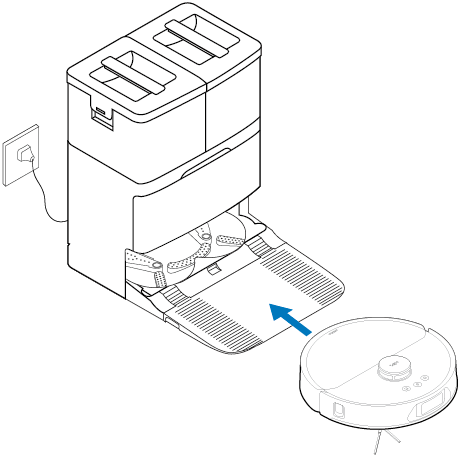
Notes:
• When you place the robot vacuum on the charging dock, the robot vacuum will turn on automatically.
• Charging begins when the charging dock’s LED blinks three times.
• It takes about 4 hours to fully charge. We recommend that you fully charge the robot vacuum for about 4 hours prior to starting its first cleaning job.
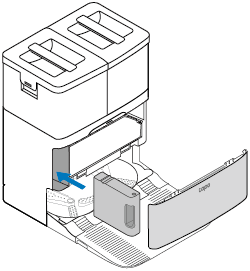
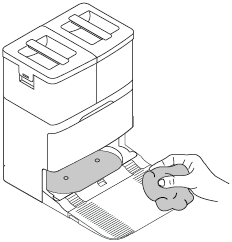
Step 7 Install Tapo Cleaning Solution
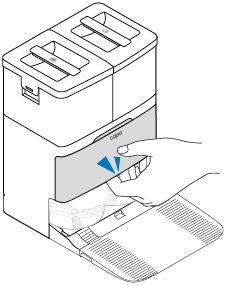
1. Pull the cover out from the opening at the bottom.
2. Make sure the seal side is facing up. Remove the Tapo cleaning solution's seal and sticker.
3. Insert the Tapo cleaning solution to the dock.
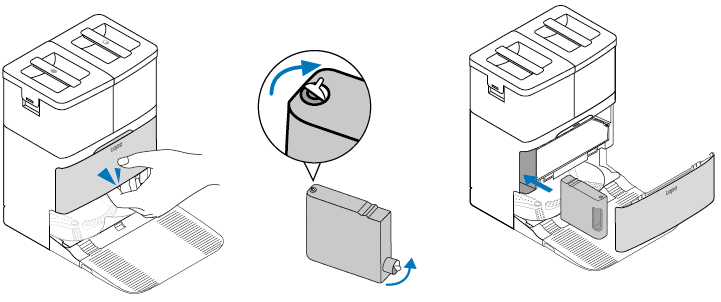
Notes:
• Avoid repeatedly removing the cleaning solution to prevent damage.
• If you don’t want to use the cleaning solution after installation, you can disable this feature on the Tapo app.
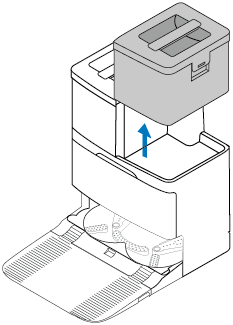
Step 8 Fill in the Clean Water Tank
1. Remove and open the clean water tank.
2. Fill the tank with water to the Max water line.
3. Close the lid, lock the latch, and reinstall the tank onto the dock with a slight press for proper installation.
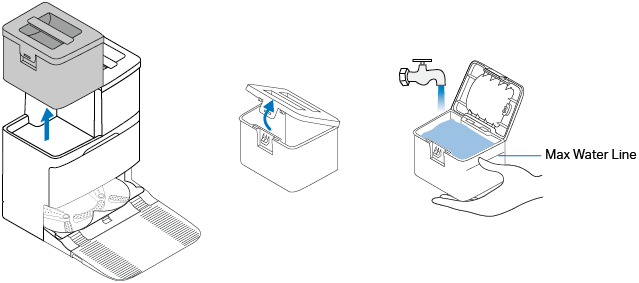
Notes:


1. Do NOT add any cleaning solution to the water tank. Install the provided Tapo cleaning solution to the dock instead.
Note: Manually adding cleaning solution to the water tank may cause damage to the water system and void the warranty.
2. Do NOT add hot water to the water tank to avoid shortening its service life.
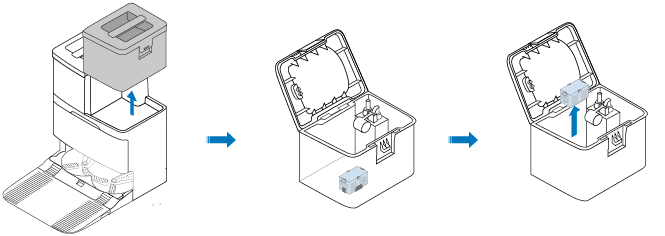
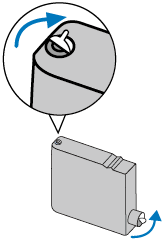
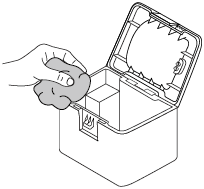
Step 9 Install the Anti-Odor Module in the Dirty Water Tank
1. Remove and open the dirty water tank.
2. Install the anti-odor module into the slot at the bottom of the water tank, making sure the grooves on both sides are firmly locked.
3. Close the lid, lock the latch, and reinstall the tank onto the dock with a slight press for proper installation.

Note: Make sure the water tank is firmly installed on the dock.
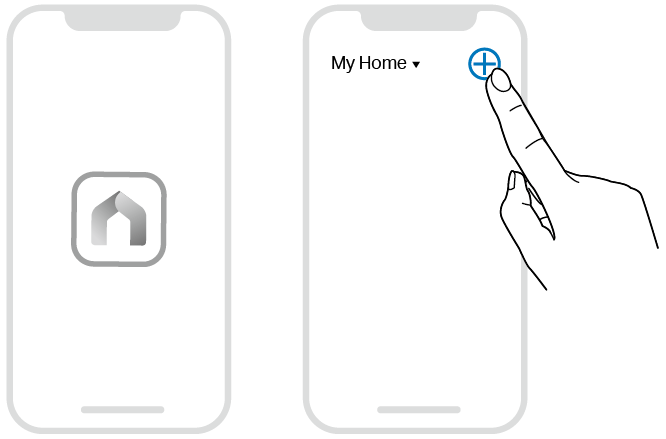
Step 10 Download the Tapo App and Connect to Wi-Fi
1. Download the Tapo app from the App Store or Google Play, then log in.

2. Open the Tapo app, tap the  icon, and select your model. Follow the step-by-step instructions to set up your robot vacuum and connect to your home Wi-Fi.
Features
• Automatic Mop Cleaning
The robot vacuum automatically returns to the dock to wash its mop cloth after cleaning, then resumes cleaning.
• Auto-Emptying & Mop Cleaning and Air-Drying
After completing its cleaning, the robot vacuum will return to the dock to automatically empty its dustbin and clean & air dry the mop cloth.
• Resuming Cleaning
If the battery is low during the cleaning, the robot vacuum will automatically return to the dock to charge. When it is appropriately charged, it will resume cleaning.
• System Shutdown Button
If the robot vacuum is unresponsive, press the SYSTEM SHUTDOWN button to turn it off.
• Reset Wi-Fi Connection
If you encounter issues when connecting to the Tapo app, you can press and hold the  and
and  buttons simultaneously for 5 seconds to reset the Wi-Fi.
• Smart Maps
Start quick mapping to create a smart map of your home, allowing the robot vacuum to know where to clean.
• Cleaning Modes & Preferences
Customize vacuum power, cleaning times, and cleaning areas.
• Scheduled Cleaning
Set an automatic cleaning schedule, then the robot vacuum will clean automatically at the set time and return to the dock after cleaning.
• Custom Zones, Carpet Areas, and Virtual Walls
Add no-go zones, carpet areas, and virtual walls on the Tapo app to prevent access to certain areas and rooms. Set carpret cleaning preferences for carpet areas.
Care and Maintenance
To maintain optimal performance, maintain the robot vacuum according to the following guidelines.
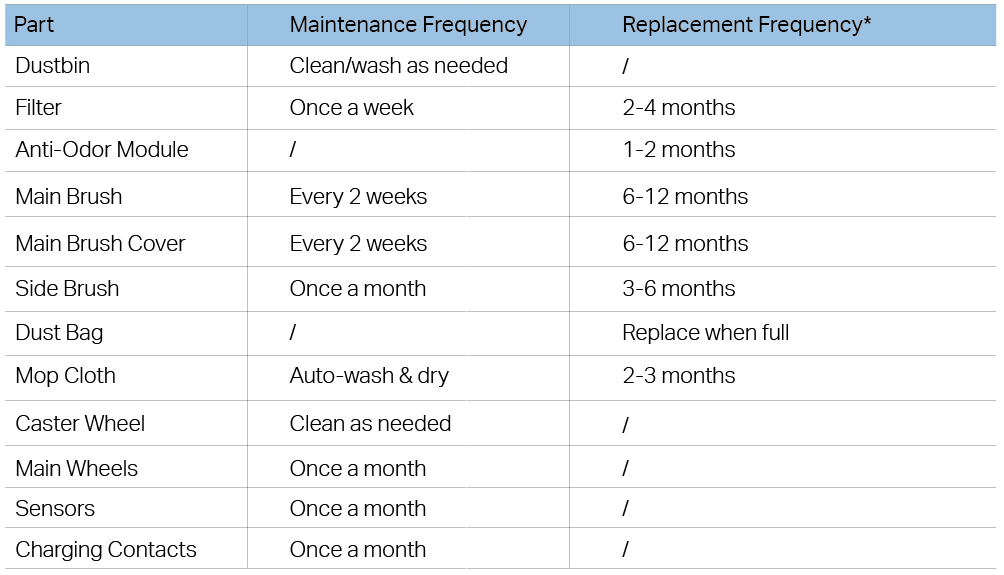
*Replacement frequency may vary depending on the actual situation. Parts should be replaced if visible wear appears.
Empty the Dustbin
Option 1: Auto-Empty
The robot vacuum automatically empties the dustbin after cleaning. You can also press  on the robot vacuum when docked or tap the Empty button on the Tapo app to suck up dust and debris in the dustbin to the dust bag.

Option 2: Empty Manually
Remove and open the dustbin to empty the dustbin.
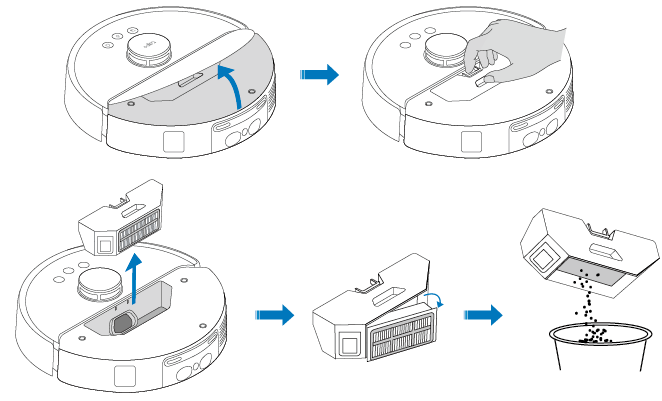
Clean the Filter
1. Remove the dustbin and the filter.
2. Clean the filter.
3. Wash the filter. Note that do not wash with hot water or detergent.
4. Air dry the filter thoroughly, then reinstall it.

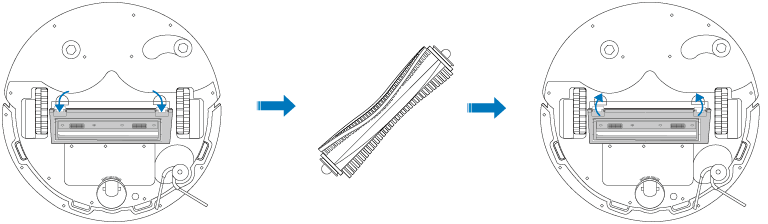
Clean the Main Brush
1. Turn the robot vacuum over, then unlatch and remove the main brush cover.
2. Remove any hair or debris.
3. Press on the main brush cover and listen for a click to lock it in place.
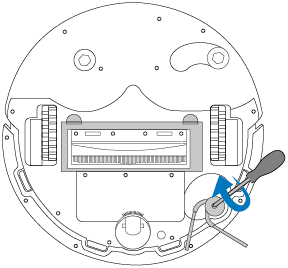
Clean the Side Brush
1. Use a screwdriver to unscrew the side brush clockwise, remove debris, and wipe with a damp cloth if necessary.
2. Turn the side brush anticlockwise to secure it tightly and ensure it is properly installed.
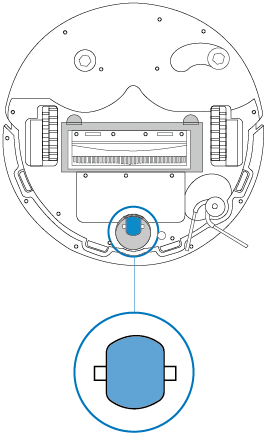
Clean the Caster Wheel
1. Pull firmly to remove the caster wheel and remove hair or dirt.
2. Reinstall the caster wheel and press it firmly into place.
Clean the Main Wheels
Wipe the main wheels with a clean, dry cloth.

Clean the Sensors
Wipe the sensors with a clean, damp cloth, then dry them with a dry cloth.

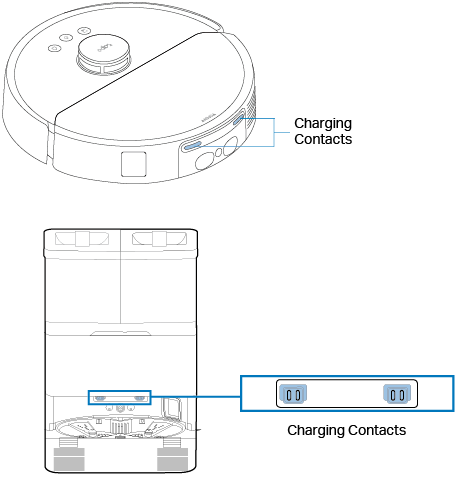
Clean the Charging Contacts
1. Power off the robot vacuum and dock.
2. Wipe the charging contacts with a clean, damp cloth, then dry them with a dry cloth. If necessary, use an alcohol-dampened cloth.
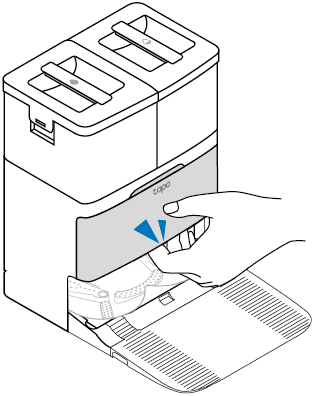
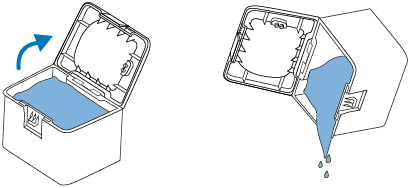
Replace the Dust Bag
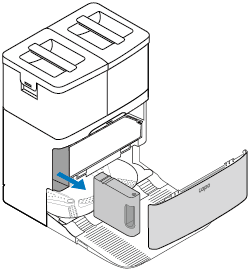
1. Pull the cover out from the opening at the bottom.
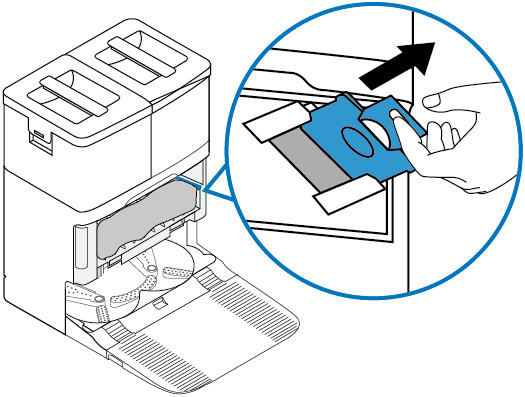
2. Pull up the handle of the dust bag to remove.
3. Throw away the used dust bag when it is full.
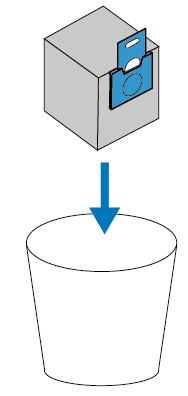
4. Install a new dust bag and put the cover back on.
Replace the Anti-Odor Module
1. Remove and open the dirty water tank.
2. Remove the anti-odor module from the dirty water tank.
3. Install the new anti-odor module into the slot at the bottom of the water tank, making sure the grooves on both sides are firmly locked.
4. Close the lid, lock the latch, and reinstall the tank onto the dock with a slight press for proper installation.
Note: Make sure the water tank is firmly installed on the dock.
Replace the Cleaning Solution
1. Pull the cover out from the opening at the bottom.
2. Remove the old Tapo cleaning solution.
3. Prepare the new Tapo cleaning solution. Make sure the seal side is facing up. Remove the Tapo cleaning solution's seal and sticker.
4. Insert the new Tapo cleaning solution to the dock.
Clean the Dirty Water Tank
1. Pull out the dirty water tank.
2. Open the water tank and pour out the water.
3. Clean the water tank using tap water.
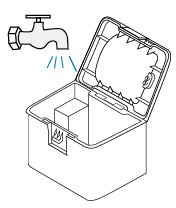
4. Wipe them with a dry cloth. Reinstall onto the dock with a slight press for proper installation.
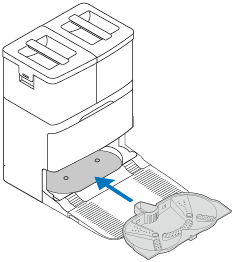
Clean Cleaning Tray and Detachable Base
1. Remove the cleaning tray.
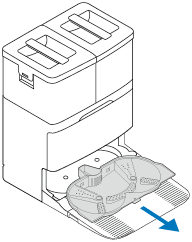
2. Clean it with a brush using tap water.
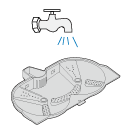
3. Wipe the base with a clean, damp cloth.
4. Reinstall the cleaning tray.
Troubleshooting
Refer to the table for troubleshooting.
| Issue | Solution |
|---|---|
| Unable to turn on the robot vacuum | 1. Low battery: Please place the robot vacuum on the dock to charge. 2. Extreme ambient temperature: Please use the robot vacuum within 0–40°C (32–104°F). 3. Loose battery connection: Remove the battery cover with a screwdriver and reseat the battery. |
| Charging Failure | 1. Dock not powered: Ensure both ends of the power cable are securely connected. 2. Poor contact: Power off the device and clean the charging contacts on both the robot vacuum and dock with an alcohol-dampened cloth. 3. Make sure the LED of the dock is on. |
| Slow Charging | 1. High/low temperature: When used in high or low temperature environments, the robot vacuum will automatically reduce the charging speed to extend its battery life. 2. Poor contact: Power off the device and clean the charging contacts on both the robot vacuum and dock with an alcohol-dampened cloth. 3. Loose battery connection: Remove the battery cover with a screwdriver and reseat the battery. |
| Wi-Fi Connection Issues | 1. Wi-Fi not activated: Press and hold the  and and  buttons for 5 seconds to reset the Wi-Fi. buttons for 5 seconds to reset the Wi-Fi.2. Weak signal: Ensure the robot vacuum is within a strong Wi-Fi range. 3. Connection error: Reset the Wi-Fi and update the Tapo app. |
| Offline | 1. Ensure the Tapo app and the robot vacuum firmware is up to date. 2. Ensure the area receives good Wi-Fi signals. 3. Ensure your router is working properly. Reboot the router and robot vacuum. 4. Try to change the router's channel to 6 and width to 20MHz. 5. Try to change the router's DNS to 8.8.8.8. 6. If the robot vacuum does not respond, remove the cover and press the SYSTEM SHUTDOWN button to turn it off, then press and hold the Power button  for 3 seconds to turn it on. for 3 seconds to turn it on. |
| Robot Vacuum Abnormal Noise | 1. Debris in brushes/wheels: Stop and clean the main brush, side brush, or wheels. 2. Dirty caster wheel: Remove and rinse if tangled or clogged. 3. Main brush/cover misaligned: Reinstall properly. |
| Robot Vacuum Poor Dust Collection | 1. Main brush/cover misaligned: Reinstall properly. 2. Clogged filters/ducts: Clean the filter, dustbin, dust collection port, air duct, and dust bag. 3. Foreign object in dust bag compartment: Remove debris. |
| Missed Spots During Cleaning | 1. Dirty sensors: Wipe the anti-drop, wall, or carpet sensors with a dry cloth. 2. Dirty LiDAR: Clean with a dry cloth. 3. Strong light interference: Close curtains or avoid direct sunlight. 4. High thresholds/obstacles: Use no-go zones to avoid or add ramps for easier access. |
| Mop Doesn't Extend | 1. The mop only extends along walls/obstacles. 2. Check and clear obstructions. |
|
Failed to return to the dock to charge: Cannot find the dock |
1. Dock not powered or moved. Ensure the dock is powered on or manually place the robot vacuum back on the dock to charge. 2. Obstructions near dock: Keep the area around the dock clear. 3. Robot vacuum too far from dock: Place the robot closer to the dock. 4. The robot vacuum will relocate after being moved and re-create the map once failed. It might not return to charge if the dock is too far. Try to manually place the robot vacuum back on the dock to charge. 5. Dirty sensors: Wipe the infrared sensors on both the robot vacuum and dock. 6. Poor contact: Power off the device and clean the charging contacts on both the robot vacuum and dock with an alcohol-dampened cloth. |
| Failed to return to the dock to charge: Stuck in front of the dock |
1. Ensure 1.5 m (4.9 ft) of clear space in front and 5 cm (2 in) to the left and right. 2. Remove any obstructions on the return route, such as a closed door. 3. Too much water in front of the dock might prevent the robot vacuum from docking. Please wipe it dry and try again. 4. Ensure you have installed the detacheable base and cleaning tray properly. |
| Failed to automatically collect dust when docked | 1. Ensure that the dock is powered on. 2. Check if the Auto-Empty feature is enabled on the Tapo app. 3. Don’t collect the dust again within 10 minutes. 4. Check if Do Not Disturb is set on the Tapo app. 5. Check if a dust bag is installed properly. 6. Check if the dust bag is full and replace it. |
| Mop Not Washing | 1. The washing will not start until the robot vacuum has mopped. 2. If the robot vacuum is on a non-dock map and hasn’t started cleaning from the dock, it will not be able to return to the dock to wash the mop. You can change the map type on the Tapo app and start cleaning from the dock. 3. Cleaning tray not installed: Reattach properly. 4. Check if the clean water tank is empty or not installed, or if the dirty water tank is full or not installed. 5. Check whether the rubber sleeve on the dock combined with the clean water tank is deformed or detached. After installing the clean water tank, press it down slightly for proper installation. |
| Hot Water Wash Not Working | Make sure you have turned on the Hot Water Wash feature on the Tapo app. |
| Poor Mop Self-Cleaning | 1. Mop not flat: Reattach properly. 2. Heavy dirt: Open the Tapo app and tap Wash Mop to clean. 3. Cleaning tray misaligned: Reinstall properly. 4. Worn mop: Replace via official channels. 5. Check whether the rubber sleeve on the dock combined with the water tanks is deformed or detached. After installing the water tanks, press them down slightly for proper installation. |
| Cleaning Tray Overflow | 1. Check whether the rubber sleeve on the dock combined with the dirty water tank is deformed or detached. After installing the dirty water tank, press it down slightly for proper installation. 2. Check if the dirty water suction port is blocked. If so, please clean it. |
| Auto-Drying Not Working | 1. Turn on the Auto-Dry feature on the Tapo app. 2. Auto-Dry is only activated after cleaning the mop. |
| Mop Auto-Removal Malfunction | 1. Make sure you have turned on the Mop Auto-Removal feature on the Tapo app. 2. Make sure the cleaning tray is installed properly. 3. Check if the mop cloth mount and roller parts are jammed or attached to foreign objects. 4. Ensure that the mop holder is placed on the cleaning tray. |
| Dock LED Flashing Red | 1. Voltage issue: Ensure the power supply matches dock specifications. 2. Low water level in the clean water tank; dirty water tank full or uninstalled; cleaning tray overflow. 3. Clogged drain pipe: Clear debris from the drain port. |
If the problem persists, please contact our Technical Support at https://www.tapo.com/support/

Authentication
FCC compliance information statement

Product Name: Robot Vacuum & Mop + All-in-One Dock
Model Number: Tapo RV50 Pro Omni
Responsible Party:
TP-Link Systems Inc.
Address: 10 Mauchly, Irvine, CA 92618
Website: http://www.tp-link.com/us/
Tel: +1 626 333 0234
Fax: +1 909 527 6804
E-mail: sales.usa@tp-link.com
This equipment has been tested and found to comply with the limits for a Class B digital device, pursuant to part 15 of the FCC Rules. These limits are designed to provide reasonable protection against harmful interference in a residential installation. This equipment generates, uses and can radiate radio frequency energy and, if not installed and used in accordance with the instructions, may cause harmful interference to radio communications. However, there is no guarantee that interference will not occur in a particular installation. If this equipment does cause harmful interference to radio or television reception, which can be determined by turning the equipment off and on, the user is encouraged to try to correct the interference by one or more of the following measures:
Reorient or relocate the receiving antenna.
Increase the separation between the equipment and receiver.
Connect the equipment into an outlet on a circuit different from that to which the receiver is connected.
Consult the dealer or an experienced radio/ TV technician for help.
This device complies with part 15 of the FCC Rules. Operation is subject to the following two conditions:
This device may not cause harmful interference.
This device must accept any interference received, including interference that may cause undesired operation.
Any changes or modifications not expressly approved by the party responsible for compliance could void the user’s authority to operate the equipment.
Note: The manufacturer is not responsible for any radio or TV interference caused by unauthorized modifications to this equipment. Such modifications could void the user’s authority to operate the equipment.
FCC RF Radiation Exposure Statement
This equipment complies with FCC RF radiation exposure limits set forth for an uncontrolled environment. This device and its antenna must not be co-located or operating in conjunction with any other antenna or transmitter.
“To comply with FCC RF exposure compliance requirements, this grant is applicable to only Mobile Configurations. The antennas used for this transmitter must be installed to provide a separation distance of at least 20 cm from all persons and must not be co-located or operating in conjunction with any other antenna or transmitter.”
We, TP-Link Systems Inc., has determined that the equipment shown as above has been shown to comply with the applicable technical standards, FCC part 15. There is no unauthorized change is made in the equipment and the equipment is properly maintained and operated.
Issue Date: 2025-11-4
CE Mark Warning

OPERATING FREQUENCY (the maximum transmitted power)
For EU/UK Region:
2400MHz~2483.5MHz / 20dBm (Wi-Fi)
2402MHz~2480MHz / 10dBm (Bluetooth)
EU Declaration of Conformity
For Robot Vacuum:
TP-Link hereby declares that the Robot Vacuum is in compliance with the essential requirements and other relevant provisions of directives 2014/53/EU, 2009/125/EC, 2011 /65/EU and (EU) 2015/863. The original EU declaration of conformity may be found at https://www.tapo.com/en/support/ce/
For All-in-One Dock / Battery:
TP-Link hereby declares that the All-in-One Dock is in compliance with the essential requirements and other relevant provisions of directives 2014/30/EU, 2014/35/EU, 2009/125/EC, 2011/65/EU and (EU)2015/863. The original EU declaration of conformity may be found at https://www.tapo.com/en/support/ce/
RF Exposure Information
This device meets the EU requirements (2014/53/EU Article 3.1a) on the limitation of exposure of the general public to electromagnetic fields by way of health protection.
The device complies with RF specifications when the device used at 20 cm from your body.
The All-in-One Dock (station) and the robotic vacuum need to communicate continuously for the purpose of real-time remote control via wireless technology. If the product enters the off or standby mode, communication and product intended function usage cannot be realized. Therefore, the product does not provide the off or standby modes.
UKCA Mark

UK Declaration of Conformity
For Robot Vacuum:
TP-Link hereby declares that the Robot Vacuum is in compliance with the essential requirements and other relevant provisions of the Radio Equipment Regulations 2017.
The original UK declaration of conformity may be found at https://www.tapo.com/support/ukca/
For All-in-One Dock / Battery:
TP-Link hereby declares that the All-in-One Dock is in compliance with the essential requirements and other relevant provisions of the Electromagnetic Compatibility Regulations 2016 and Electrical Equipment (Safety) Regulations 2016.
The original UK declaration of conformity may be found at https://www.tapo.com/support/ukca/
Canadian Compliance Statement
This device contains licence-exempt transmitter(s)/receiver(s) that comply with Innovation, Science and Economic Development Canada’s licence-exempt RSS(s). Operation is subject to the following two conditions:
(1) This device may not cause interference.
(2) This device must accept any interference, including interference that may cause undesired operation of the device.
L’émetteur/récepteur exempt de licence contenu dans le présent appareil est conforme aux CNR d’Innovation, Sciences et Développement économique Canada applicables aux appareils radio exempts de licence. L’exploitation est autorisée aux deux conditions suivantes :
1) L’appareil ne doit pas produire de brouillage;
2) L’appareil doit accepter tout brouillage radioélectrique subi, même si le brouillage est susceptible d’en compromettre le fonctionnement.
Radiation Exposure Statement:
This equipment complies with IC radiation exposure limits set forth for an uncontrolled environment. This equipment should be installed and operated with minimum distance 20cm between the radiator & your body.
Déclaration d'exposition aux radiations:
Cet équipement est conforme aux limites d'exposition aux rayonnements IC établies pour un environnement non contrôlé. Cet équipement doit être installé et utilisé avec un minimum de 20 cm de distance entre la source de rayonnement et votre corps.
Industry Canada Statement
CAN ICES-003 (B)/NMB-003(B)
Korea Warning Statements:
당해 무선설비는 운용중 전파혼신 가능성이 있음.
NCC Notice & BSMI Notice
注意!
取得審驗證明之低功率射頻器材,非經核准,公司、商號或使用者均不得擅自變更頻率、加大功率或變更原設計之特性及功能。
低功率射頻器材之使用不得影響飛航安全及干擾合法通信;經發現有干擾現象時,應立即停用,並改善至無干擾時方得繼續使用。
前述合法通信,指依電信管理法規定作業之無線電通信。
低功率射頻器材須忍受合法通信或工業、科學及醫療用電波輻射性電機設備之干擾。
為避免本器材影像畫面遭偷窺或擷取,本器材使用者應先修改預設密碼,並定期更新密碼。
安全諮詢及注意事項
請使用原裝電源供應器或只能按照本產品注明的電源類型使用本產品。
清潔本產品之前請先拔掉電源線。請勿使用液體、噴霧清潔劑或濕布進行清潔。
注意防潮,請勿將水或其他液體潑灑到本產品上。
插槽與開口供通風使用,以確保本產品的操作可靠並防止過熱,請勿堵塞或覆蓋開口。
請勿將本產品置放於靠近熱源的地方。除非有正常的通風,否則不可放在密閉位置中。
不要私自拆開機殼或自行維修,如產品有故障請與原廠或代理商聯繫。
請勿更換不正確類型的電池,以免破壞保護措施。 請勿將電池丟入火源或烤箱、使用機械擠壓或切割電池,否則將導致爆炸。
請勿將電池放置於可能爆炸或洩漏易燃液體、氣體的高溫環境中;請勿將電池置於低氣壓環境下,這將導致爆炸或易燃液體、氣體洩漏。
產品適用於家居環境的地面清潔,請勿用在室外、非地面、商用或工業環境。
本設備不適合身體、感官或精神能力下降或缺乏經驗和知識的人(包括兒童)使用,除非他們已由負責其安全的人員對設備的使用進行監督或指導。
應監督兒童,確保他們不會把玩本設備。 本設備只能與包裝隨附的電源配件一起使用。
警告:若要幫電池充電,只能使用設備包裝內附的可充電配件。
限用物質含有情況標示聲明書
| 設備名稱:二合一掃地機器人 型號(型式):Tapo RV50 Pro Omni Equipment name Type designation (Type) |
||||||
|---|---|---|---|---|---|---|
| 單元 Unit |
限用物質及其化學符號 Restricted substances and its chemical symbols |
|||||
| 鉛 Lead (Pb) |
汞 Mercury (Hg) |
鎘 Cadmium (Cd) |
六價鉻 Hexavalent chromium (Cr+6) |
多溴聯苯 Polybrominated biphenyls (PBB) |
多溴二苯醚 Polybrominated diphenyl ethers (PBDE) |
|
| 內部配線 | ○ | ○ | ○ | ○ | ○ | ○ |
| 印刷電路板 | ○ | ○ | ○ | ○ | ○ | ○ |
| 馬達 | ○ | ○ | ○ | ○ | ○ | ○ |
| 開關 | ○ | ○ | ○ | ○ | ○ | ○ |
| 外殼塑料 | ○ | ○ | ○ | ○ | ○ | ○ |
| 備考1.〝超出0.1 wt %〞及〝超出0.01 wt %〞係指限用物質之百分比含量超出百分比含量基準值 Note 1:“Exceeding 0.1 wt %” and “exceeding 0.01 wt %” indicate that the percentage content of the restricted substance exceeds the reference percentage value of presence condition. 備考2.〝○〞係指該項限用物質之百分比含量未超出百分比含量基準值。 Note 2:“○” indicates that the percentage content of the restricted substance does not exceed the percentage of reference value of presence. 備考3.〝-〞係指該項限用物質為排除項目。 Note 3:The “−” indicates that the restricted substance corresponds to the exemption. |
||||||

Продукт сертифицировано згідно с правилами системи УкрСЕПРО на відповідність вимогам нормативних>Продукт сертифіковано згідно с правилами системи УкрСЕПРО на відповідність вимогам нормативних документів та вимогам, що передбачені чинними законодавчими актами України.

Safety Information
Keep the device away from water, fire, humidity or hot environments.
This appliance contains batteries that are only replaceable by skilled persons.
Do not attempt to disassemble, repair, or modify the device. If you need service, please contact us.
If the supply cord is damaged, it must be replaced by the manufacturer, its service agent or similarly qualified persons in order to avoid a hazard.
| Avoid replacement of a battery with an incorrect type that can defeat a safeguard. Avoid disposal of a battery into fire or a hot oven, or mechanically crushing or cutting of a battery, that can result in an explosion. Do not leave a battery in an extremely high temperature surrounding environment that can result in an explosion or the leakage of flammable liquid or gas; Do not leave a battery subjected to extremely low air pressure that may result in an explosion or the leakage of flammable liquid or gas. |
Children should be supervised to ensure that they do not play with the appliance.
The appliance is only to be used with the charging dock (Tapo RVD200) provided with the appliance.
The appliance contains a 5200mAh lithium-ion battery.
This appliance can be used by children aged from 8 years and above and persons with reduced physical, sensory or mental capabilities or lack of experience and knowledge if they have been given supervision or instruction concerning use of the appliance in a safe way and understand the hazards involved. Children shall not play with the appliance. Cleaning and user maintenance shall not be made by children without supervision.
Operating Temperature: 32 ~ 104°F (0 ~ 40℃)
Storage temperature: -4 ~ 140°F (-20 ~ 60℃)
When the battery is charged: 32 ~ 104°F (0 ~ 40℃)
Explanation of the symbols on the product label
Note: The product label is on the bottom of the product and its power supply. Symbols may vary from products.
| Symbol 符號解釋 |
Explanation 解釋 |
|---|---|
 |
Class II equipment Class II 設備 |
 |
Class II equipment with functional earthing 具有功能接地的Class II 設備 |
 |
Alternating current 交流電 |
 |
DC voltage 直流電壓 |
 |
Polarity of output terminals 輸出端子極性 |
 |
Indoor use only 僅限室內使用 |
 |
Dangerous voltage 危險電壓 |
 |
Caution, risk of electric shock 注意,有觸電危險 |
 |
Energy efficiency Marking 能源效率標示 |
 |
Protective earth 保護地線 |
 |
Earth 地線 |
 |
Frame or chassis 機架接地 |
 |
Functional earthing 功能地線 |
 |
Caution, hot surface 警告,表面高溫 |
 |
Caution 警告 |
 |
Operator’s manual 操作手冊 |
 |
Stand-by 待機 |
 |
“ON”/”OFF” (push-push) 「開」/「關」 ( 按壓式) |
 |
Fuse 保險絲 |
 |
Fuse is used in neutral N 保險絲用於中性線N |
 |
RECYCLING This product bears the selective sorting symbol for Waste electrical and electronic equipment (WEEE). This means that this product must be handled pursuant to European directive 2012/19/EU in order to be recycled or dismantled to minimize its impact on the environment. User has the choice to give his product to a competent recycling organization or to the retailer when he buys a new electrical or electronic equipment. 回收利用 本產品標示有「廢棄電氣電子設備(WEEE)」的分類回收標誌。這表示本產品必須依據歐盟指令 2012/19/EU 進行妥善回收或拆 解,以減少對環境的影響。 使用者可選擇將本產品交給合格的回收機構,或在購買新電器或電子設備時,交回給零售商進行回收處理。 |
 |
Caution, avoid listening at high volume levels for long periods 注意,避免長時間以高音量收聽 |
 |
Disconnection, all power plugs 斷開所有電源插頭 |