How to install Tapo Smart Switch Module (Tapo S110E)
*Note:
1. Before installing the S110E, please remember that you will be working with your home’s electricity. This can be dangerous, so if you are not familiar with basic electrical wiring, do not attempt to install it. Contact a licensed electrician for assistance.
2. In this article, AC stands for alternating current, and DC stands for direct current.
Introduction
The Tapo S110E relay module connects via Wi-Fi and Bluetooth, operating in dry or wet contact modes based on wiring.
Dry Contact
The load power supply operates independently from the S110E’s, allowing different supply voltages. Dry Contact is ideal for controlling low-power devices such as garage doors and access control systems.
Wet Contact
The load power is supplied by the S110E. They share the same power supply. Ideal for controlling devices that require the same power source, such as lights, smart outlets, and similar applications.
Appearance

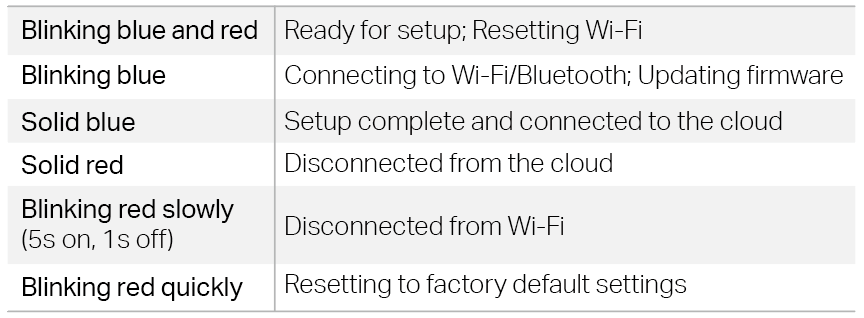
LED Status
Button Explanations
To prevent electric shocks, avoid touching the device after wiring. Use the device button only when powered by DC. Please use the Tapo app to set up, configure, or reset your device.
- Turn on/ off the device: Press once.
- Reset Wi-Fi while keeping the previous settings: Press and hold for 5 seconds.
- Restore factory settings: Press and hold for 10 seconds until the LED blinks red, then release it.
Wiring
Wiring Video
Before You Start
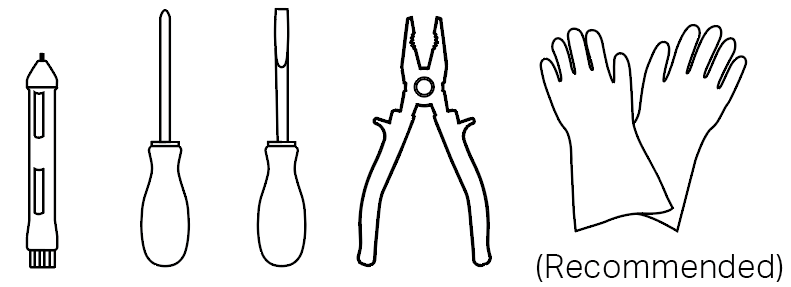
- Tools You’ll Need
|
|
|
|
- Get to Know the Wires
Different countries have different color codes for their electric wires. Refer to local regulations or Get to Know the Wiring Color Codes for wire color requirements.
Push Button Switch: A push button switch returns to its original position when released. Its current status cannot be identified based on its appearance.

Rocker Switch – Flip Mode: Each press toggles the load on or off, regardless of the switch position.

Rocker Switch – Fixed Position Mode: The load follows the switch position. It only turns on when the rocker is in the ON position.

If you still can't tell the switch type, you can change the switch type on the Tapo app to try which one meets your needs.
Basic Wiring Diagram
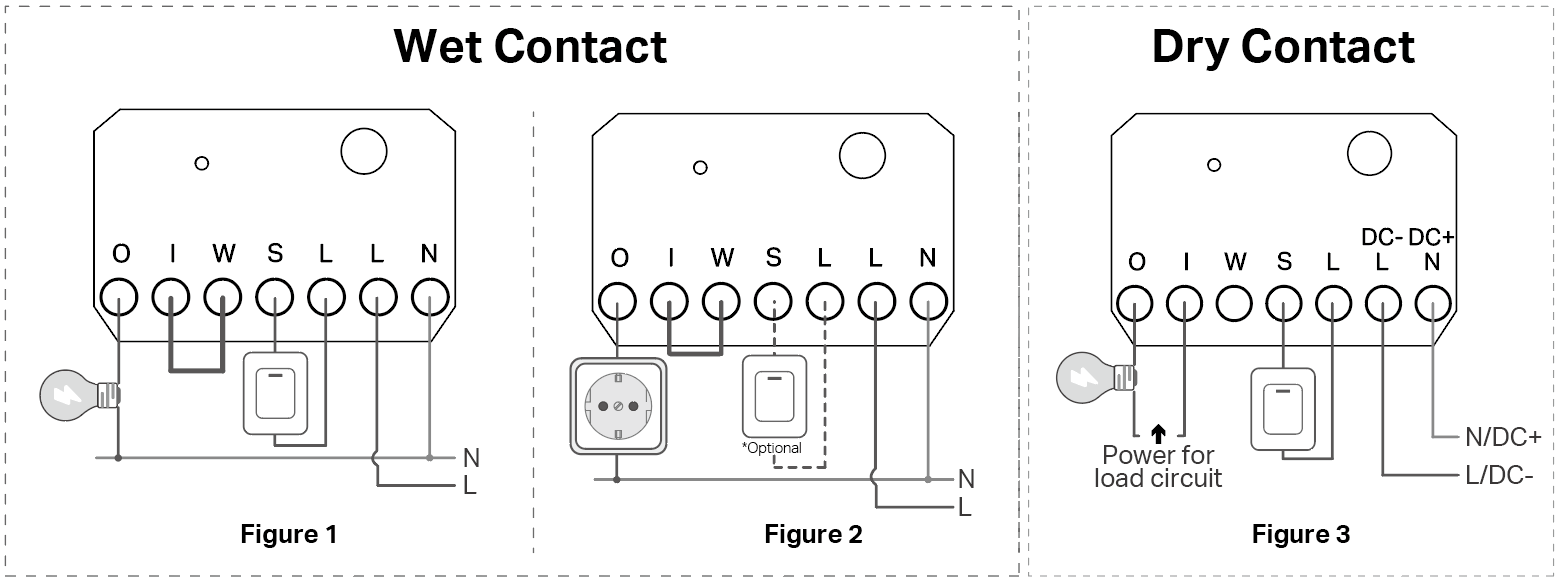
Wiring Instructions
|
Terminals |
Wet Contact (Figure 1, 2) |
Dry Contact (Figure 3) |
|
L |
For AC input, connect to the Line wire. |
|
|
N |
For AC input, connect to the Neutral wire. |
|
|
DC- |
For DC input, connect to the Negative terminal. Ensure that you verify the correct polarity and voltage. |
|
|
DC+ |
For DC input, connect to the Positive terminal. Ensure that you verify the correct polarity and voltage. |
|
|
W |
Short the "I" and the "W" terminals with the provided short wire. |
Should not be connected. |
|
I |
Short the "I" and the "W" terminals with the provided short wire. |
Connect the "O" and "I" terminals to the load circuit. The load power supply operates independently from the S110E’s. |
|
O |
Connect to the load device. |
Connect the "O" and "I" terminals to the load circuit. The load power supply operates independently from the S110E’s. |
|
S |
Connect to the traditional switch. The other end of the traditional switch is connected to the L (DC-) terminal. For details about the switch type, see Get to Know the Switch Type. Both push button switches and rocker switches are supported. Select the appropriate switch type when configuring the app. |
|
Note
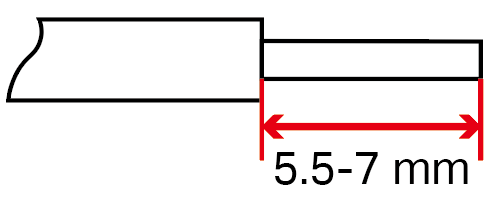
The wire strip length should be between 5.5 and 7 mm.
Set up your device via Tapo app
1. Get the Tapo app from the App Store or Google Play and log in.

2. Open the Tapo App.
3. Tap the “+” button in the app and select Add Device.
4. Select Switches/Buttons and then Tapo S110E.
5. Set the Wiring Mode to Dry Contact or Wet Contact as needed.
6. Turn on the circuit breaker. The LED indicator’s status should blink blue and red.
7. Follow the app instructions to complete the setup.
Set up your device via Matter
Due to compatibility issues with third-party applications, adding S110E via Matter may result in some features not being supported. For details, please refer to Unsupported features when adding the S110E device via Matter.
1. Complete the following basic configurations in the Tapo APP.
Device Settings Page: Work Mode, Switch Type
2. Go to Device Settings > Matter Setup Code to find the electronic Matter setup code.
3. Scan the Matter setup code on the third-party app.
4. Follow the app instructions to complete the setup.
For more information about Matter, visit Q&A for TP-Link Matter-enabled devices.
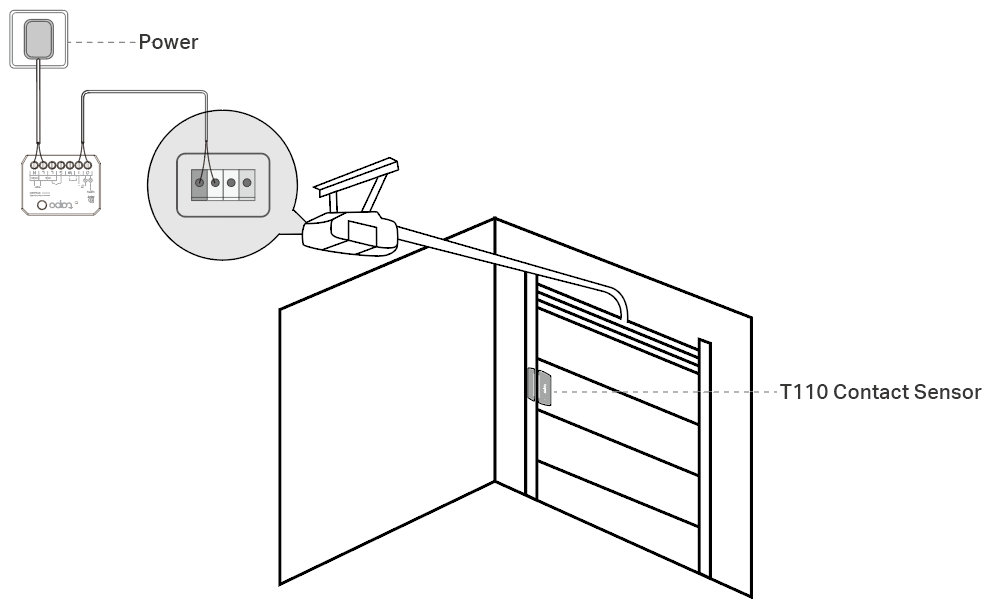
Garage Door Scenario Configuration Example
Step 1: Check garage door compatibility.
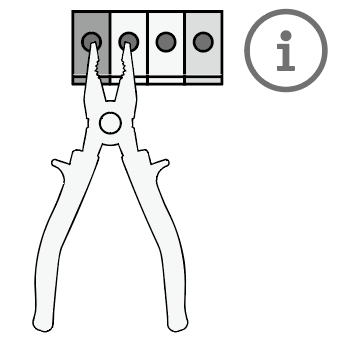
Use pliers to short the wall button terminals. If your garage door does not open or close, your garage door opener is not compatible.
Step 2: Wire your device according to the following figure.
When the switch module is powered by AC, distinguish the Line and Neutral wires carefully. Note that reversing the plug insertion direction can lead to the Line and Neutral wires being reversed.
When the switch module is powered by DC, the adapter voltage must be at least 24V.
Step 3: Power on your device and set it up via the Tapo app.
The work mode needs to be set to Dry Contact, and the trigger mode needs to be set to Pulse Mode.
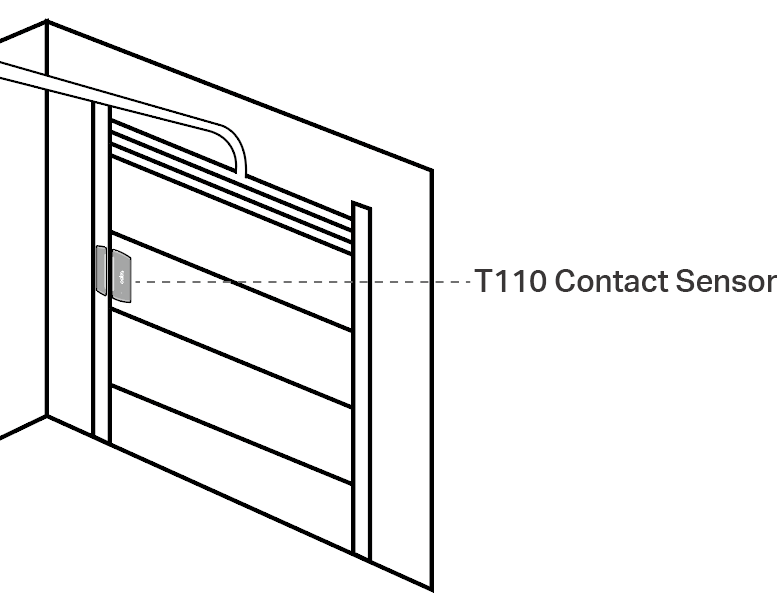
(Optional) Step 4: Install the T110 sensor.
It is recommended to use your switch module with the T110 contact sensor to detect the garage door status.
A Tapo Hub is required. Make sure your Tapo Hub’s firmware is updated to the latest version and is successfully set up via the Tapo app.
(Optional) Step 5: Set the PIN code (voice control security code).
You can go to Device Settings > Voice Control Security Code to set the PIN code in the third-party app.
After setting the PIN code, the third-party voice service will require a security code to control the device. It is recommended for high-security devices (like garage doors).
Matter Troubleshooting
Unsupported features when adding the S110E device via Matter
|
Features |
Support of Tapo |
Support of Matter |
||||
|
Alexa |
Google Home |
Apple Home |
SmartThings |
Home Assistant |
||
|
Schedule/ Timer |
√ |
× |
× |
× |
× |
× |
|
Away Mode* |
√ |
× |
× |
× |
× |
× |
|
Device Type change (in 3rd party)§ |
/ |
√
|
√
|
√
|
× |
√
|
|
Change Wi-Fi |
√ |
× |
× |
× |
× |
× |
|
Change Work Mode |
√ |
× |
× |
× |
× |
× |
|
Set Switch Type |
√ |
× |
× |
× |
× |
× |
|
LED OFF Control |
√ |
× |
× |
× |
× |
× |
|
Load State After Power Off♦ |
√ |
× |
× |
× |
× |
× |
|
Delayed Shut Off♦ |
√ |
× |
× |
× |
× |
× |
|
Auto-Off Timer♦ |
√ |
× |
× |
× |
× |
× |
|
Power Protection* |
√ |
× |
× |
× |
× |
× |
|
Charge Guard* |
√ |
× |
× |
× |
× |
× |
|
Firmware Upgrade |
√ |
× |
× |
× |
× |
× |
|
Energy Usage* |
√ |
× |
× |
× |
√
|
√
|
|
Solar Power Statistics* |
√ |
× |
× |
× |
× |
× |
*For wet contact only
♦For wet contact and dry contact (on/off mode) only
§The device type can be modified in the third-party app. For example, Apple Home allows changing Plug to Plug/Light/Fan.
Troubleshooting
1. Why can’t I see the energy monitoring feature in the Tapo app?
A: Energy monitoring is only available when the S110E is operating in wet contact mode. If the issue persists in wet contact mode, please get in touch with technical support.
2. I’m confused about whether to choose dry or wet contact mode. How do I decide?
A: You should use dry contact mode when the load device has its own power supply and is electrically isolated from the S110E, which is suitable for controlling garage doors and access systems, while wet contact mode is ideal for devices like lights and outlets where the S110E directly supplies power to the load, and if unsure, please refer to the in-app guidance or consult a qualified electrician.
3. Why does the switch type not work properly after setup?
A: If your physical switch does not behave as expected, you may have chosen the wrong type in the app—try switching between Push Button and Rocker.
4. Why does my load device flicker or fail to stay on?
A: Load flickering or instability is often caused by loose wiring, insufficient supply voltage (especially in wet contact mode), or a load type that is not compatible with relay-based control.
5. Why can’t I complete the Matter setup by scanning the sticker QR code?
A: If more than 15 minutes have passed since initial configuration in the Tapo app, the pairing window may have closed, so instead of scanning the sticker, please open the Matter code from the app to reactivate setup mode and complete the pairing.
6. Why can’t I see the control switch for my garage door device in the Alexa app?
A: When PIN code is enabled in Alexa, the device type is recognized as a garage door, which disables on-screen control in the Alexa app for security reasons. You can only operate it via voice command with the correct PIN. If you don’t enable the PIN code, the control toggle will appear in the UI.
Is this faq useful?
Your feedback helps improve this site.
TP-Link Community
Still need help? Search for answers, ask questions, and get help from TP-Link experts and other users around the world.