How to improve the connection stability of my Hub and its sub-devices
Introduction
This guide offers technical solutions to address connectivity issues between the Tapo Hub and its sub-devices, such as Sub-G cameras, doorbells, and Sensors. Common performance bottlenecks, such as latency, stuttering, or intermittent disconnections, can be effectively resolved by optimizing device placement, refining Wi-Fi configurations, or using Ethernet for a dedicated, stable link. Implementing these strategic adjustments will ensure superior signal integrity and an enhanced user experience across your smart home ecosystem.
Requirements
Download the Tapo App by visiting the Google Play Store, the App Store, or by scanning the QR code.

Troubleshooting
First, please check the signal between the sub-devices and the hub. You can find the signal strength in each sub-device’s Device Settings > Device Info.
Please check the signal strength and follow the guide below to get targeted measures to solve the problem.
Scenario 1: Poor Connection Signal between Router and Hub
Tapo Hub typically connects to the router via Wi-Fi or via an Ethernet cable. When connected to the router via Wi-Fi, the Wi-Fi signal will affect the performance of the hub and sub-devices. Here’s a guide to help you improve signal strength between the hub and the router.
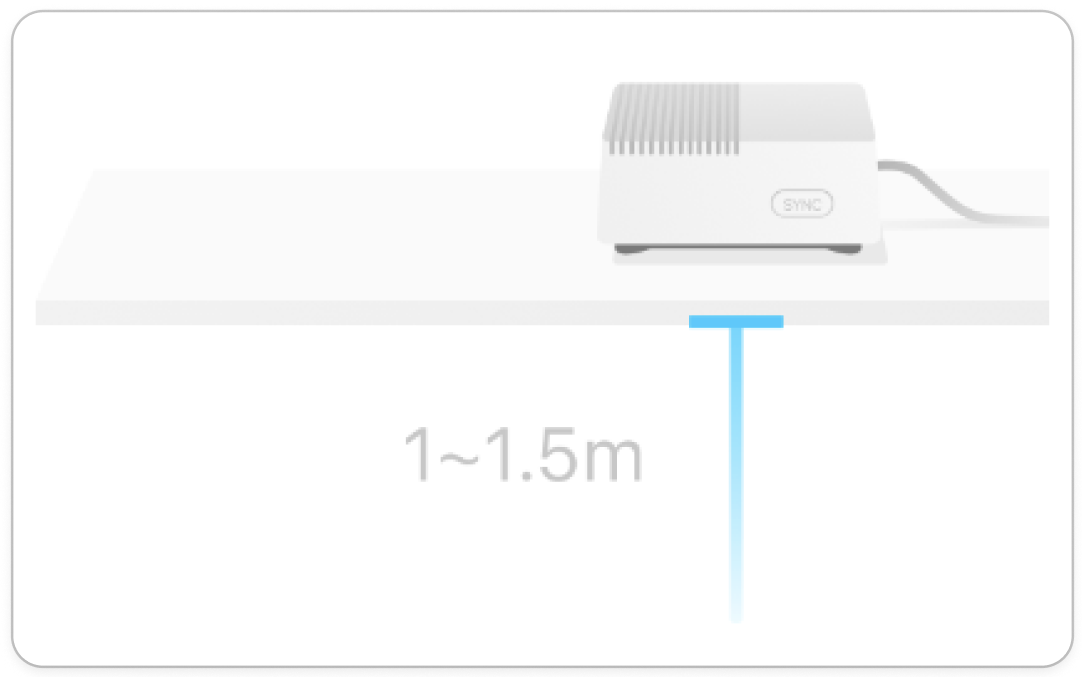
Tip 1: Select an appropriate installation position for the hub
- Place the Hub and the router on the same floor. Elevating the Hub to 1-1.5 meters in an unobstructed environment can improve connectivity.
- Avoid obstacles and minimize walls between the Hub and the router. Keep them as close as possible within the available range.
- Avoid placing the Hub near devices that may cause electromagnetic interference, such as wireless phones, microwaves, and Bluetooth devices.
Tip 2: Optimize wireless channel and bandwidth for Sub-G Camera/Doorbell
The Hub uses Wi-Fi to transmit data. Optimizing its channel settings helps reduce wireless interference. The hub’s Wi-Fi channel follows your home router’s channel, so please optimize the 2.4GHz Wi-Fi Settings on your home router. Generally, you can access the router's settings panel, log in, navigate to the 2.4GHz wireless frequency band, choose an optimal channel (1, 6, or 11), and set the channel width to 20MHz to reduce interference.
Tip 3: Use an Ethernet cable to connect router
While a wireless connection between the hub and router might be interfered with by other devices, a wired connection is the best choice for stable and high-speed network connectivity.
Scenario 2: Poor connection signal between the hub and its sub-devices
Tapo Hub's sub-devices need a good signal to transmit data to the Hub. Signal quality depends on the distance between the sub-devices and the Hub, as well as on any obstacles between them. You may refer to the following tips to get an optimal installation position for the sub-devices:
- Install sub-devices away from obstacles like walls and close to the router,
- Avoiding electromagnetic interference from devices like microwaves, TVs, and audio systems.
- Make sure your sensor can get a stable signal strength before installation. You can check in Device Info. If the signal at the sensor's location is good, proceed to fix it permanently using adhesive tape.
Get to know more details of each function and configuration please go to Download Center to download the manual of your product.
Is this faq useful?
Your feedback helps improve this site.


TP-Link Community
Still need help? Search for answers, ask questions, and get help from TP-Link experts and other users around the world.