How do I configure IP QoS on TL-R460&TL-R860?
This Article Applies to:
Why we need IP QoS?
Within a normal home network, the bandwidth is shared by all computers. This means any computer using high-bandwidth applications, for example torrent programs or other P2P software, will affect the other computers. This may also include negative effects on the performance of the entire network. How can we avoid this?
The answer is IP QoS, which is designed to minimize the impact caused when the connection is under heavy load. Using IP QoS, we can assign a specific minimum or maximum bandwidth for each computer, which means they have less impact on each other. Please follow the steps below to configure IP QoS.
How to configure IP QoS?
Note:
1. The feature of IP QoS on TL-R460 is added in the firmware which version is 080711. Please upgrade your TL-R460 to latest firmware firstly. To download the latest firmware of TL-R460, please refer todownload center.
2. You´d better set static IP Address on your local computers or set up Address Reservation on the router in order to manage easily.
Step 1 Open the web browser and type the LAN IP address of the router in the address bar and press Enter. The default IP address of TL-R460 &TL-R860 is 192.168.1.1.

Step 2 Type the username and password in the login page. The default username and password are both admin in lower case.
Step 3 Click IP QoS on left page and select Enable IP QoS.
Step 4 Choose bandwidth type and configure bandwidth apply.
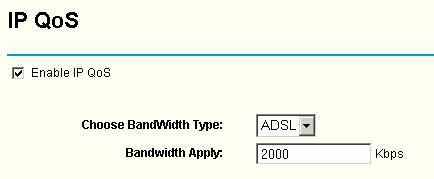
Bandwidth Type- ADSL or other. If your Internet connection is based on ADSL, please select it as ADSL. If not, please select other.
Bandwidth Apply- The real bandwidth your ISP provides to you. For example, if you apply 2Mbps bandwidth, please configure it as 2000Kbps.
Step 5 Type IP Address or IP range of your local computers in IP Range bar.

IP Range- Single IP address or IP address range. When you configure single IP address, the computer with configured IP address will get independent bandwidth. When you configure IP address range, all computers in the range will share given bandwidth.
Step 6 Select Mode.

Mode- Minimum Bandwidth and Maximum Bandwidth
Minimum Bandwidth- Assuring bandwidth, whenever, even though the traffic is very large in your network, as long as you have demand, it will support you assuring bandwidth at least.
Maximum Bandwidth- Limited bandwidth, when the network is idle, you can use idle bandwidth adequately, but it won’t exceed Maximum Bandwidth.
Step 7 Configure minimum bandwidth or maximum bandwidth as per your detailed demand.
Note:
1. The amount of Minimum Bandwidth in whole rules shouldn’t be larger than Bandwidth Apply.
2. The Maximum Bandwidth in each rule shouldn’t be larger than Bandwidth Apply.
Example
If you apply 1Mbps Bandwidth from your ISP and you have 4 computers, and you want each computer to have independent bandwidth for use, please configure IP QoS as diagram below.

Step 8 Click Save to save settings you have configured. IP QoS.
Get to know more details of each function and configuration please go to Download Center to download the manual of your product.
Is this faq useful?
Your feedback helps improve this site.
TP-Link Community
Still need help? Search for answers, ask questions, and get help from TP-Link experts and other users around the world.