How to set up Portal Authentication for guest network (new logo)
Imagine that you run a small shop and provide a guest network for your customers. You want to seize every opportunity to promote your shop, which makes portal authentication an excellent choice. Customers will be directed to a web page for access verification, on which your personalized promotion is displayed. Moreover, you can specify a web link so that the newly connected guest will be redirected to, for example, the official website of your shop.
1. Log in to the web-based interface of the router. If you don’t know how to do that, please refer to How do I log into the web-based Utility (Management Page) of TP-Link wireless router?
2. Go to Advanced > Guest Network. Focus on the Wireless section, and select Portal for Security.
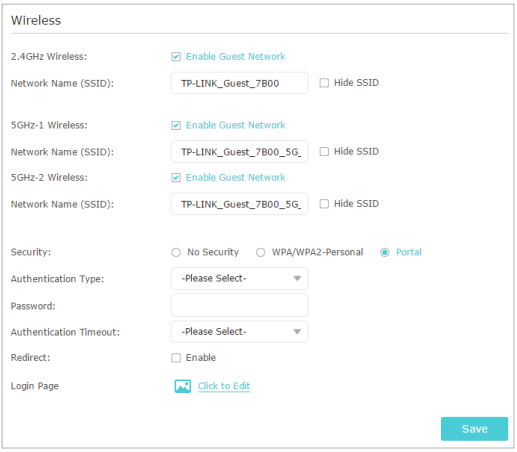
3. Select the Authentication Type.
• Simple Password – Specify a password for authentication (8-16 alphanumeric or “_” characters are allowed).
• No Authentication – Guests can access the network without any authentication.
4. Specify the Authentication Timeout. When a guest’s authentication expires, they have to reconnect to the network.
5. (Optional) Enable Redirect and enter the desired web link. The newly connected guest will be redirected to the website you have specified.
6. (Optional)You can click Click to Edit to personalize the authentication page, and click Save.
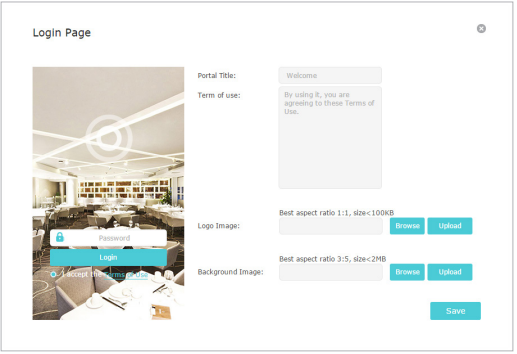
• Portal Title – Up to 31 characters.
• Terms of Use – Up to 1023 characters.
• Logo Image – Upload a JPG or PNG image (less than 100KB) to customize the logo.
• Background Image – Upload a JPG or PNG image (less than 2MB) to customize the background.
7. Click Save.
Get to know more details of each function and configuration please go to Download Center to download the manual of your product.
Is this faq useful?
Your feedback helps improve this site.


_Overview_normal_20230128023857v.png)
TP-Link Community
Still need help? Search for answers, ask questions, and get help from TP-Link experts and other users around the world.