How to prepare for using the tpPLC Utility
TP-Link tpPLC Utility lets you conveniently view and manage your TP-Link powerline devices via your computer. On the tpPLC Utility, you can add extra powerline adapters, modify wireless settings, upgrade firmware, and perform other functions. Please note that the product's features may vary slightly depending on the model and software version you have.
You can follow the instructions to prepare the tpPLC Utility on your computer:
Step 1. Download the utility and install it on your computer.
• For Windows Users
a) Go to your product's support page at https://www.tp-link.com and download the tpPLC Utility package (You may type in the model No. on the search bar).

b) Double-click the package and follow the setup wizard to install the utility.
Note: WinPcap (version 4.1.2 or higher) is required for the tpPLC Utility. If it is not found on your computer, the wizard will guide you to install it.
c) Wait until the installation is completed. The following icon will appear on your desktop. Icons may vary by model

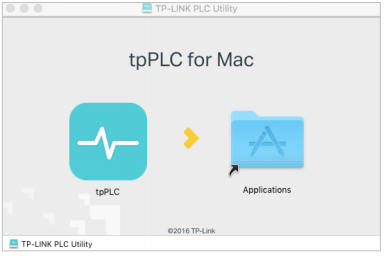
• For Mac Users
a) Go to the product support page at http://www.tp-link.com and download the tpPLC Utility package.
b) Double-click the package and drag tpPLC to Applications.
c) Find the utility in Launchpad or Applications. Click to open it.

Step 2. Double-click the tpPLC icon to open the utility.
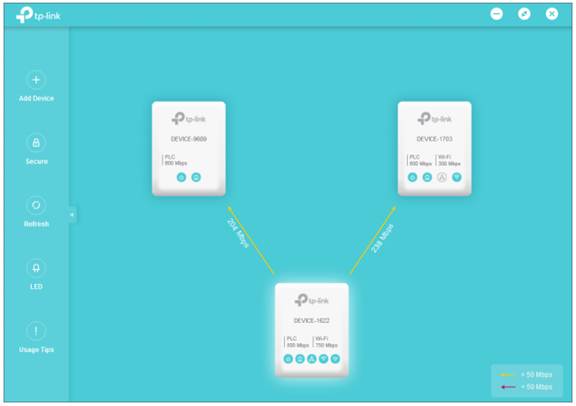
Step 3. Connect your powerline device to the tpPLC.
Simply connect your computer to a powerline device via an Ethernet cable or wirelessly. Then the utility will show you the powerline network, with the local powerline device at the bottom and remote powerline devices above it.
Note: You can click each device to view the current powerline data rates. If you see a red line between two devices, move either device to another location and check the rates again.
Looking For More
Is this faq useful?
Your feedback helps improve this site.

4.0_package_1568103121723d.jpg)
2.0_1508142049083d.jpg)
TP-Link Community
Still need help? Search for answers, ask questions, and get help from TP-Link experts and other users around the world.