How to set up Wireless Schedule on your TP-Link Router

Archer C5400 , Archer AX55 , Archer AX53 , Archer AX10 , Archer C6U , Archer C80 , Archer AXE95 , Archer AX10000 , Archer C3150 , Archer AX50 , Archer C6 , Archer C7 , Archer AX90 , Archer AX6000 , Archer C5400X , Archer C24 , Archer A20 , Archer A64 , Archer C60 , Archer C20 , Archer C64 , Archer AX1800 , Archer BE800( V1 V1.60 ) , Archer C59 , Archer AX4200 , Archer C3200 , Archer AX75 , Archer AX4400 , Archer AX73 , Archer A10 , Archer A54 , Archer AX4800 , Archer C50 , Archer C54 , Archer BE550( V1 V1.60 ) , Archer AXE75 , Archer A6 , Archer A7 , Archer AX72 , Archer AXE5400V , Archer AXE200 Omni , Archer GX90 , Archer A8 , Archer A9 , Archer C2300 , Archer AX23 , Archer AX3000 Pro , Archer AX20 , Archer C4000 , Archer AX21 , Archer AX3000V , Archer AXE300 , Archer AX1500 , Archer C90 , Archer AX11000 , Archer AX3200 , Archer AX3000
Recent updates may have expanded access to feature(s) discussed in this FAQ. Visit your product's support page, select the correct hardware version for your device, and check either the Datasheet or the firmware section for the latest improvements added to your product. Please note that product availability varies by region, and certain models may not be available in your region.
You can automatically turn off your wireless network at a specific time when you do not need the wireless connection. The different models may have different configuration pages, here we list 3 cases.
Case 1. Take Archer C4000 for a demonstration.
1. Visit http://tplinkwifi.net, and log in with the password you set for the router.
2. Go to Advanced > Wireless > Wireless Schedule page.
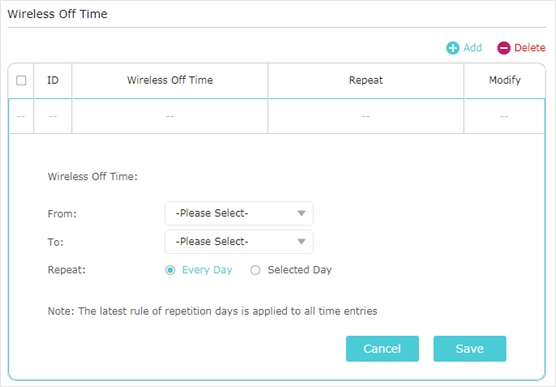
3. Enable the Wireless Off Time Schedule feature.
4. Click Add to specify the wireless off period during which you need the wireless off automatically and click Save.
Case 2. Take Archer C7 for a demonstration.
1. Visit http://tplinkwifi.net, and log in with your TP-Link ID or the password you set for the router.
2. Go to Advanced > Wireless > Wireless Schedule.
3. Select 2.4GHz or 5GHz to set a schedule.
4. Enable Wireless Schedule.
5.Click to schedule the wireless off time. Drag the cursor over the cells to choose the time periods during which you don’t need a wireless connection, and click Save.
6. Click Save.
7. If you want to set the wireless off time for the other band, repeat the steps above.
Case 3. Take Archer C80 for a demonstration.
1. Visit http://tplinkwifi.net, and log in with your TP-Link ID or the password you set for the router.
2. Go to Advanced > Wireless > Wireless Schedule.
3. Enable the Wireless Schedule feature.
4. Click Add to specify the wireless off period during which you need the wireless off automatically and click SAVE.
Note:
1. Make sure that the time of the router is correct before using this function. You can go to Advanced > System Tools > Time Settings to modify the time.
2. The wireless network will be automatically turned on after the time period you set.
To get to know more details of each function and configuration please go to Download Center to download the manual of your product.
คำถามที่พบบ่อยที่เกี่ยวข้อง
คำถามที่พบบ่อยนี้มีประโยชน์หรือไม่?
ความคิดเห็นของคุณช่วยปรับปรุงเว็บไซต์นี้
คุณกังวลอะไรเกี่ยวกับบทความนี้?
- ไม่พอใจกับผลิตภัณฑ์
- ยุ่งยากเกินไป
- มีชื่อเรื่องที่สับสน
- ใช้ไม่ได้กับฉัน
- คลุมเครือเกินไป
- อื่น ๆ
ขอบคุณ
เราขอขอบคุณสำหรับคำติชมของคุณ
คลิกที่นี่ เพื่อติดต่อฝ่ายสนับสนุนด้านเทคนิคของ TP-Link
เว็บไซต์นี้ใช้คุกกี้เพื่อปรับปรุงการนำทางเว็บไซต์ วิเคราะห์กิจกรรมออนไลน์ และมอบประสบการณ์การใช้งานที่ดีที่สุดแก่ผู้ใช้บนเว็บไซต์ของเรา คุณสามารถปฏิเสธการใช้คุกกี้ได้ตลอดเวลา คุณสามารถดูข้อมูลเพิ่มเติมได้ใน นโยบายความเป็นส่วนตัว ของเรา อย่าแสดงอีก
คุกกี้พื้นฐาน
คุกกี้เหล่านี้จำเป็นต่อการทำงานของเว็บไซต์และไม่สามารถปิดการใช้งานในระบบของคุณได้
TP-Link
accepted_local_switcher, tp_privacy_base, tp_privacy_marketing, tp_smb-select-product_scence, tp_smb-select-product_scenceSimple, tp_smb-select-product_userChoice, tp_smb-select-product_userChoiceSimple, tp_smb-select-product_userInfo, tp_smb-select-product_userInfoSimple, tp_top-banner, tp_popup-bottom, tp_popup-center, tp_popup-right-middle, tp_popup-right-bottom, tp_productCategoryType
แชทสด
__livechat, __lc2_cid, __lc2_cst, __lc_cid, __lc_cst, CASID
Youtube
id, VISITOR_INFO1_LIVE, LOGIN_INFO, SIDCC, SAPISID, APISID, SSID, SID, YSC, __Secure-1PSID, __Secure-1PAPISID, __Secure-1PSIDCC, __Secure-3PSID, __Secure-3PAPISID, __Secure-3PSIDCC, 1P_JAR, AEC, NID, OTZ
คุกกี้การวิเคราะห์และการตลาด
คุกกี้การวิเคราะห์ช่วยให้เราวิเคราะห์กิจกรรมของคุณบนเว็บไซต์ของเราเพื่อปรับปรุงและปรับการทำงานของเว็บไซต์ของเรา
คุกกี้การตลาดสามารถตั้งค่าผ่านเว็บไซต์ของเราโดยพันธมิตรโฆษณาของเราเพื่อสร้างโปรไฟล์ความสนใจของคุณและแสดงโฆษณาที่เกี่ยวข้องกับคุณบนเว็บไซต์อื่นๆ
Google Analytics, Google Tag Manager
_gid, _ga_<container-id>, _ga, _gat_gtag_<container-id>
Google Ads และ DoubleClick
test_cookie, _gcl_au
Meta Pixel
_fbp
Crazy Egg
cebsp_, _ce.s, _ce.clock_data, _ce.clock_event, cebs
lidc, AnalyticsSyncHistory, UserMatchHistory, bcookie, li_sugr, ln_or