How to configure 802.1Q tag VLAN on TL-SG3109
This Article Applies to:
A Virtual Local Area Network (VLAN) is a network topology configured according to a logical scheme rather than the physical layout. Hosts in the same VLAN communicate with each other as if they are in a LAN. However, hosts in different VLANs cannot communicate with each other directly.
Now let´s learn how to configure the tag VLAN on L2 managed Switches by the following example:
Network Topology:
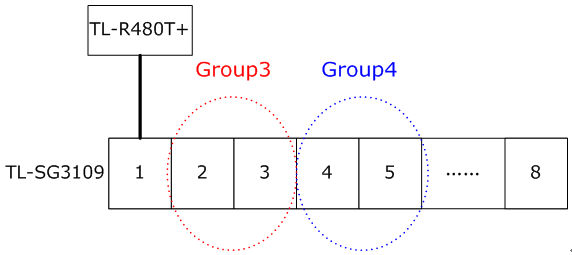
Here we take TL-SG3109 which has 8 ports as an example.
TL-SG3109 connects to Internet via TL-R480T+ in port 1. The computers of Group3 connect to port2&3 of TL-SG3109, computers of Group4 connect to port 4&5 of it.
Purpose:
1 The computers from Group3 can communicate with each other.
2 The computers from Group4 can communicate with each other.
3 The computers of Group3 and Group4 can’t communicate with each other.
4 Both the Group3 and Group4 can go to Internet through TL-R480T+.
VLAN Configuration parameters:
To achieve the purpose, we configure 3 VLANs:VLAN3,VLAN4,VLAN5
-To achieve Purpose 1, we create the VLAN3 (VLAN ID=3):
Port: port1,2,3.
Port VLAN Mode: General
Port Membership: Untagged.
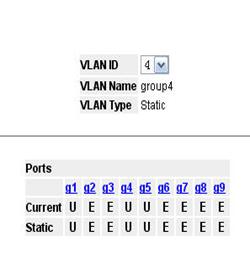
- To achieve Purpose 2, we create the VLAN4(VLAN ID=4):
Port: port1,4,5.
Port VLAN Mode: General
Port Membership: Untagged
In fact, we have already achieved the Purpose 3 by setting VLAN3 and VLAN4.
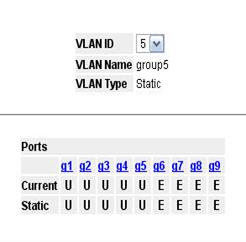
- To achieve Purpose 4, we create the VLAN5(VLAN ID=5):
Port: port1,2,3,4,5,
Port VLAN Mode: General
Port Membership: Untagged
-Setting PVID for each port.
|
Port
|
PVID
|
|
Port1
|
5
|
|
Port2
|
3
|
|
Port3
|
3
|
|
Port4
|
4
|
|
Port5
|
4
|
The frames forwarding by port 2&3 will be tagged based on PVID 3, so it will only accepted by ports belongs to VLAN 3.We can get the other PVIDs in a similar way.
Now ,let’s start to configure the switch:
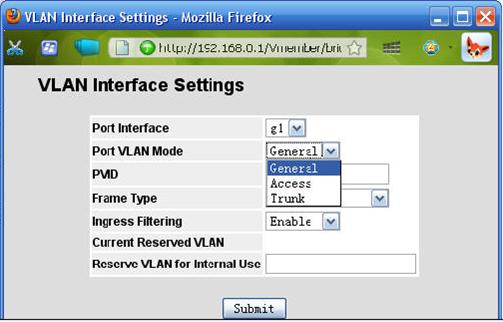
Part I:Setting Port VLAN Mode
Step 1:Please login the configuration page of the TL-SG3109 and go to:
Bridging Config->VLAN->Membership->Interface Settings- Port VLAN Mode:
Step2:Please adjust the mode from Access to General
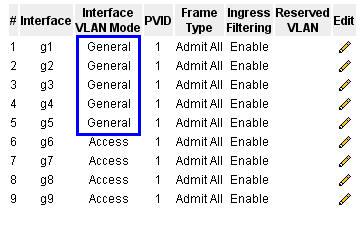
Step 3:Please adjust all the VLAN ports to general
Part II: Setting VLANs
Step 1:Creat the VLAN 3:

Step 2:Please also create VLAN4 and VLAN5
Step 3:Please add ports1,2,3 in VLAN 3.

Step 4:Please also add member ports in VLAN4 and VLAN5.
Part III: Setting PVIDs for ports.
Again, please go back to Interface Setting->PVID.
Please assign a PVID as per the table in VLAN Configuration parameters.
Finally, we get a summary like this:
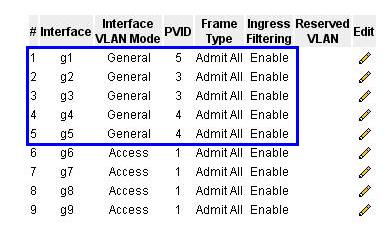
Now, the network will work as described in Purpose.
Get to know more details of each function and configuration please go to Download Center to download the manual of your product.
Is this faq useful?
Your feedback helps improve this site.
TP-Link Community
Still need help? Search for answers, ask questions, and get help from TP-Link experts and other users around the world.