How to Set Up Remote Management on TP-Link Routers
Remote management lets you access and manage your TP-Link router through a web interface when you are not physically on the same network. This is useful for troubleshooting issues from another location, adjusting settings while away, or helping others with their network. Keep in mind that enabling remote access does expose your router to the Internet, so it is important to use a strong password and limit access where possible. The TP-Link Tether app is a simpler and more secure alternative for remote router management. This guide covers how to enable and disable remote management on TP-Link routers, and how to restrict access to specific IP addresses.
Key Takeaways
- Remote management can be enabled or disabled on a TP-Link router through the web management interface.
- Once enabled, the router can be accessed remotely using its wide area network (WAN) IP address and a configured port number.
- Remote access can be opened to all devices or restricted to a specific IP address.
- The Web Management Port must be set to a value in the range of 1024 to 65535, or 80.
- Remote users can view most router settings but cannot modify Internet settings, IPv6, and Backup and Restore.
Important Considerations Before You Enable Remote Management
The TP-Link Tether App: A Simpler Option
Before enabling remote management through the web interface, consider using the TP-Link Tether app as an alternative. Tether lets you manage your router remotely after linking it to a TP-Link ID (also called a TP-Link cloud account). This method is generally simpler to set up and does not require opening your router to direct Internet access. You can also How to change wireless settings on TP-Link Wireless Router and block or unblock connected devices without ever touching the web interface.
Dynamic IP Addresses and DDNS
Your router's WAN IP address is usually a dynamic IP, meaning your Internet service provider (ISP) may change it over time. You can find the current WAN IP address by going to Basic > Network Maps > Internet in the router's web management page. If your ISP changes your IP address frequently, consider setting up Dynamic DNS (DDNS) on your router. DDNS assigns a fixed hostname to your changing IP, so you can always reach your router remotely without needing to track the current address.
Why You Might Enable Remote Management
Remote management through the web interface is useful in several situations:
- Troubleshoot network issues remotely: Diagnose and fix connection problems without needing to be on-site.
- Manage connected devices: View and control which devices are on your network from anywhere.
- Adjust settings on the go: Update Wi-Fi passwords, port forwarding rules, VPN settings, perform a firmware upgrade, or some other settings while away from home.
- Help family or others remotely: Walk someone through a network issue by accessing the router settings directly.
- Monitor network activity: Check connection status and traffic information without a physical visit.
Security Considerations
Enabling remote management means your router's admin interface is reachable from anywhere on the Internet. To reduce risk:
- Use a strong, unique admin password. Avoid using default or easy-to-guess passwords.
- Restrict access to a specific IP address rather than allowing all devices (see Step 3 below).
- Disable remote management when you no longer need it.
How to Set Up Remote Management on a TP-Link Router
Step 1: Log In to the Web Management Page
Log in to the web-based interface of your router. If you are unsure of the router's IP address, see how to find your TP-Link router's IP address.
Step 2: Go to the Remote Management Settings
Navigate to Advanced > System Tools/System > Administration and locate the Remote Management section.
Note:The remote management interface varies by model.
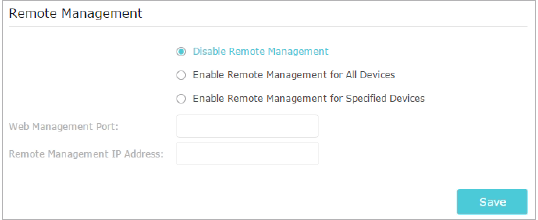
Step 3: Choose Your Remote Management Option
Select the option that best fits your needs, then click Save.
To disable remote management (default):
Select Disable Remote Management and click Save. This prevents any external device from accessing the router's admin panel over the Internet.
To allow all devices to manage the router remotely:
- Select Enable Remote Management for All Devices.
- Enter a Web Management Port number (valid range: 1024 to 65535, or 80).
- Click Save.
Once saved, any device on the Internet can access the router by navigating to http://[Router's WAN IP address]:[port number] in a browser. For example: http://113.116.60.229:1024.
To restrict remote management to a specific device:
- Select Enable Remote Management for Specified Devices.
- Enter a Web Management Port number (valid range: 1024 to 65535, or 80).
- Enter the IP address of the remote device in the Remote Management IP Address field.
- Click Save.
Only the device using that IP address will be able to access the router remotely, using the same http://[WAN IP]:[port] format.
Note: Remote users can view most settings in the web management page, but cannot modify Internet settings, IPv6, and Backup and Restore.
Este guia foi útil?
A sua resposta ajuda-nos a melhorar o nosso site.


