General Questions About Tapo T150
The Tapo T150 is a 5-in-1 smart sensor that integrates five detection functions into a single device, including:
- Human presence detection: Detects both movement and subtle micro-movements (e.g., slight body or head motion), allowing continuous presence recognition even when a person is stationary
- Motion detection: Identifies human movement within the configured detection range
- Temperature monitoring: Measures ambient temperature for climate-related automation scenarios
- Humidity monitoring: Tracks environmental humidity levels
- Ambient light sensing: Detects illumination levels to support lighting automation
By combining millimeter-wave radar and PIR sensing technologies, the Tapo T150 improves detection accuracy and reduces false triggers. The integration of multiple sensing capabilities allows a single device to replace several standalone sensors, enabling more flexible and efficient smart home automation.
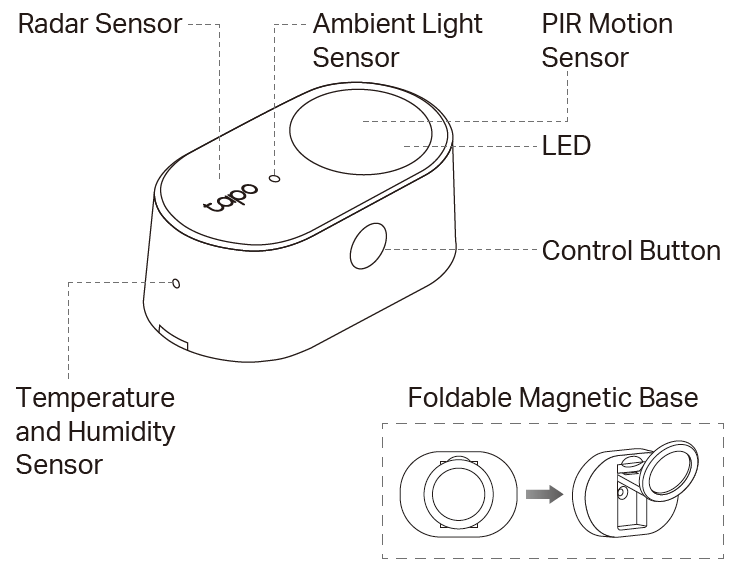
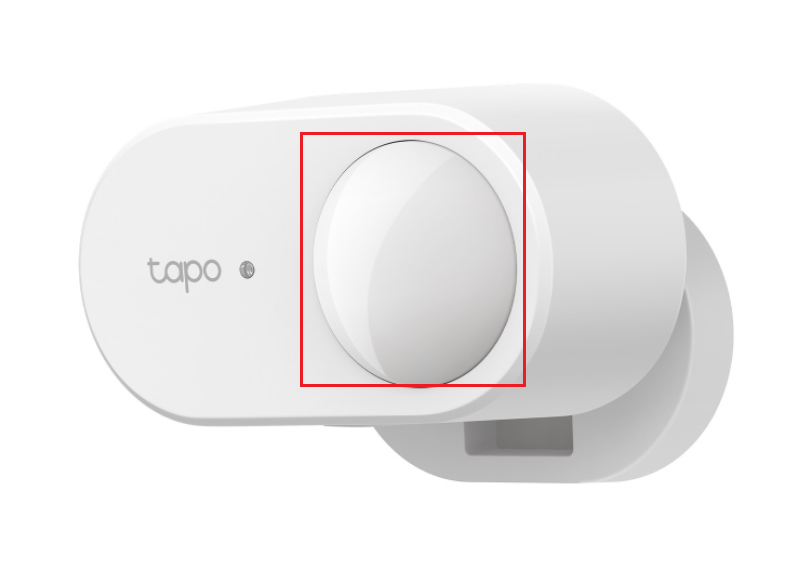
Control Button Explanation
- Double-press: Test the connection with the hub by checking if the hub sounds an alarm.
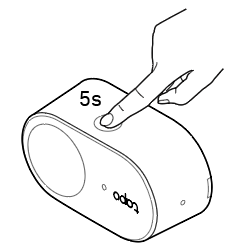
- Press and hold for 5 seconds: Reset and enter pairing mode.
LED Explanation
|
LED Status |
Indication |
|
Blinks quickly |
Ready to be paired |
|
Blinks slowly |
Updating firmware |
|
Blinks once |
Human presence/motion detected By default, this LED status is disabled. Go to Device Settings > LED Indicator in the Tapo App to enable it. |
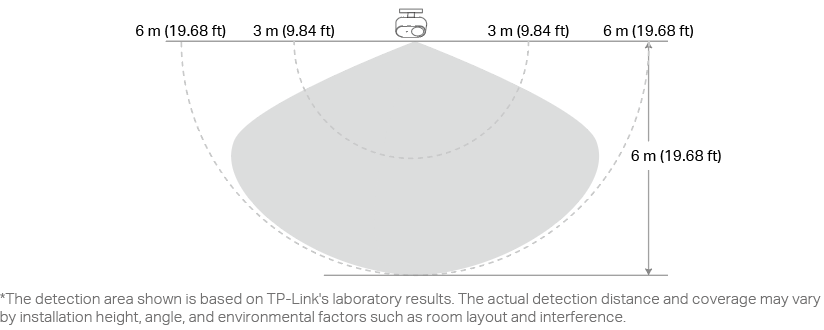
The Tapo T150 provides ultra-wide coverage with:
- A maximum detection distance of up to 19.7 ft (6 m)
- A wide detection angle of up to 130°
Here is a setup video for your reference:
Before You Start
A Tapo Hub is required. Make sure your hub’s firmware and Tapo app are up to date.

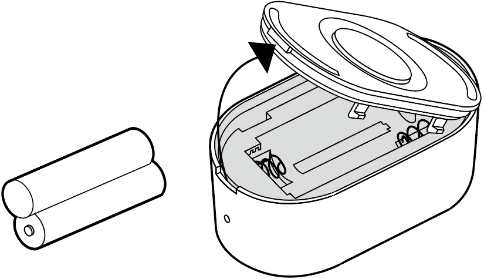
Step 1. Power Up Your Sensor
Remove the back cover and insert the batteries. The front LED should blink.
Step 2. Log In
Open the app, and log in with your TP-Link ID. If you don't have an account, create one first.

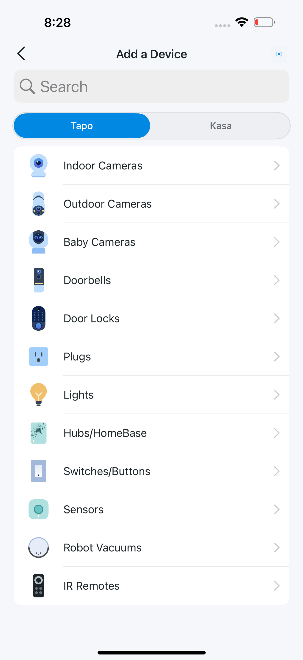
Step 3. Add Your Sensor
Tap the + button, choose Add Device in the app, and search for your model. Follow the app instructions to complete the setup.
Choose the right location to ensure accurate detection. Do not permanently secure the sensor until the installation location is confirmed.
- Ensure the sensor covers the entire activity area, with a clear and direct view preferred over maximum coverage distance.
- Install the sensor at a height of 1.2 to 1.8 meters above the floor.
- Install the sensor away from interference sources, and avoid diagonally facing large interference sources.
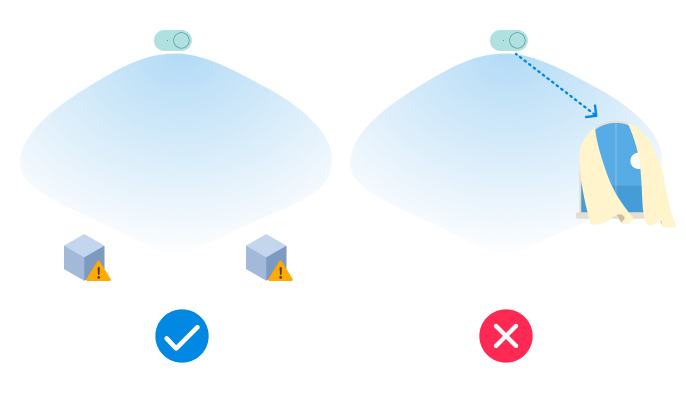
- Position the sensor close to the activity area, but away from the interference sources. Avoid placing your sensor at the same distance from both areas.
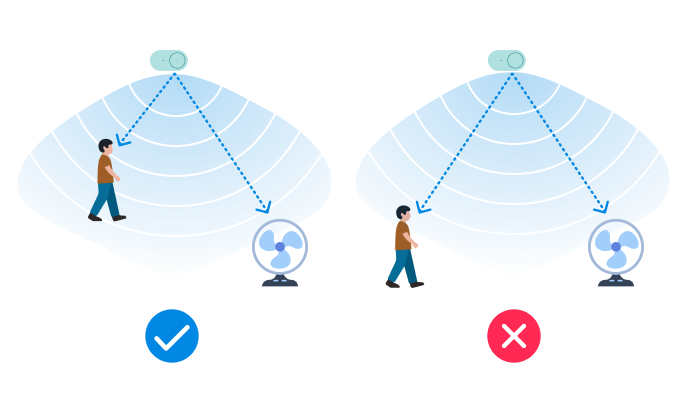
- For better radar detection, position the sensor to face the chest (heart area), where a person typically sits or remains still for extended periods.
Note: When a person is still or moving slightly, the minute chest movements of breathing are easier to detect. Aiming the sensor at the chest helps improve detection accuracy. Facing the back or side may result in missed detections.
- Avoid placing obstacles between the sensor and the monitored area, as obstructions may affect detection performance.
- Common interference sources are as follows. Adjusting sensitivity, detection range, and installation position can help reduce these effects.
- Moving objects: such as curtains and fans.
- Vibrating objects: such as refrigerators and washing machines.
- Reflective objects: Large metal surfaces, such as metal cabinets and mirrors (containing a metal coating).
- Convective objects: such as air conditioning vents and drafty windows.
Base Mounting Tips
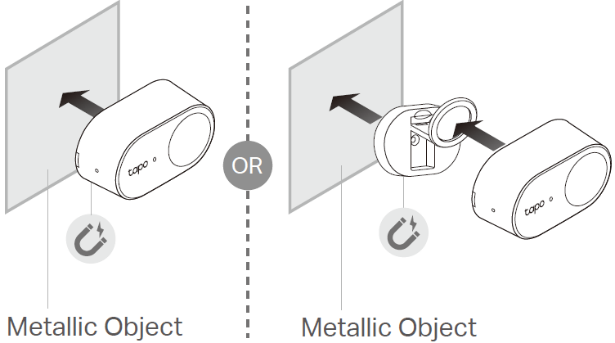
Option 1: Attach to metallic surfaces
Magnetically attach to metallic objects.
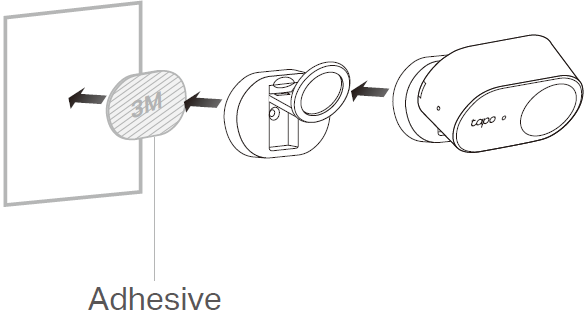
Option 2: Stick to a clean wall
1) Stick the base with the adhesive to the clean wall, and press it down for 15s to ensure the base is firmly attached.
2) Attach the sensor to the base.
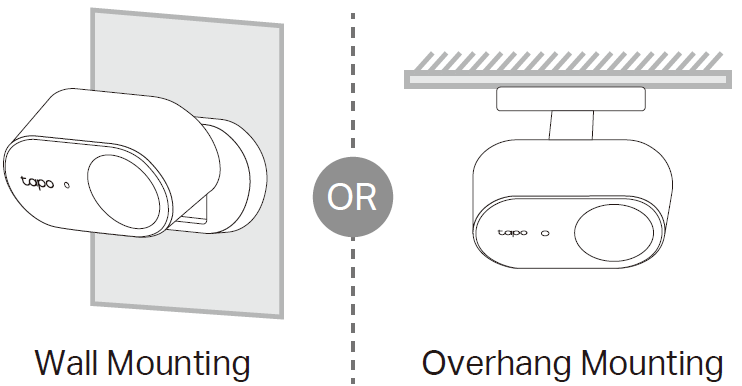
Option 3: Wall/Overhang mounting
1) Drill a 6mm diameter screw hole.
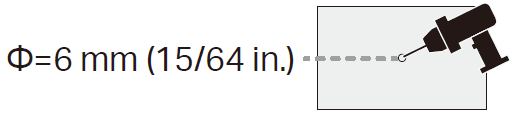
2) Insert the anchor into the hole, then use the mounting screw to affix the base over the anchor.

3) Attach the sensor to the base.
1. Open the Tapo app. Click the device card, then go to Device Settings > Human Presence Setting.
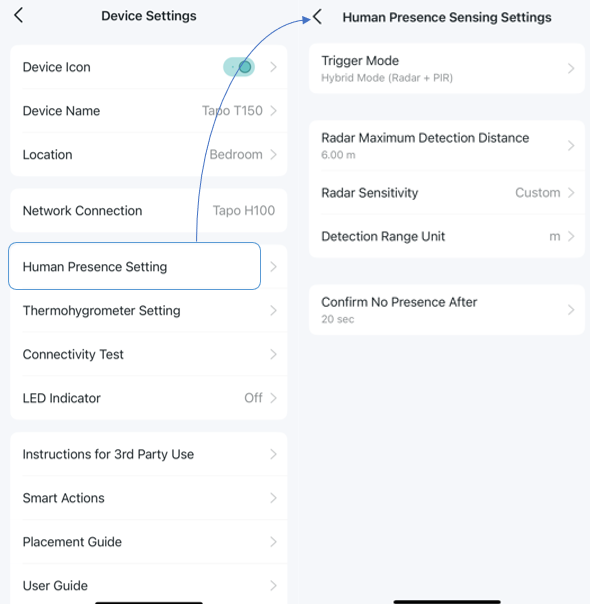
2. Set Human Presence parameters according to the following parameter descriptions.
- Trigger Mode
Hybrid Mode (Radar + PIR) is recommended.
- Radar Maximum Detection Distance
It is recommended to configure the detection range based on the actual environment:
a. Small spaces (e.g., less than 3 meters): Limit or disable distance zones beyond the room size to reduce interference and avoid false triggers from outside the intended area.
b. Reflection considerations: Radar signals are based on electromagnetic waves and may be reflected by walls or objects. In smaller spaces, reflections may cause detection beyond the actual physical distance.
c. Interference impact: Strong interference sources may affect multiple distance zones simultaneously. In some cases, reflections may also introduce interference at longer or multiple distance ranges. A sufficiently large interference source can impact several zones at once; for example, a source located at 2.5m (Zone 3) might also affect the 1.5–2.25m and 3–3.75m zones. Additionally, if a person is very close to the radar (Zones 1 or 2), the signal energy may rise significantly across all zones.
Adjusting detection range appropriately can help improve overall accuracy and stability. Please note that simply excluding the specific zone where a person is located does not guarantee the radar will not be triggered; it is also necessary to exclude the surrounding zones to minimize possible interference.
- Radar Sensitivity
Higher sensitivity makes it easier to detect people, but excessive sensitivity may result in false alarms. Lower it if false triggers occur; increase it if detection is weak.
- Confirm No Presence After x sec/min
a. If you want the sensor to exit the presence state more quickly, you can set a shorter Confirmation Time.
b. If you frequently enter and leave the space and want to avoid lights or automations turning on and off repeatedly, it is recommended to set a longer duration, such as 30 seconds or more.
Note: Setting the time too short may reduce detection accuracy. Unless an extremely fast response is required, a value of 15 seconds or longer is recommended.
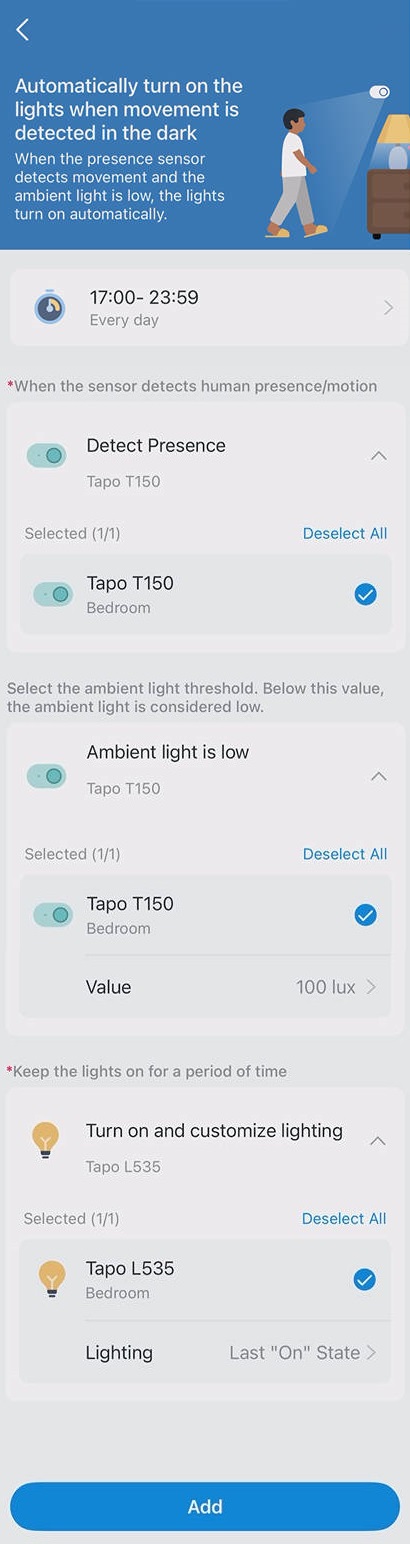
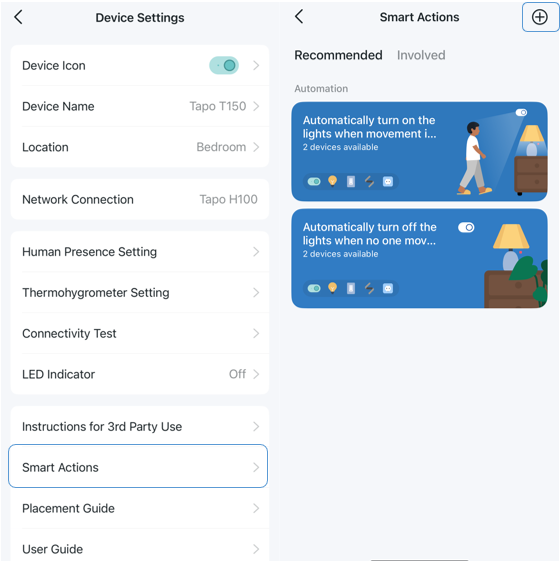
The sensor can work with other Tapo devices to automate your home. You can customize smart actions based on the templates.
Option 1: Edit based on the featured actions
1) Go to the Device Settings > Smart Actions page, and you will see the Featured Actions.
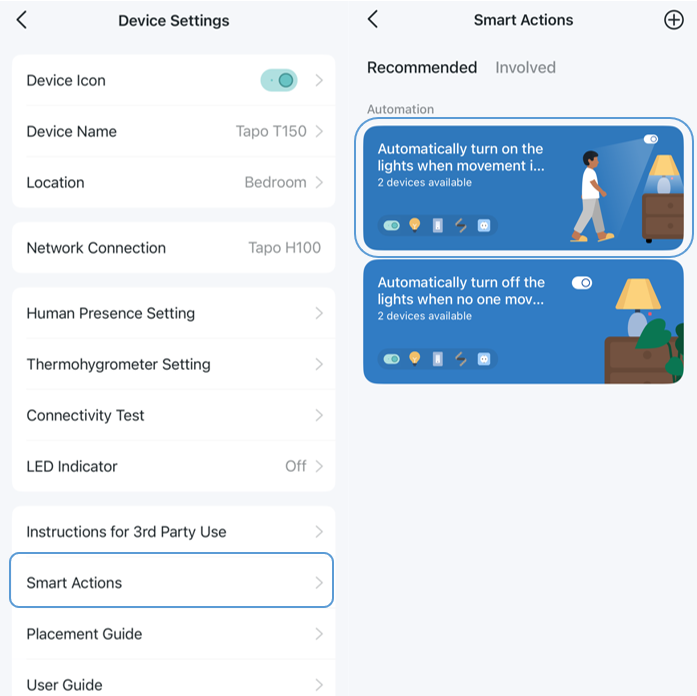
2) Tap on a featured action. Select the devices, set the time as needed, then tap Add to save changes.
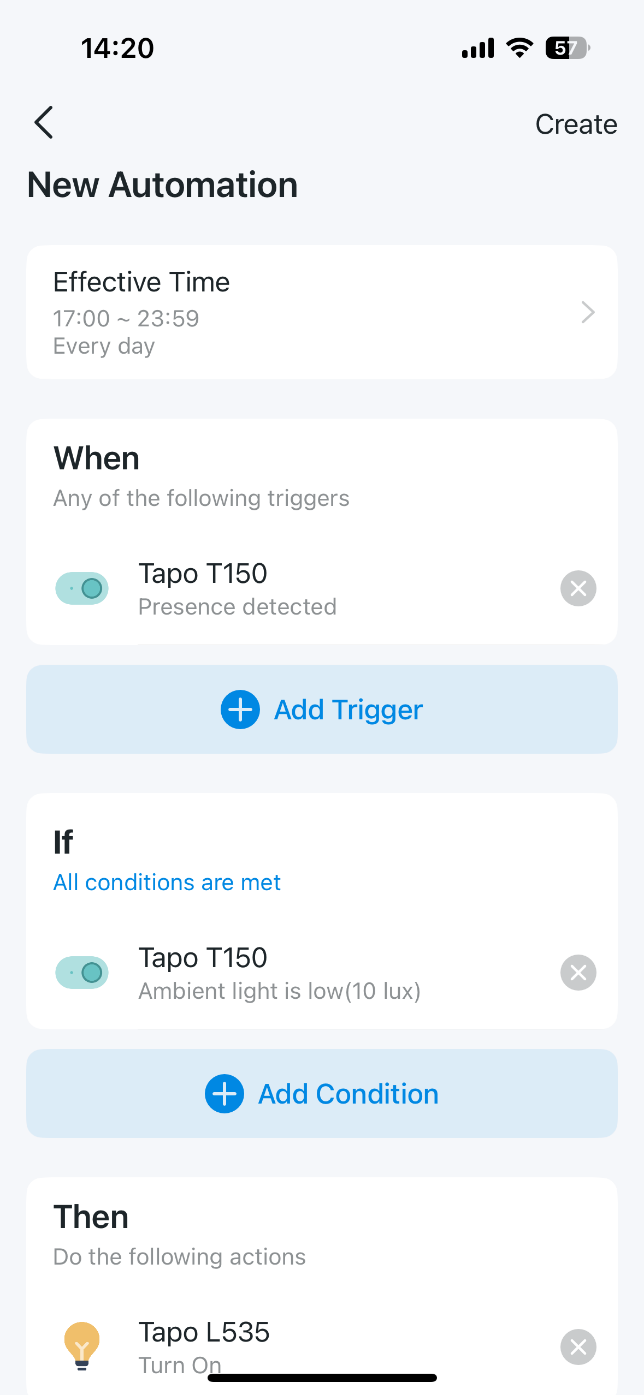
Option 2: Create your own actions
Go to the Device Settings > Smart Actions page, and tap + on the top right to add an action.
- For Shortcuts: Tap “+” to add actions, such as turning on a smart light.

- For Automation: Tap “+” to add triggers (When), such as when the sensor detects presence. Tap “+” to add conditions (If), such as when the ambient light is low. Tap “+” to add actions (Then), such as turning on lights.
Press and hold the Control button for 5 seconds until the front LED starts blinking.
Q1. Does the Tapo T150 support fall detection or sleep monitoring?
No. The Tapo T150 does not support fall detection or sleep monitoring.
While the advanced dual-sensor technology (PIR and millimeter-wave radar) of Tapo T150 is designed for high-precision presence detection, it cannot guarantee consistent monitoring during sleep. The extremely subtle movements of a sleeping person, such as breathing, can sometimes fall below the threshold required for reliable, continuous detection by the sensor. Therefore, the device may not consistently maintain a "Presence" status throughout a full sleep cycle.
Q2. What type of battery does the Tapo T150 use? What is the battery life?
The Tapo T150 is powered by two AAA (LR03) batteries.
Under normal usage conditions, the batteries can last up to 3 years, so there is no need to install the sensor near a power outlet. Actual battery life may vary depending on detection frequency, environment, and settings.
Q3: Which obstacles can PIR and radar signals penetrate?
- PIR Signals: PIR (Passive Infrared) has almost no penetration capability and cannot see through solid objects.
- Radar Signals: Radar can penetrate relatively thin non-metallic materials, such as thin glass, wooden doors, or even wooden partition walls.
- Detection Behavior:
- In Hybrid Mode, movement behind these thin obstacles typically will not cause false triggers; however, false triggers may occur in Radar Mode.
- Because the "Presence" state is maintained by radar, large movements behind thin obstacles can affect how quickly the sensor switches to "Absence". For example, if a T150 is facing a glass door, a person walking behind that glass door may still be detected as "Present".
Q4. How accurate is the ambient light sensor? Can it be used for professional light measurement?
The ambient light sensing feature of the Tapo T150 is designed primarily for smart home automation scenarios — such as triggering lights to turn on when a room becomes dark. The lux values reported by the sensor can vary significantly depending on the sensor's installation angle, position, and the surrounding environment. As a result, readings taken at different locations or angles within the same room may differ.
The T150's light sensor is not a professionally calibrated light measurement instrument. For applications that require precise or standardized illumination readings, a dedicated professional light meter is recommended.
Q1. How can I prevent presence from being lost when a person is stationary?
If presence is occasionally lost while someone remains still, please check the following:
- After first installation or relocation, the device requires up to 3 minutes of environment learning.
- Ensure the sensor is facing the main activity area.
- Make sure the sensitivity is not set too low.
- Avoid setting the Confirmation Time (Confirm No Presence After x sec/min) too short.
Q2. How can I adjust detection range or reduce false triggers?
How to maximize detection range
- Install the sensor slightly higher to achieve wider coverage.
- Ensure the maximum detection distance is set to 6 m in the Tapo app.
How to reduce false triggers
- Adjust Radar Sensitivity Automatically and simulate real usage conditions during setup.
- If using manual sensitivity settings, avoid setting sensitivity too high unless necessary.
- Be aware that in houses with thin walls (such as wooden structures), movement behind the wall or on upper floors may trigger presence detection.
Q3. Does installation angle affect detection performance?
Yes. For optimal performance, we recommend installing the sensor with the Tapo logo facing forward.
Improper vertical angles may negatively affect detection accuracy.
Q4. Can the Tapo T150 be installed on the ceiling?
We recommend installing the Tapo T150 on a higher wall or in a wall corner, rather than on the ceiling.
Ceiling installation may result in limited detection coverage compared to wall-mounted placement.
Q5. How can I avoid pet-triggered detection?
To minimize detection caused by pets:
- Reduce sensitivity if pets frequently move within the detection zone.
- Limit the detection range to avoid covering areas primarily used by pets.
Q6. Can the Tapo T150 be used in bathrooms?
The Tapo T150 is rated IP55 and can be used in humid environments such as bathrooms.
However, avoid direct water splashes or submersion.
Q7. Can multiple Tapo T150 sensors be installed in the same room?
It is not recommended to install multiple millimeter-wave presence sensors in the same area, as their radar signals may interfere with each other.
If multiple Tapo T150 units must be used, it is recommended to keep a distance of at least 6 meters between sensors.
Q1. How is the Tapo T150 different from traditional PIR sensors?
Compared with traditional PIR (Passive Infrared) sensors, the Tapo T150 offers several key advantages:
- Higher detection accuracy: The T150 uses a fusion detection mechanism, where both PIR and millimeter-wave radar must be triggered to confirm presence, effectively reducing false alarms.
- Presence detection: Unlike PIR sensors that only detect obvious movement, the T150 can maintain presence status by detecting subtle human movements (such as small body or head movements), even when a person is relatively stationary.
- Fewer false positives and missed detections: Improved resistance to environmental interference.
- Stronger penetration capability: Presence can still be maintained in scenarios such as being behind glass (for example, showering behind a glass door).
- More flexible sensitivity and range control: Users can adjust sensitivity and detection distance to suit different spaces.
- Better automation experience: Supports shorter exit delays, enabling lights or other devices to turn off more quickly when a space becomes vacant.
Q2. What do “Presence Sensitivity” and “Occupancy Sensitivity” mean?
These two parameters control how the sensor determines presence state transitions:
- Presence: Sensor Trigger Sensitivity
Defines the threshold for detecting a transition from absence to presence. Higher sensitivity makes the sensor more responsive to movement, but may increase the likelihood of false triggers.
- Occupancy: Continuous Presence Sensitivity
Defines the threshold for detecting a transition from presence to absence. Higher sensitivity improves detection of subtle movements (such as breathing), but if set too high, environmental noise may prevent the sensor from exiting the presence state.
Q3. Why does the sensor still show “Presence” after someone leaves the room?
This behavior is expected and can be influenced by several factors:
- The sensor switches to “Absence” only after the configured Confirmation Time (Confirm No Presence After x sec/min) has elapsed.
- After a person leaves, the radar energy data detected by the sensor decreases gradually, and it may take a few seconds for the signal to drop below the detection threshold.
- Environmental vibrations, airflow, or interference from behind walls or the device’s mounting surface may temporarily maintain the presence state.
- The radar has slight sensitivity to movement behind its mounting location. When combined with environmental reflections, this can sometimes be detected, preventing the sensor from switching to "Absence".
These mechanisms help prevent false absence detection caused by brief exits or minor environmental changes.
Q4. Why doesn’t the actual absence trigger time exactly match the set duration?
The Tapo T150 uses a continuous radar-based judgment process.
- Absence is confirmed only after a complete detection cycle with no valid human movement detected.
- If environmental interference occurs or someone briefly re-enters the detection area, the timer will restart.
As a result, the actual absence trigger time may slightly differ from the configured value.
Q5. Will the LED indicator flash when presence is detected?
By default, the LED indicator is disabled to minimize disturbance.
You can enable the LED in the Tapo app. Once enabled, the green LED will briefly flash whenever presence is detected.
Q6. How can I avoid false detection caused by pets?
The movement of pets can trigger both PIR and radar sensors, as they are detected as living entities.
To reduce such occurrences:
- Adjust sensitivity to a lower level if pets frequently move within the detection area
- Limit the detection range to exclude areas primarily occupied by pets.
If necessary, use hybrid detection mode (PIR + radar), and partially cover the sensor (the raised dome) with tape to reduce sensitivity in specific directions.
These adjustments can help minimize unwanted triggers while maintaining normal human detection.
Note: Please be aware that robot vacuums moving through the room may also be detected as "Presence" by the sensor.
Q7. Why may auto sensitivity adjustment fail in some environments?
In environments with fixed or continuous interference sources, auto adjustment may not complete successfully.
Examples include:
- Oscillating fans
- Other non-removable moving or vibrating objects
In such cases, it is recommended to manually adjust settings:
- Block specific distance zones affected by interference
- Fine-tune sensitivity to focus on the actual monitoring area
Installation Tip:
- In these cases, we recommend manually adjusting the sensitivity or shielding specific distance zones.
- For the best performance, always try to install the Tapo T150 as far away from potential interference sources as possible
Q1. Which smart home platforms are supported?
Through a Tapo Hub with Matter support, the Tapo T150 can integrate with third-party smart home platforms such as:
- Apple Home
- Amazon Alexa
- Google Home
- Samsung SmartThings
Third-party platform support is provided via the Tapo Hub, not directly by the sensor itself.
For specific parameters regarding third-party compatibility, you may refer to How to use Tapo T150 with third-party smart home platforms.
Q2. Does the Tapo T150 collect room or personal information?
No. The Tapo T150 uses millimeter-wave radar technology and does not collect:
- Audio data
- Video or images
- User behavior details
- Household layout information
The customer’s privacy is fully protected.
To learn more about each function and configuration, please visit the Download Center to download the manual for your product.
Buscar Más
¿Es útil este artículo?
Tus comentarios nos ayudan a mejorar esta web.
TP-Link Community
Still need help? Search for answers, ask questions, and get help from TP-Link experts and other users around the world.