What if my NAS device doesn’t work properly with the TP-Link ISP-customized Router?
Introduction
Some customers may encounter issues when trying to get a NAS device to work with a TP-Link router or switch. This FAQ article aims to list common problems you may encounter and provide troubleshooting guidance.
Requirements
- Prepare a Laptop/Windows PC/MacBook to check the NAS devices.
- Prepare an Ethernet cable (CAT5e or above) to connect the NAS to the TP-Link router.
Troubleshooting
Scenario 1: The corresponding port LED is not lit when the NAS is connected to the TP-Link router/switch
- Ensure that the physical connection between the NAS and the TP-Link router/switch is correctly connected.
- Change another Ethernet cable (CAT5e or above), and try another port on the router/switch.
- Set the port negotiation strategy of your NAS device to auto if you have the NAS configured for high-speed Ethernet.
Note: If you have used your NAS on a previous LAN and have changed its settings, you will need to access it through that previous network to change those settings, or perform a factory reset to reconfigure it within the TP-Link network. You may contact the NAS support for help if needed.
- Contact TP-Link support with the results above and the model of the NAS.
Scenario 2: Cannot access the NAS when it’s connected to the LAN port of a TP-Link Router/Switch while the corresponding port LED is lit up
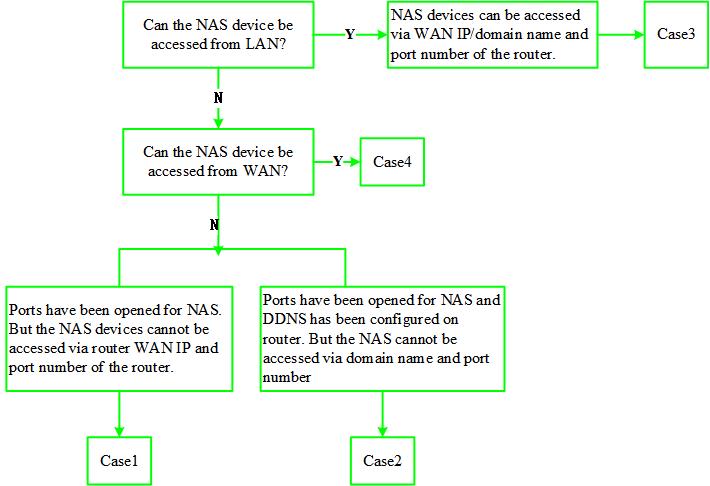
Case 1: The NAS devices cannot be accessed from the router’s LAN, but the NAS’s ip address is pingable on the PC connected to the Router.
Step 1. Disable the firewall on both the NAS and the PC.
Step 2. Follow the guidance to change public network to private network on your computer.
Step 3. Check whether there are any advanced settings, such as access control or MAC filtering, on the NAS device.
Step 4. Contact TP-Link support with the results above, and let us know the NAS model number.
Case 2: The NAS devices cannot be accessed from the router’s LAN, and the NAS’s ip address cannot be pinged on the PC connected to the Router.
- Check if the NAS device is in the same subnet as your PC.
- Make sure the PC is connected to the main network instead of the guest/multi network of the router.
- Contact TP-Link support with the results above and the model number of the NAS.
Case 3: The NAS can be accessed from the router’s LAN, but not via the router’s WAN IP and port number.
- Ensure your router has a public WAN IP address. You can check whether the WAN IP is a public IP via the website.
- Follow the guidance to enable the Virtual Server. Once the Virtual Server is successfully enabled on the router, the NAS can be accessed via the router’s WAN IP address and port number in this case.
Case 4: The NAS can be accessed from the router’s LAN, but not via the router’s domain name and port number.
- Check if the NAS can be accessed from the router’s WAN IP and port number; if it cannot, follow Case 3 above to do troubleshooting.
- If the Virtual Server is correctly configured, please ping the domain name on the PC to ensure the DDNS has been configured correctly.
Scenario 3: The speed is slow when the device accesses the NAS via the domain name from the LAN
- Contact NAS support and check the bandwidth supported by the NAS vendor.
- Open the ports for the specific services in Virtual Server settings on the router, as Scenario 2-Case 3. Please contact NAS Technical Support for information about port forwarding if needed.
- Contact TP-Link support with the results above and let us know the domain name and model number of your NAS.
Scenario 4: When a NAS device is connected to a TP-Link Router, the file Transfer speed is slow via wireless connection, while the wired speed is normal
- Connect your computer or smartphone to your router’s Wi-Fi, then run the Speedtest® without doing any high traffic behaviors, and also check the wireless link speed on computer.
- Try to change the channel and channel width on the router.
- Contact TP-Link support with the screenshots of the speed results and the model of the NAS.
Scenario 5: The router starts dropping connections or slowing down the speed after connecting to a NAS
- Turn off the NAS for a while and see if the problem persists.
- Adjust the orientation of the NAS and router and the distance between them.
- Try to change the channel and channel width on the router.
- Contact TP-Link support with the results above and the model number of the NAS.
Scenario 6: The NAS cannot be detected, or the files cannot be read when the NAS is connected to the USB port of the TP-Link router
In this case, the NAS device can be regarded as a normal hard drive. You could refer to the FAQs below for troubleshooting.
What should I do if TP-Link router cannot read files on my hard drive
What should I do if TP-Link router cannot detect my USB flash drive or hard drive
If there is no luck, please contact TP-Link support with the results above and the NAS model number.
Is this faq useful?
Your feedback helps improve this site.

_1.0-F_normal_20250401123748m.png)

TP-Link Community
Still need help? Search for answers, ask questions, and get help from TP-Link experts and other users around the world.