How to join an OneMesh Network with a Range Extender already set up

Archer C1200 , Archer C5400 , RE715X , Archer C4 , Archer C5 , Archer AX10 , Archer C2 , RE205 , Archer AX96 , Archer C6U , Archer C80 , Archer AXE95 , Archer C8 , Archer AX10000 , Archer C9 , Archer C6 , Archer C7 , Archer AX90 , RE330 , RE450( V4 ) , RE315 , Archer A20 , RE1500X , Archer C60 , Archer A1200 , Archer C64 , RE500XD , RE200( V4 ) , Archer C59 , RE500 , Archer C58 , Archer AX4200 , Archer C3200 , Archer A2 , Archer AX75 , Archer AX73 , RE765X , Archer A10 , Archer C50 , Archer C55 , Archer C54 , Archer AXE75 , RE190 , Archer A6 , Archer A7 , Archer AX72 , Archer A5 , Archer A8 , Archer A9 , RE230 , Archer AX68 , RE605X , Archer AX5300 , RE500X , Archer C4000 , RE580X , Archer AXE300 , Archer AX1500 , Archer AX60 , Archer AX3000 , RE220( V2 ) , Archer A2600 , Archer AX55 , RE505X , Archer C5200 , Archer AX53 , Archer AX51 , Archer A2200 , Archer C3150 , Archer AX50 , RE650 , Archer AX6000 , RE603X , Archer C25 , Archer C24 , RE700X , Archer A64 , Archer C2600 , RE1750X , Archer C21 , Archer C20 , RE780X , Archer AX1800 , Archer AX206 , RE300 , Archer C900 , Archer AX4400 , Archer C3000 , RE305 , RE600X , Archer C50
As actualizações recentes podem ter expandido o acesso às funcionalidades abordadas nesta FAQ. Visite a página de suporte do seu produto, selecione a versão de hardware correta para o seu dispositivo e consulte a Folha de dados ou a secção de firmware para obter as mais recentes melhorias adicionadas ao seu produto. Tenha em atenção que a disponibilidade do produto varia consoante a região e que determinados modelos podem não estar disponíveis na sua região.
Once the extender is connected to a TP-Link OneMesh router via web browser or WPS button, the extender will automatically join the router’s OneMesh network and copy the router’s wireless settings. You can manually join an OneMesh network during the configuration via the TP-Link Tether app. For more information about setting up the extender with OneMesh network, refer to the following FAQs:
How to Configure OneMesh Range Extender via Tether App
How to Configure OneMesh Range Extender via Web Browser
How to Configure OneMesh Range Extender via WPS Button
If you have already set up the extender before without joining the OneMesh network, choose one of the methods below to set up an OneMesh network:
Note: Before setting up an OneMesh network, it is recommended to enable Smart Connect on your host router to enjoy a seamless connection between dual-band networks.
Method 1: Via the TP-Link Tether App
1. Plug the extender into an electrical outlet next to your router, and then wait until the Power LED turns solid on.
Note: For safety, only plug the extender in upright direction.
2. Launch Tether App and select the extender you want to join the OneMesh network.
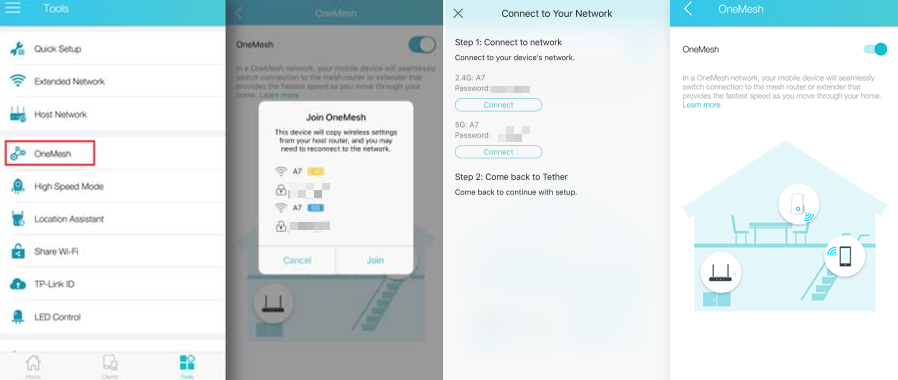
3. Go to Tools > OneMesh and enable OneMesh.
Note: If your host router does not support OneMesh, you need to reselect a host network which supports OneMesh function first. Go to Tools > Host Network and click Reselect Host Network, and then follow the app instructions to complete the configuration.
Method 2: Via a Web Browser
1. Visit http://tplinkrepeater.net, and log in with the password you set for the extender. Please refer to How to log into the Web GUI of my Range Extender?
2. Go to Settings > OneMesh and enable Join OneMesh.
Note: If your host router does not support OneMesh, you need to reselect a host network which can support OneMesh function first. Go to Settings > Wireless > Connect to Network and follow the instructions to complete the configuration.
Test whether OneMesh network is built successfully or not:
Follow the above instructions to join the OneMesh network. After that, you can view all the devices in OneMesh network in Basic > OneMesh on the web management page of your host router.
Get to know more details of each function and configuration please go to Download Center to download the manual of your product.
Este guia foi útil?
A sua resposta ajuda-nos a melhorar o nosso site.
Qual é a sua preocupação com este artigo?
- Insatisfeito com o produto
- Demasiado Complicado
- Título Confuso
- Não se aplica a mim
- Muito Vago.
- Outro
Obrigado
We appreciate your feedback.
Click here to contact TP-Link technical support.
Este site utiliza cookies para melhorar a navegação no site, analisar atividades online e proporcionar aos utilizadores a melhor experiência no nosso site. Pode opor-se à utilização de cookies a qualquer momento. Pode aprender mais informações no nosso política de privacidade .
Your Privacy Choices
Este site utiliza cookies para melhorar a navegação no site, analisar atividades online e proporcionar aos utilizadores a melhor experiência no nosso site. Pode opor-se à utilização de cookies a qualquer momento. Pode aprender mais informações no nosso política de privacidade .
Os cookies são necessários para o funcionamento do website e não podem ser desativados nos seus sistemas.
TP-Link
accepted_local_switcher, tp_privacy_banner, tp_privacy_base, tp_privacy_marketing, tp_top-banner, tp_popup-bottom, tp_popup-center, tp_popup-right-middle, tp_popup-right-bottom, tp_productCategoryType
Youtube
id, VISITOR_INFO1_LIVE, LOGIN_INFO, SIDCC, SAPISID, APISID, SSID, SID, YSC, __Secure-1PSID, __Secure-1PAPISID, __Secure-1PSIDCC, __Secure-3PSID, __Secure-3PAPISID, __Secure-3PSIDCC, 1P_JAR, AEC, NID, OTZ
Os cookies de analise permite-nos analisar as suas atividades no nosso website para melhorar e ajustar a funcionalidade do nosso website.
O cookies de marketing podem ser definidos através do nosso website pelos nossos parceiros publicitários de forma a criar um perfil dos seus interesses e mostrar-lhe anúncios relevantes em outros websites.
Google Analytics & Google Tag Manager
_gid, _ga_<container-id>, _ga, _gat_gtag_<container-id>
Google Ads & DoubleClick
test_cookie, _gcl_au
Meta Pixel
_fbp
Crazy Egg
cebsp_, _ce.s, _ce.clock_data, _ce.clock_event, cebs
lidc, AnalyticsSyncHistory, UserMatchHistory, bcookie, li_sugr, ln_or