How to Configure Repeater Mode on TL-WR700N
This Article Applies to:

Definition:The TL-WR700N copies and reinforces the existing wireless signal to extend the coverage of the signal. So the network name(SSID) and password don't change. This mode is especially useful for a large space to eliminate signal-blind corners.
Application: Large house,office,warehouse or other spaces where the existing signal is weak.
Physical Connection
Step 1:
Connect the WR700N directly to your computer’s Ethernet port by an Ethernet cable;
Step 2:
Power on the WR700N
.png)
Initial Computer Setup– For Windows 7, Vista & XP (For Mac OS X, please go to page3)
Step 1:
Windows 7&Windows Vista: Go to Start->Control Panel ->Network and Sharing Center
Windows XP: Go to Start->Control Panel->Network Connections
.jpg)
Step 2:
Windows 7: Go to Network andSharing Center>Change Adapter settings
Windows Vista: Go to Network andSharing Center>Manage Network Connections
Windows XP: (Go to Next Step)
.png)
Step 3:
Windows 7, Vista and XP: Right Click Local Area Connection >Select Properties > Double Click Internet Protocol Version 4 (TCP/IPv4) or Internet Protocol (TCP/IP) forWindows XP.
.png)
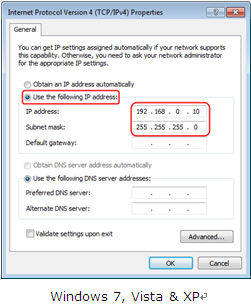
Step 4:
Windows 7, Vista and XP: Select “Use the Following IP address:”
Type the following information:
1. IP address: 192.168.0.10
2. Subnet mask: 255.255.255.0
Click OK to exit
Click OK again to apply the settings.
Initial Computer Setup– For Mac OS X
Go to the Apple->System Preferences->Network-> Highlight Ethernet ->Configure IPv4: Using DHCP with manual address
Input the IPv4 Address: 192.168.0.10
Click Apply
.jpg)
Access the Management Page
Open a Web Browser -> Type 192.168.0.254 in the address bar -> Press Enter
.jpg)
Enter the default User Name: admin
Enter the default Password: admin
Click OK
.jpg)
Run Quick Setup
Go to Quick Setup-> Click Next
.jpg)
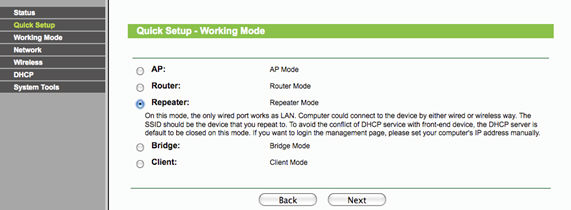
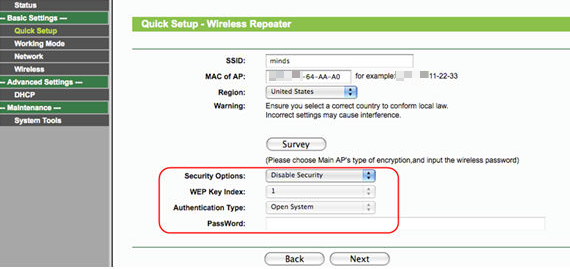
Select Repeater-> Click Next
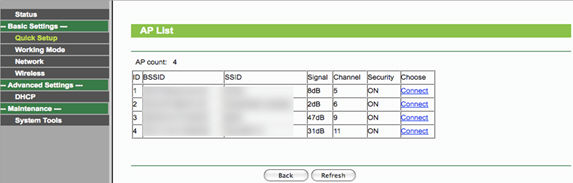
Click Survey
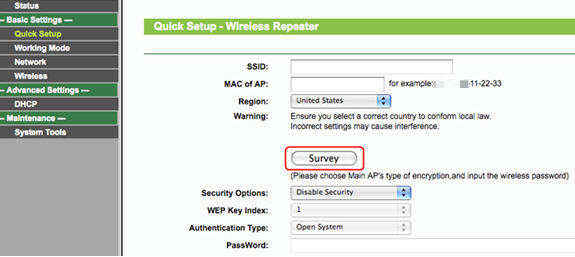
Locate your router network name under the SSID column -> Click Connect
Security Options: (Please match Security Options with your existing router)
Please refer to Original Equipment Manufacturer for details
Password: (Please match Security Password with your existing router)
Click: Next
Click: Reboot, and wait until it goes to 100% percent
.jpg)
Relocate the WR700N
You may now relocate the WR700N to a centralized location in order to make the most of Repeater Mode.
Congratulations! Your wireless signal has been enhanced. All your wireless devices have a more stable connection.
Final Computer Reversion– For Windows 7, Vista & XP (For Mac OS X, please go to page 9)
Step 1:
Windows 7&Windows Vista: Go to Start->Control Panel ->Network and Sharing Center
Windows XP: Go to Start->Control Panel->Network Connections
Step 2:
Windows 7: Go to Network and Sharing Center->Change Adapter settings
Windows Vista: Go to Network and Sharing Center->Manage Network Connections
Windows XP: (Go to Next Step)
Step 3:
Windows 7, Vista and XP: Right Click Local Area Connection ->Select Properties -> Double Click Internet Protocol Version 4 (TCP/IPv4) or Internet Protocol (TCP/IP) for Windows XP.
Step 4:
Windows 7, Vista and XP: Select “Obtainan IP address automatically” and “Obtain DNS server address automatically”
Click OK to exit
Click OK again to apply the settings.
Final Computer Reversion – For Mac OS X
Go to the Apple->System Preferences->Network-> Highlight Ethernet ->Configure IPv4: Using DHCP
Click Apply.
Get to know more details of each function and configuration please go to Download Center to download the manual of your product.
Is this faq useful?
Your feedback helps improve this site.
TP-Link Community
Still need help? Search for answers, ask questions, and get help from TP-Link experts and other users around the world.