How to waterproof Tapo wired outdoor security cameras
This Article Applies to:
You may refer to the video first:
Introduction
To prevent water ingress, install waterproof accessories and ensure all components are securely fitted with waterproof rings when installing Tapo Wired Outdoor Cameras.
Installation
Step 1. Install Waterproof Cable Attachments for the network interface
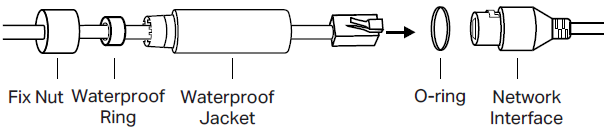
- Route the network cable through the following components in order: fix nut, waterproof ring, and then the waterproof jacket.
- Insert the waterproof ring into the waterproof jacket.
- Fix the O-ring to the network interface of the camera and connect the network cables.
- Attach the network interface to the waterproof jacket, then twist to lock. Rotate the fix nut to secure it to the waterproof jacket.
Step 2. Install Waterproof Seal for Power Connectors

To get to know more details of each function and configuration please go to Download Center to download the manual of your product.
Is this faq useful?
Your feedback helps improve this site.


TP-Link Community
Still need help? Search for answers, ask questions, and get help from TP-Link experts and other users around the world.