How to configure link aggregation on TP-Link Wi-Fi products
Note:The wireless router doesn't support link aggregation under the Access Point Mode.
Introduction: Some TP-Link Wi-Fi products have the Link Aggregation function which can aggregate two LAN ports together at most in order to get a higher LAN speeds up to 2Gbps theoretically.
If you build a NAS server in your local network and require a higher LAN speed than 1Gbps, the device environment could be set as below:

Note: Our products only support layer 2 LACP, don’t support layer 3 or layer 4 LACP.
Step 1:
Login the management page of the supported product.

If needed, you may refer to How do I log into the web-based Utility (Management Page) of TP-Link wireless router? for more detailed information.
Step 2:
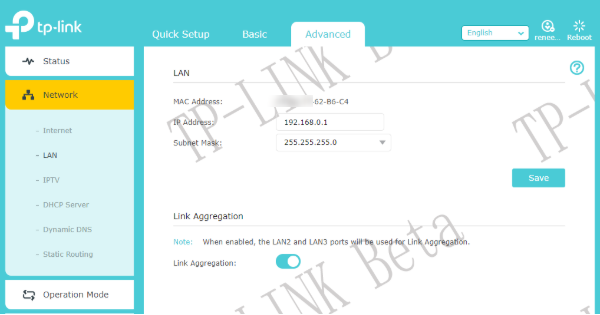
Click Advanced, Network, and then LAN.
Step 3:
Select your model number:
For Archer AX6000/AX11000/AX50/C5400X:
Enable the Link Aggregation function, select two LAN ports you want as aggregated ports (the aggregated ports are set to LAN2 and LAN3 on AX6000/AX11000 as default). Then click Save.

For Archer C5400/C3150:
Enable the Link Aggregation function, select the work mode as “LACP active” and select two LAN ports you want as aggregated ports. Then click Save.
For Archer C2300:
Enable the Link Aggregation function, select the work mode as “Static LAG” – “SRC MAC + DST MAC” and select two LAN ports you want as aggregated ports. Then click Save.
Step 4:
Configure the Link Aggregation function on the NAS server.
For Archer AX6000/AX11000/AX50/C5400X/C2300:
Select the work mode as “Balance XOR” or the mode works with a switch that supports Static Link Aggregation.
For Archer C5400/C3150:
Select the work mode as “IEEE 802.3ad Dynamic Link Aggregation” or the mode works with a switch supports IEEE 802.3ad (Dynamic) Link Aggregation (LACP, 802.1AX).
Step 5:
Connect the NAS server to our product as we showed at first.
Step 6:
Make sure the NAS server has received a valid IP address from our product normally. You could check it in DHCP Client List.

Is this faq useful?
Your feedback helps improve this site.


TP-Link Community
Still need help? Search for answers, ask questions, and get help from TP-Link experts and other users around the world.