How to set up Bandwidth Control on an Omada Gateway via the Omada Controller
Contents
Objective
This article introduces how to configure the Bandwidth Control feature on an Omada gateway via the Omada Controller.
Requirements
- Omada Gateways
- Omada Software Controller / Hardware Controller / Cloud Based Controller
Introduction
Bandwidth control allows you to effectively manage network traffic by setting rules limiting bandwidth for different data flows. This helps optimize network performance by ensuring a fair distribution of bandwidth across your network.
Configuration
Bandwidth control involves creating rules to limit the bandwidth for various types of network traffic. Here’s how you can configure the function using the ER706W gateway as an example.
Step 1. Configure the WAN Connection
Log in to the Omada Controller and navigate Settings > Wired Networks > Internet. In the WAN Ports Config section, click the Edit icon under the Action column for WAN2 (or select another WAN port based on your setup).

On the configuration page, set the Connection Type. It is set to Dynamic by default, but you can change it to PPPoE or another type as needed, based on your ISP requirements. Click Apply to save the modifications.

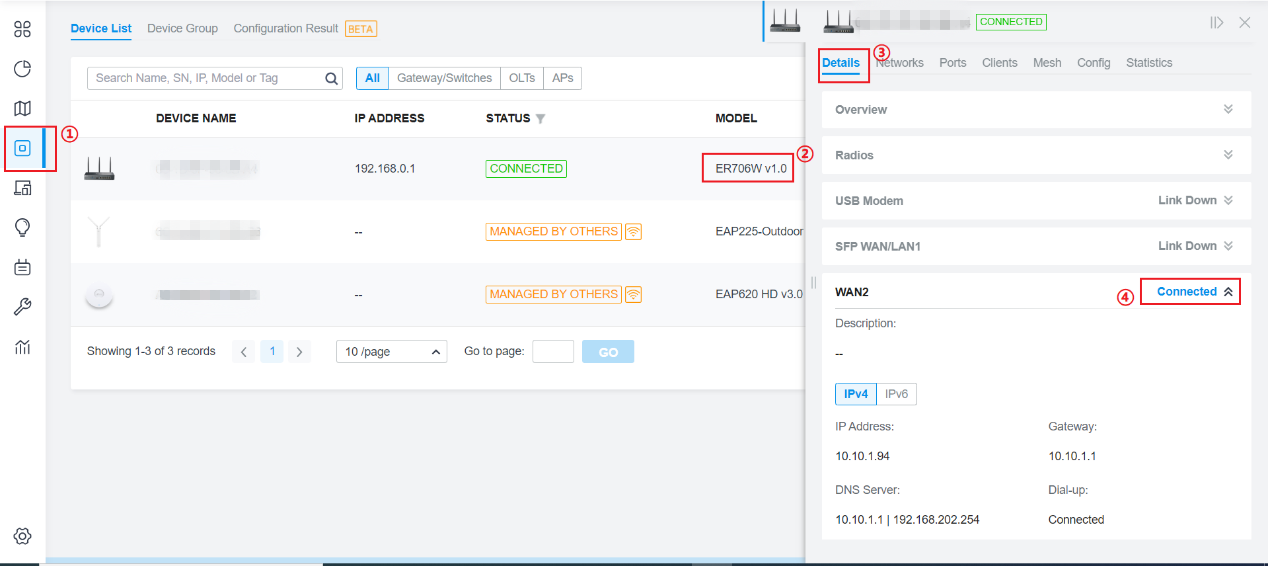
Go to the Devices page, select the ER706W device, and check the Details section to confirm that WAN2 is connected.
Step 2. Set Up an IP Group
Go to Settings > Profiles > Groups and click Create New Group.

Create an IP Group for a specific device or group of devices (e.g., management or parental control). Set the Type to IP Group, use an IP address like 192.168.0.100 as an example, and choose 32 for the Subnet. You can also add an optional Description and click Apply.

Step 3. Configure Bandwidth Control
Navigate to Settings > Transmission > Bandwidth Control and toggle the Bandwidth Control switch on (it is off by default). Click Apply to enable the global Bandwidth Control setting.
Click Create New Rule to set up a bandwidth control rule.

Create a rule and name it “manage_pc.” Set the Source Type to IP Group and select the IP group you created earlier (e.g., "manage_pc"). Choose WAN2 as the WAN interface and configure Upstream Bandwidth to 40 Mbps and Downstream Bandwidth to 80 Mbps. Set Mode to Individual, meaning these limits apply to each LAN client matching the IP Group criteria individually. Then click Create to save the rule.

Create another rule and name it “all_client.” Leave Source Type as Network (default) and set Network to ALL. Again, select WAN2. Configure both Upstream and Downstream Bandwidth to 50 Mbps each. Set Mode to Shared, meaning the bandwidth is shared among all LAN clients. Click Create to save the rule.

Here are the Bandwidth Control rules configured: 
Note: If you use multiple WAN ports for internet access, make sure to select the appropriate ports during the WAN configuration.

Verification
To verify the setup, perform a speed test on the management PC. The results should show an upload speed of less than 40 Mbps and a download speed of less than 80 Mbps.

Run speed tests simultaneously on two other client PCs. The combined upload speed should be below 50 Mbps, and the combined download speed should be below 50 Mbps.


Conclusion
You have now successfully set up Bandwidth Control on your Omada Gateway.
Get to know more details of each function and configuration please go to Download Center to download the manual of your product.
คำถามที่พบบ่อยนี้มีประโยชน์หรือไม่?
ความคิดเห็นของคุณช่วยปรับปรุงเว็บไซต์นี้


