-
Para Casa
Modems/ Gateways
A sua porta de acesso à internet
Expansão de Rede
Forma mais fácil para expandir e melhorar a sua rede
SOHO Switches
Conexões de qualidade através de cabo de rede
Adaptadores
Equipe os seus equipamentos com um acesso Wi-Fi mais rápido
Acessórios
Tudo o que precisa para um estilo de vida conectado
-
Smart Home
Câmaras Cloud
Um olhar no que é importante
Smart Plugs
Autonomia nos equipamentos domésticos
Smart Bulbs
Luz para todas as ocasiões
-
Para Empresas
JetStream Switches
Rede com fios de alta velocidade com e sem gestão L3
Omada EAP Series
Professional business Wi-Fi with centralized management
Omada Cloud SDN
A solução Wi-Fi Cloud inteligente para redes de negócios
Pharos Wireless Broadband
Ideal para redes Wi-Fi bridge ponto a ponto de longo alcance
SafeStream Router
Secure VPNs e Gateways de balanceamento de carga para negócios
-
Para ISP
DSL
Capable of high-speed network and integrated broadband applications
LTE/3G
Maintains internet access wherever you go.
PON
The leading technology for delivering gigabit Internet services
Powerline Adapter
Transforms electrical wiring to carry the network signal.
Range Extender
Easily expand your Wi-Fi coverage.
Switches
Boosts your business network with premium performance.
Business Wireless
Takes your enterprise Wi-Fi to new levels.
How to set up Auto Reboot of 3G/4G Wireless Router TL-MR3420 (new logo)?
Auto Reboot allows you to specify a time when the router will reboot automatically.
Note: TL-MR3420_V5 is used for demonstration in this article.
1. Visit http://tplinkwifi.net, and log in with the password you set for the router. For details, please refer to How to log in to the web-based interface of Wi-Fi Routers (new logo)?
2. Go to Advanced > System Tools > Reboot.
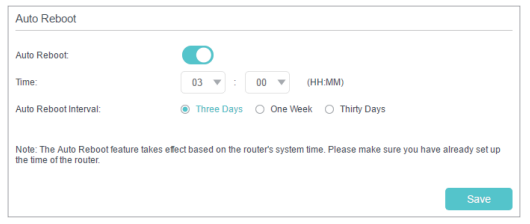
3. Enable Auto Reboot.
4. Specify the time at which your router will reboot and the Auto Reboot Interval.
Note: This feature takes effect based on the system time of the router. To set system time, refer to How to set up System Time of 3G/4G Wireless Router TL-MR3420 (new logo)?
5. Click Save.
Get to know more details of each function and configuration please go to Download Center to download the manual of your product.
A sua resposta ajuda-nos a melhorar o nosso site.