How to configure OneMesh Range Extender via WPS button
Follow the steps below to configure OneMesh range extender via WPS button. Here takes RE300 for demonstration.
1. Plug the extender into an electrical outlet next to your router, and then wait until the Power LED turns solid on.
Note: For safety, only plug the extender in upright direction as shown below.
2. Press the WPS button on your host router which supports OneMesh function, and then press the WPS button on the extender for 1 second within 2 minutes.
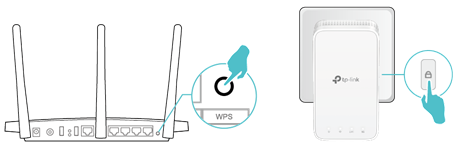
3. Wait until the signal LED changes from blinking to solid on, which indicates that the WPS connection is successful.
Note: If the LED does not turn solid on, try again or refer to How to Configure OneMesh Range Extender via Tether App or How to Configure OneMesh Range Extender via Web Browser.
4. Once the extender connects to an OneMesh router and it will automatically copy router’s wireless settings. For more information about OneMesh, refer to https://www.tp-link.com/onemesh/.
Note: It is recommended to enable Smart Connect on your host router to enjoy a seamless connection between dual-band networks. With Smart Connect enabled, your host router’s 2.4GHz and 5GHz share the same SSID (network name) and password. Refer to your host router’s user guide to enable Smart Connect.
5. Relocate your extender for optimal Wi-Fi coverage and performance.
1).Plug in the extender about halfway between your router and the Wi-Fi dead zone. The location you choose must be within the range of your router.
2).Wait for about 2 minutes until the Signal LEDturns solid white. If it doesn’t, relocate the extender closer to the router to achieve better signal quality.
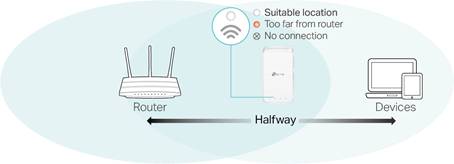
Tip: To minimize signal interference, please choose a location which is far away from Bluetooth devices and other household electronic devices, such as cordless phones, microwave ovens and baby monitors.
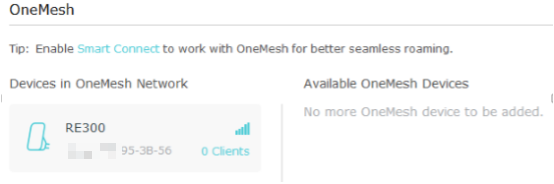
Test whether OneMesh network is built successfully or not:
Follow the above instructions to join the OneMesh network. After that, you can view all the devices in OneMesh network in Basic > OneMesh on the web management page of your host router.
Get to know more details of each function and configuration please go to Download Center to download the manual of your product.
Is this faq useful?
Your feedback helps improve this site.
-3.0-package_normal_1584497266805j.png)
8.0-F_normal_20231212005905m.png)

TP-Link Community
Still need help? Search for answers, ask questions, and get help from TP-Link experts and other users around the world.