TP-Link Range Extender Not Connecting to Router: Troubleshooting Guide
Your TP-Link range extender has been configured and the LED lights are on, but there is no internet access or the connection is unstable. This is a common range extender connection problem and the cause is usually an IP address or Dynamic Host Configuration Protocol (DHCP) configuration conflict between the extender and your main router. This guide also covers devices connected to the extender that show no network access.
There are two methods that can resolve the TP-Link extender connection problem. Use Method 1 if you do not know how to log in to your router's management page. Use Method 2 if you can access your router's management page directly.
Key Takeaways
- If your TP-Link range extender's LED lights are on but there is no internet or the connection is unstable, the cause is often an IP address or DHCP conflict between the extender and your main router.
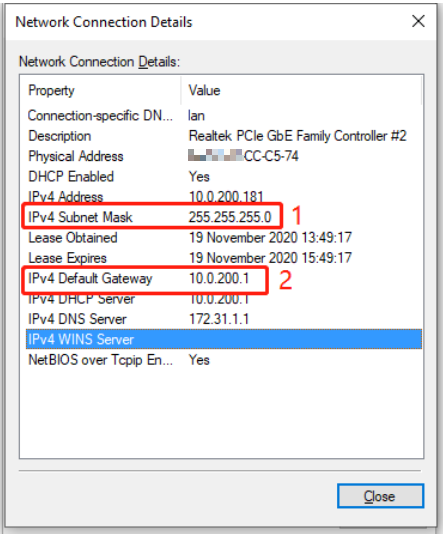
- Method 1 (no router access needed): Connect your computer to the main router, check your computer's IP connection details to find the IPv4 Default Gateway and DHCP Server values, then use those values to manually configure the extender's IP address and DHCP settings on the extender's management page.
- Method 2 (with router access): Log in to your router's management page to check its LAN IP address, subnet mask, and DHCP pool range, then configure the extender's management page to use a static IP address in the same subnet, with a DHCP pool that is a smaller subset of the router's DHCP range.
- When setting the extender's DHCP pool, it must be a smaller range than the main router's pool and must not overlap. For example, if the router's pool is 192.168.0.100–192.168.0.199, set the extender's pool to something like 192.168.0.150–192.168.0.199.
- Set the Address Lease Time on the extender to 1440 minutes. Set the Default Gateway and Primary DNS on the extender to the router's LAN IP address.
Method 1: If You Can't Access Your Router's Management Page
Please connect the computer to your main router with Ethernet cable or Wi-Fi, then check the IP info of your computer. If you don’t know how to check the IP address on a computer, please refer How to find IP address on your devices.
Configure these settings on the extender's management page:
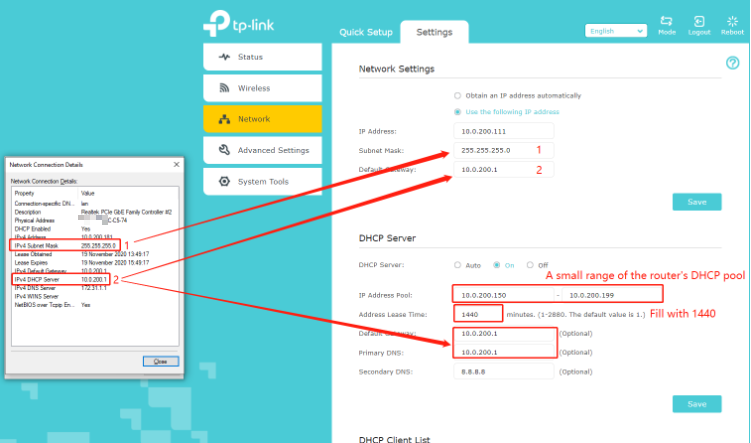
- Log in to the management page of your extender.
- Go to Settings > Network
Network Settings: choose ‘use the following IP address’
Save
DHCP server: choose ‘on’
IP address: 10.0.200.X
IP address pool: set a small range of the main router
(X.X.X.150-X.X.X.199)
Address Lease Time: 1440
Default Gateway & Primary DNS: Fill with the IPv4 DHCP Server shown in the Network Connection Details of the computer.
Save
Method 2: If You Can Access Your Router's Management Page
First, complete the standard range extender setup.
Then check the DHCP configuration info on the router’s management page:
The following example uses a TP-Link AX1600 router. If your router is not TP-Link, contact your router manufacturer's support for help finding these settings.
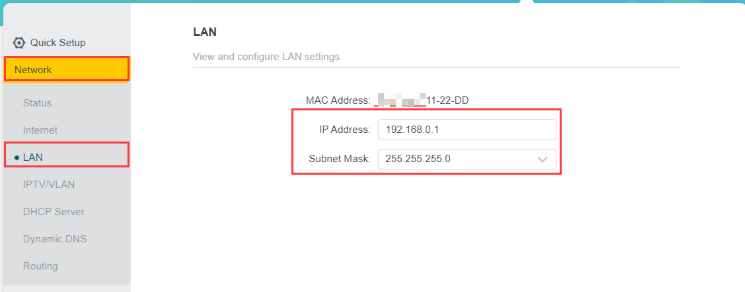
On this page, the IP address is the Router’s LAN IP
The subnet mask needs to be filled into the extender’s DHCP settings.
IP address (router’s LAN IP): 192.168.0.1 ①
Subnet Mask: 255.255.255.0 ②
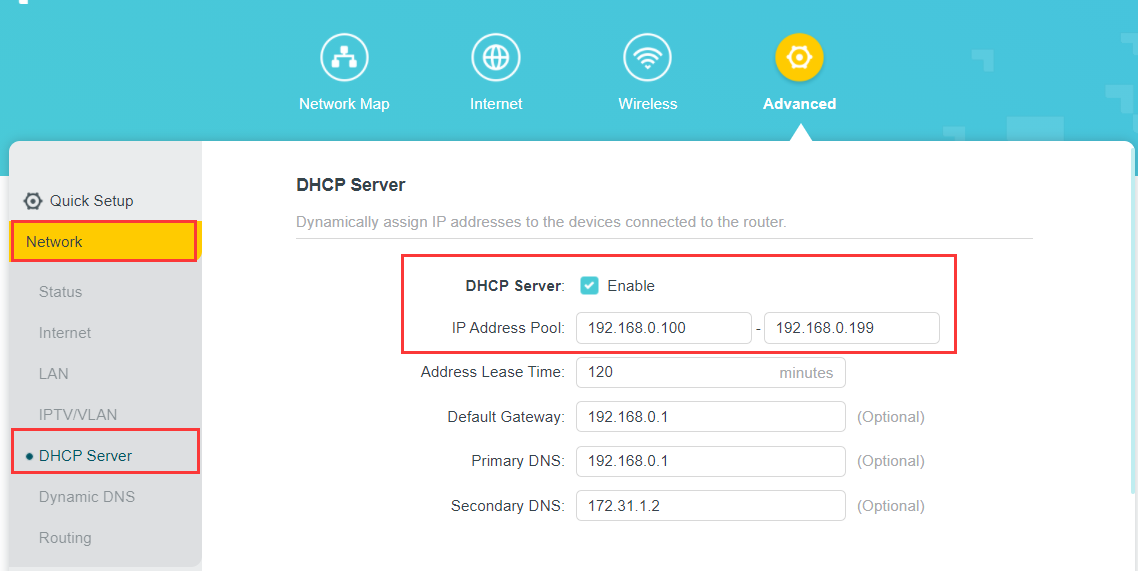
IP address pool: this range is set on the main router, on the extender, we need to set a smaller range than this one.
IP address pool (main router): 192.168.0.100-192.168.0.199
IP address pool (extender): 192.168.0.150-192.168.0.199 ③
All the info in red text, we need to configure on the extender’s management page.
Finally, set on Range Extender:
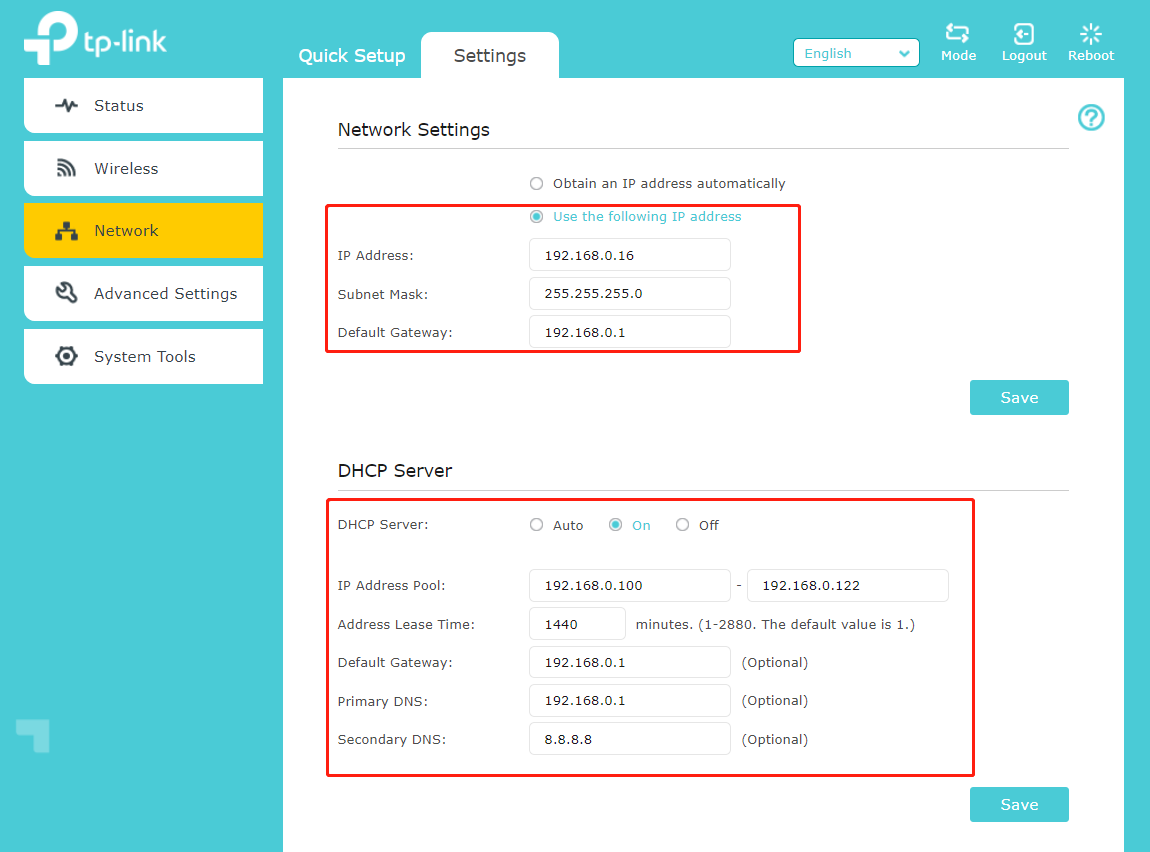
Step 1: Configure the Network Settings:
Choose the ‘Use the following IP address’
Enter the value from ① IP address (router’s LAN IP): 192.168.0.X
Subnet Mask: This subnet mask need to check on the main router (normally, the subnet mask is 255.255.255.0)
- Enter the value from ② Subnet Mask: 255.255.255.0
Default Gateway: Fill with the router’s LAN IP
- Enter the value from ① IP address (router’s LAN IP): 192.168.0.1
Step 2: Configure the DHCP Server:
Enable the DHCP server. (choose one)
IP address pool: this is the range of the clients’ IP, normally we need to check on the router’s management page. (a small range of the router’s IP pool)
- Enter the value from ③IP address pool (extender): 192.168.0.150-192.168.0.199 (Smaller than the router’s DHCP pool)
Address Lease time: the IP that the client got can be used for xxx minutes. (set 1440 in this case)
Default Gateway: Fill with the router’s LAN IP
- Enter 1440 in the Address Lease Time field
If it still cannot fix the problem, please contact Support for help.
Полезен ли беше този ЧЗВ?
Вашите отзиви помагат за подобряване на този сайт.


