Omada SDN Controller User Guide

Monitor and Manage the Clients

This chapter guides you on how to monitor and manage the clients through the Clients page using the clients table and the properties window and the Hotspot Manager system. To view clients that have connected to the network in the past, refer to View the Statistics During the Specified Period with Insight . This chapter includes the following sections:

? 7. 1 Manage Wired and Wireless Clients in Clients Page

? 7. 2 Manage Client Authentication in Hotspot Manager

7. 1 Manage Wired and Wireless Clients in Clients Page

7. 1. 1 Introduction to Clients Page

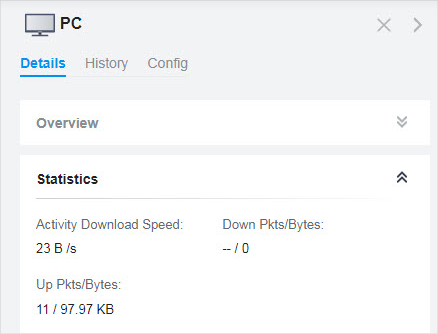
The Clients page offers a straight-forward way to manage and monitor clients. It displays all connected wired and wireless clients in the chosen site and their general information. You can also open the Properties window for detailed information and configurations.

7. 1. 2 Using the Clients Table to Monitor and Manage the Clients

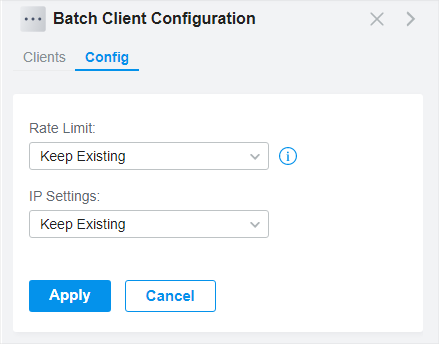
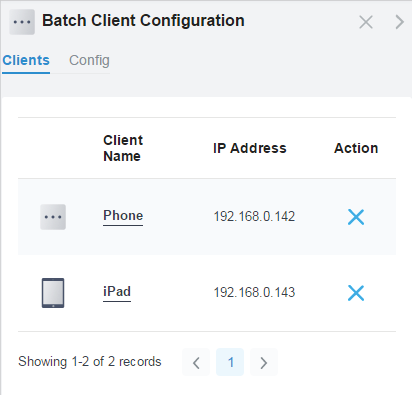
To quickly monitor and manage the clients, you can customize the columns and filter the clients for a better overview of their information. Also, quick operations and batch configuration are available.

? Customize the Information Columns

Click next to the Action column and you have three choices: Default Columns, All Columns, and Customize Columns. To customize the information shown in the table, click the checkboxes of information type.

To change the list order, click the column head and the icon appears for you to choose the ascending or descending order.

When this icon appears in the Wireless Connection column, it indicates the client is in the power-saving mode.

? Filter the Clients

To search specific client(s), use the search box above the table. To filter the clients by their connection type, use the tab bars above the table. For wireless clients, you can further filter them by the frequency band and the type of connected wireless network.

Quick Setup , creating wireless networks , etc.

? Quick Operations

For quick operations on a single client, click the icons in the Action column. The available icons vary according to the client status and connection type.

8. 4. 1 Known Clients .

? Multiple Select for Batch Configuration

To select multiple clients and add them to the Properties window, click on the upper-right and then check the boxes. When you finish choosing the clients, click Edit Selected and the chosen client(s) will be added to the Properties window for batch client configuration.

7. 1. 3 Using the Properties Window to Monitor and Manage the Clients

In Properties window, you can view more detailed information about the connected client(s) and manage them. To open the Properties window, click the entry of a single client, or click the icon to select multiple clients for batch configuration. Use the following icons for the Properties window.

.

Monitor and Manage a Single Client

? Monitor a Single Client

After opening the Properties window of a single client, you can view the basic information, traffic statistics, and connection history under the Details and History tabs.

Under the Details tab, Overview and Statistics displays the basic information and traffic statistics of the client, respectively. The listed information varies due to the client’s status and connection type.

Under the History tab, you can view the connection history of the client.

? Manage a Single Client

In Config, you can configure the following parameters:

Alias

Rate Limit

Custom : Specify the download/upload rate limit based on needs.

Download/Upload Limit

Use Fixed IP Address

4. 3 Configure Wired Networks .

Monitor and Manage Multiple Clients

To manage multiple clients at the same time, click , select multiple clients, and click Edit Selected . Then you can configure the following parameters under the Config tab.

Rate Limit

Keeping Existing : The rate limit of the chosen clients remains their current settings.

Custom : Specify the download/upload rate limit based on needs.

Download/Upload Limit

IP Setting

Keeping Existing : The IP setting of the chosen clients remains their current settings.

Use DHCP : The IP addresses of the clients is automatically assigned by the DHCP server, such as the Layer 3 switch and the gateway.

Use Fixed IP Address: Select a network and assign fixed IP addresses to the chosen clients manually. To view and configure networks, refer to 4. 3 Configure Wired Networks . Note that an Omada-managed gateway is required for this function. Otherwise, you cannot set fixed IP addresses for the chosen clients.

You can view their names and IP addresses in the Clients tab and remove client(s) from Batch Client Configuration by clicking in the Action column.

7. 2 Manage Client Authentication in Hotspot Manager

Hotspot Manager is a portal management system for centrally monitoring and managing the clients authorized by portal authentication. The following four tabs are provided in the system for a easy and direct management.

Authorized Clients

Vouchers

Local Users

Operators

7. 2. 1 Authorized Clients

The Authorized Clients tab is used to view and manage the clients authorized by portal system, including the expired clients and the clients within the valid period.

To open the list of Authorized Clients, click Hotspot Manager from the drop-down list of Sites and click Authorized Clients in the pop-up page . You can search certain clients using the search box, view their detailed information in the table, and manage them using the action column.

7. 2. 2 Vouchers

The Vouchers tab is used to create vouchers and manage unused voucher codes. With voucher configured and codes created, you can distribute the voucher codes generated by the controller to clients for them to access the network via portal authentication. For detailed configurations, refer to 4. 9. 1 Portal .

Follow the steps below to create vouchers for authentication:

1. Click Hotspot Manager from the drop-down list of Sites and click Vouchers in the pop-up page .

2. Click +Create Vouchers on the lower-left, and the following window pops up. Configure the following parameters and click Save .

Portal

Code Length

Amount

Type

Limited Usage Counts : The voucher code can only be used for a limited number of times within its valid period.

Limited Online Users : The voucher code can be used for an unlimited number of times within its valid period, but only a limited number of wireless clients can access the network with this voucher code at the same time.

Duration

Rate Limit

Custom : Specify the download/upload rate limit based on needs.

Download/Upload Limit

Note: Download/Upload Limit on this page are only available for wireless clients connected to the SSIDs with Portal authentication enabled. To limit the rate of wired clients connected to the switch and gateway, go to the Settings > Transmission > Bandwidth Control.

Traffic Limit

Note: Traffic Limit on this page are only available for wireless clients connected to the SSIDs with Portal authentication enabled. To limit the rate of wired clients connected to the switch and gateway, go to the Settings > Transmission > Bandwidth Control .

Description (optional)

3. The voucher codes are generated and displayed in the table.

4. Print the vouchers. Click to print a single voucher, or click checkboxes of vouchers and click Print Selected Vouchers to print the selected vouchers. And you can click Print All Unused Vouchers to print all unused vouchers.

5. Distribute the vouchers to clients, and then they can use the codes to pass authentication. If a voucher code expires, it will be automatically removed from the list.

6. To delete certain vouchers manually, click to delete a single voucher, or Delete to delete multiple voucher codes at a time.

7. 2. 3 Local Users

The Local Users tab is used to create user accounts for authentication. With the Local User configured, clients are required to enter the username and password to pass the authentication. You can create multiple accounts and assign them to different users. For detailed configurations, refer to 4. 9. 1 Portal .

There are two ways to create local user accounts: create accounts on the page and import from a file.

To create local user accounts, follow the steps below.

1. Click Hotspot Manager from the drop-down list of Sites and click Local Users in the pop-up page .

2. Create Local User accounts through two different ways.

? Create Local User accounts

Click +Create User on the lower-left, and the following window pops up. Configure the following parameters and click Save .

Portal

Username

Password

Status

Authentication Timeout

MAC Address Binding Type

No Binding: No MAC address is bound to the local user account.

Static Binding : Bind a MAC address to this user account manually. Then only the user with the this MAC address can use the username and password to pass the authentication.

Dynamic Binding : The MAC address of the first user that passes the authentication will be bound to this account. Then only this user can use the username and password to pass the authentication.

Maximum Users

Name (optional)

Telephone (optional)

Rate Limit

Custom : Specify the download/upload rate limit based on needs.

Download/Upload Limit

Note: Download/Upload Limit on this page are only available for wireless clients connected to the SSIDs with Portal authentication enabled. To limit the rate of wired clients connected to the switch and gateway, go to the Settings > Transmission > Bandwidth Control .

Traffic Limit

Note: Traffic Limit on this page are only available for wireless clients connected to the SSIDs with Portal authentication enabled. To limit the rate of wired clients connected to the switch and gateway, go to the Settings > Transmission > Bandwidth Control .

? Create Local User accounts from files.

Click on the upper-right, and the following window pops up. Select a file in the format of CVS or Excel, and click Import . To see required parameters and corresponding explanation, refer to Create Local User accounts . Note that the imported file will override the current user data.

Portal

3. The local user account(s) will be created and displayed in the module. You can view the information of the created local users, search certain accounts through the name, and use icons for management.

7. 2. 4 Operators

The Operators tab is used to manage and create operator accounts that can only be used to remotely log in to the Hotspot Manager system and manage vouchers and local users for specified sites. The operators have no privileges to create operator accounts, which offers convenience and ensures security for client authentication.

To create operator accounts, follow the steps below.

1. Click Hotspot Manager from the drop-down list of Sites and click Operators in the pop-up page .

2. Click on the lower-left, and the following window pops up.

3. Specify the username, password and description (optional) for the operator account. Then select sites from the drop-down list of Site Privileges . Click Save .

4. The operator accounts are created and displayed in the table. You can view the information of the create operator accounts on the page, search certain accounts through the name and notes, and use icons for management.

5. Then you can use an operator account to log in to the Hotspot Manager system:

? For software controller

Visit the URL https://Omada Controller Host’s IP Address:8043/hotspot/login (for example: https://192.168.0.174:8043/hotspot/login), and use the operator account to enter the hotspot manager system.

? For hardware controller

Visit the URL https://Omada Controller Host’s IP Address:443/hotspot/login (for example: https://192.168.0.174:443/hotspot/login), and use the operator account to enter the hotspot manager system.

? For cloud-based controller

Visit the URL https://URL of the controller/hotspot/login, and use the operator account to enter the hotspot manager system.