Omada SDN Controller User Guide
- About this Guide
- Chapter 1 Omada SDN Controller Solution Overview
- Chapter 2 Get Started with Omada SDN Controller
- Chapter 3 Manage Omada Managed Devices and Sites
- Chapter 4 Configure the Network with Omada SDN Controller
- Chapter 5 Configure the Omada SDN Controller
- Chapter 6 Configure and Monitor Omada Managed Devices
- Chapter 7 Monitor and Manage the Clients
- Chapter 8 Monitor the network
- Chapter 9 Manage Administrator Accounts of Omada SDN Controller
- Chapter 10 Omada APP
Omada app is a mobile application designed for Omada products. It allows you to conveniently monitor and manage your network. The Omada app can be used for Standalone and Controller mode. This appendix introduces how to use Omada app to manage your network. It includes the following sections:
�? 1 Install Omada App on the Mobile Device
�? 2 Manage Your Network in Standalone Mode
�? 3 Manage Your Network in Controller Mode
1 Install Omada App on the Mobile Device
Omada app runs on iOS and Android devices, such as smart phones and tablets. Launch the Apple App Store (iOS) or Google Play store (Android) and search “TP-Link Omada�?or simply scan the QR code to download and install the app.

2 Manage Your Network in Standalone Mode
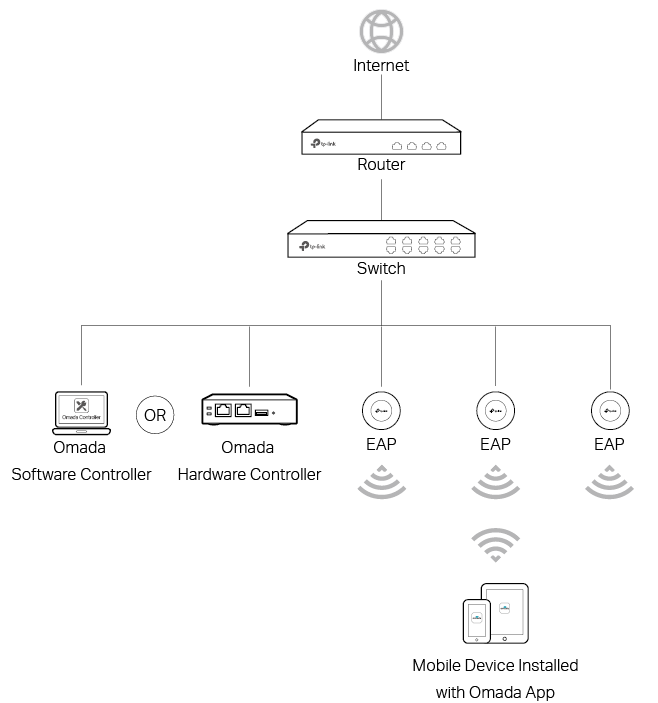
For a relatively small-scale network which has a few EAPs (usually less than three) and only basic functions are required, standalone mode is recommended. You can use a mobile device to configure each EAP individually for basic functionality without configuring an Omada SDN Controller. Note that the EAP which is managed by Omada SDN Controller is inaccessible in standalone mode.
Refer to the topology below, make sure that the following requirements have been met:
�? An Ethernet connection from your Omada EAP to the LAN with a DHCP server.
�? The supported firmware version of the EAP. To check the firmware versions of the supported EAPs, please refer to www.tp-link.com/omada_compatibility_list .
�? A compatible iOS or Android device with Omada app.
Follow the steps below to manage your network via Omada app in standalone mode. The following page is exampled with the iOS version of the app. The Android version is similar.
1. Connect your mobile device to the EAP by using the default SSID (format: TP-Link 2.4GHz/5GHz_XXXXXX ) printed on the label.
2. Launch the Omada app, tap Standalone APs and wait for the EAP device to be discovered.Pull down to refresh if your devices do not appear.
![]() Note:
Note:
|
All the EAP devices in the same subnet will be discovered by Omada app and shown on the page. You can tap the discovered EAP device to configure directly. |
3. Tap on the EAP device appearing on the page. Set a new username and password for your login account of the EAP.
4. Edit the default SSID and password to keep your wireless network secure. Tap Next .
![]() Note:
Note:
|
The settings will take effect after several minutes. For operation system differences, the wireless network connection will be different. When the default SSID of the EAP device is changed, normally mobile device join the new wireless network automatically. For the unsupported operation system, you should manually connect to the new SSID. |
5.
You can view the name of the EAP device and other information including wireless parameters and clients. You can tap
 to change the settings of radio, SSID and device account.
![]() Note:
Note:
|
�? Omada app is designed to help you quickly configure some basic settings. For advanced configuration, you can use controller mode. And when your EAP is managed by the controller, you can not use standalone mode. �? In standalone mode, only one user is allowed to log in to the management page of the EAP at the same time. Thus the management web page of the EAP cannot be logged in to when using the Omada app and vice versa. Also, only one user can log in to the EAP via Omada app. |
3 Manage Your Network in Controller Mode
For a large-scale network which has routers, switches and mass EAPs, advanced functions are required, and controller mode is recommended. Controller mode allows you to configure and manage the devices and network in a straightforward and efficient way.
Omada app offers a convenient way to access the Omada SDN Controller and adopt devices. With Local Access and Cloud Access function on the Omada app, you can manage the devices both locally and remotely while the controller is running.
3. 1 Locally Manage Your Devices Using the Omada App
Local Access function on Omada app is designed for accessing the hardware/software controller which is in the same subnet with your mobile devices. Refer to the topology below, make sure that the following requirements have been met:
�? An Ethernet connection from your Omada EAP to the LAN with a DHCP server.
�? The version of the Omada SDN Controller is 4.1.5 or above.
�? A compatible iOS or Android device with Omada app (iOS: 3.0.28 and above, Android: 3.0.10 and above).
Follow the steps below to manage your network via Omada app in controller mode locally. The following page is exampled with the iOS version of the app. The Android version is similar.
1. Connect your mobile device to the EAP by using the default SSID (format: TP-Link 2.4GHz/5GHz_XXXXXX ) printed on the label. Note that the EAP should be in the same subnet with the controller.
2. Launch the Omada app, go to Local Access, tap the + button on the upper-right corner to add the Omada controller. Normally Omada app will discover the controller which is in the same subnet. If the controller cannot be found, you can add the controller by entering the IP address and port of the controller host in the manual column.
3. Tap the Omada Controller, the controller login page will show. Enter the username and password of the controller, then tap Log In to launch the controller.
4. On the Devices screen, tap the Device that is pending for the adoption. And you can use the functions at the bottom to navigate various screens of the Omada Controller including the wireless statistics, clients information and basic settings.
3. 2 Remotely Manage Your Devices Using the Omada App
Cloud Access function on Omada app is designed for accessing the hardware/software/cloud-based controller via Omada Cloud Service. Thus, you can configure your controller and manage EAPs at any time, from anywhere.
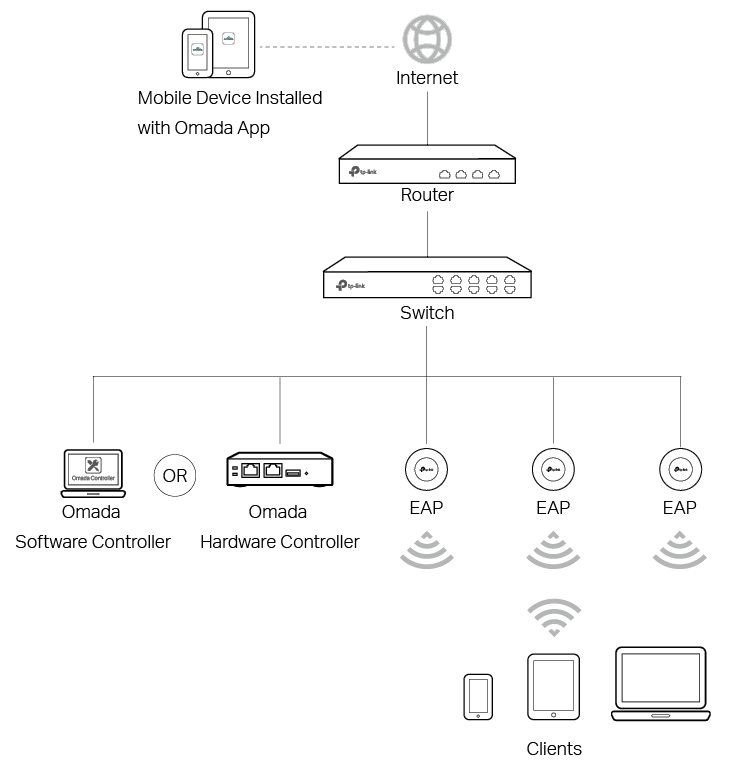
Hardware/Software Controller
Refer to the topology for hardware/software controller below, make sure that the following requirements have been met:
�? Both your hardware controller/controller host and mobile device have internet access.
�? The version of the Omada Controller is 4.1.5 or above.
�? A compatible iOS or Android device with Omada app (iOS: 3.0.28 and above, Android: 3.0.10 and above).
�? Cloud Access is enabled on the controller. The controller has been bound with a TP-Link ID.
Follow the steps below to manage your network via Omada app in controller mode remotely. The following page is exampled with the iOS version of the app. The Android version is similar.
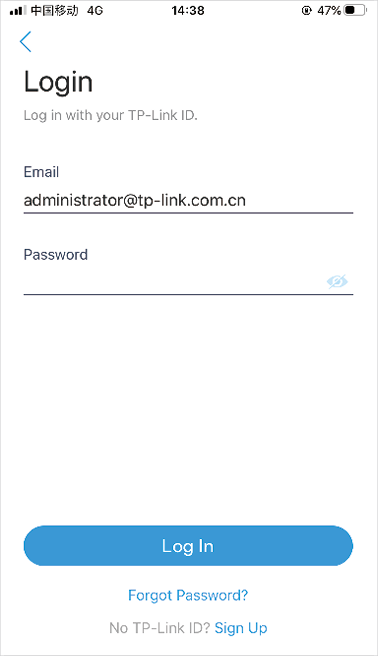
1. Launch the Omada app, go to Cloud Access and tap Go to Log In to log in to Omada Cloud with your TP-Link ID.
2. All the controllers which are bound with your TP-Link ID will appear on the page.
�? If you want to add a hardware controller, tap + on the upper right, scan its QR code and follow the instructions to add a hardware controller.
�? If you want to add devices to an existing hardware/software controller, tap the controller to launch the controller.
3. On the Devices screen, tap the device that is pending for the adoption. And you can use the functions at the bottom to navigate various screens of the Omada Controller including the wireless statistics, clients information and basic settings.
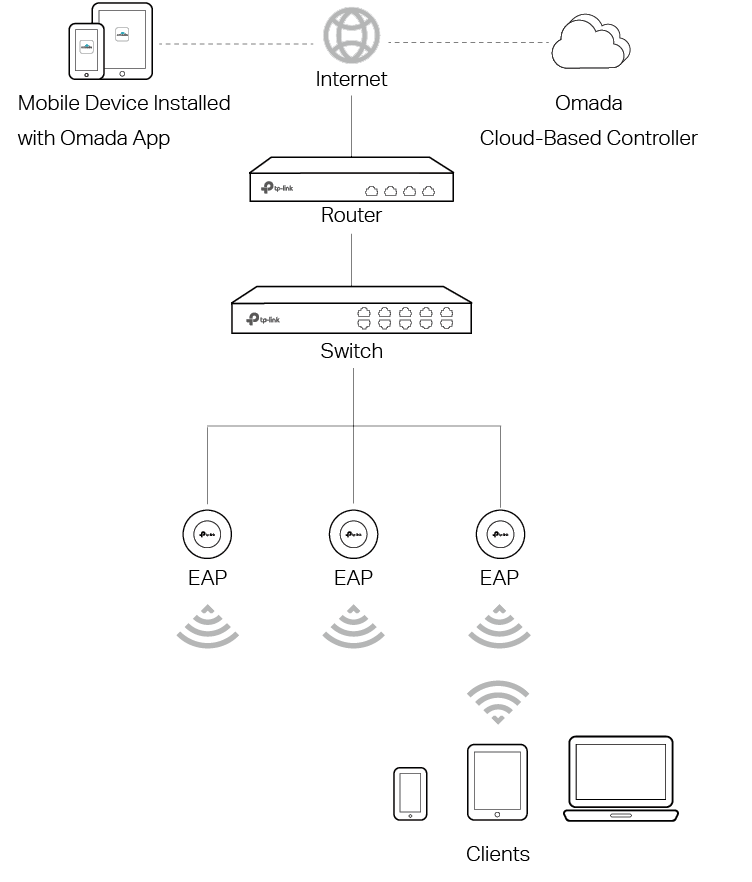
Cloud-Based Controller
Refer to the topology for cloud-based controller below, make sure that the following requirements have been met:
�? Your mobile device has internet access.
�? A compatible iOS or Android device with Omada app.
�? The supported firmware version of the router/switch/EAP.
Follow the steps below to manage your network via Omada app in controller mode remotely. The following page is exampled with the iOS version of the app. The Android version is similar.
1. Launch the Omada app, go to Cloud Access and tap Go to Log In to log in to Omada Cloud with your TP-Link ID.
2. All the online controller which are bound with your TP-Link ID will appear on the page. Tap the cloud-based controller to launch and configure the controller.
3. On the Devices screen, tap the + on the upper right to add devices to your cloud-based controller. You can scan the barcode of the serial number of the device or enter the serial number manually.
![]() Note:
Note:
|
To successfully add a device to your cloud-based controller, make sure the following requirements are met: �? Your device is powered on and connected to the internet. �? If the device has been managed by another controller, please forget it on the previous controller and reset it to factory default. |
4. On the Devices screen, the newly added device will appear. To manage and configure devices on the cloud-based controller, you need to activate them by assigning available licenses. Tap the device to load the page for device details.
5. Tab Activate and follow the instructions to assign licenses to the devices.
6. After binding with licenses, the devices can be managed and configured. You can use the functions at the bottom to navigate various screens of the Omada Controller including the wireless statistics, clients information and basic settings.