Omada SDN Controller User Guide
- About this Guide
- Chapter 1 Omada SDN Controller Solution Overview
- Chapter 2 Get Started with Omada SDN Controller
- Chapter 3 Manage Omada Managed Devices and Sites
- Chapter 4 Configure the Network with Omada SDN Controller
- Chapter 5 Configure the Omada SDN Controller
- Chapter 6 Configure and Monitor Omada Managed Devices
- Chapter 7 Monitor and Manage the Clients
- Chapter 8 Monitor the network
- Chapter 9 Manage Administrator Accounts of Omada SDN Controller
- Chapter 10 Omada APP
3. Manage Omada Managed Devices and Sites
Start managing your network by creating sites and adopting devices so that you can configure and monitor your devices centrally while keeping things organized. The chapter includes the following sections:
Different sites are logically separated network locations, like different subsidiary companies or departments. It’s best practice to create one site for each LAN (Local Area Network) and add all the devices within the network to the site, including the router, switches and APs.
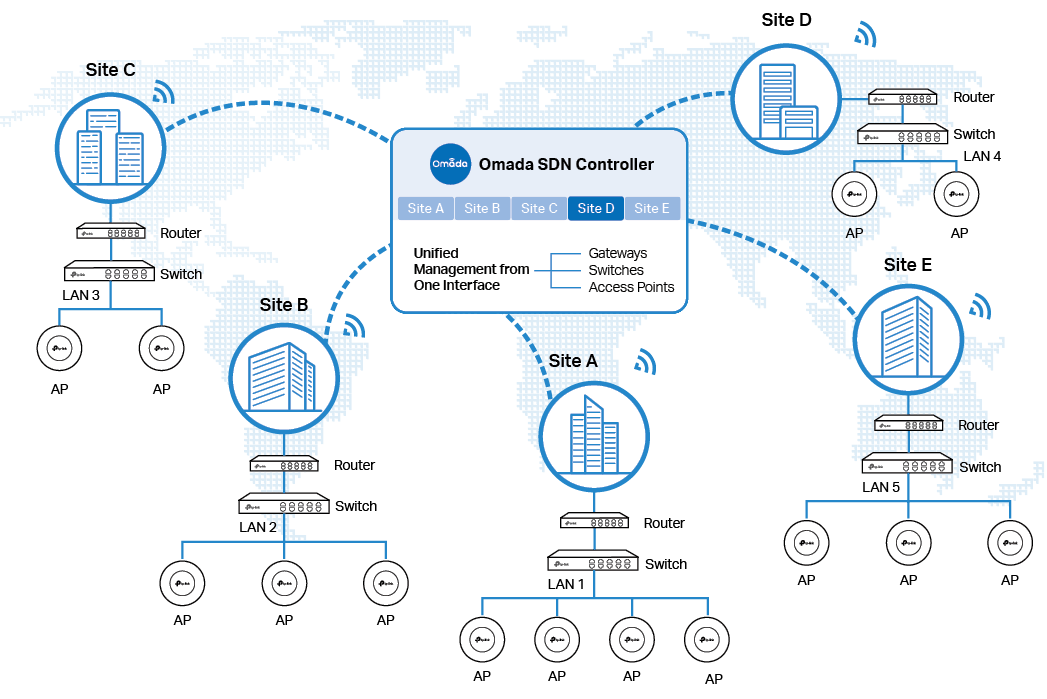
Devices at one site need unified configurations, whereas those at different sites are not relative. To make the best of a site, configure features simultaneously for multiple devices at the site, such as VLAN and PoE Schedule for switches, and SSID and WLAN Schedule for APs, rather than set them up one by one.
To create and manage a site, follow these steps:
1 ) Create a site.
2 ) View and edit the site.
3 ) Go into the site.
|
Create a Site |

|
View and Edit the Site |

|
Go Into the Site |
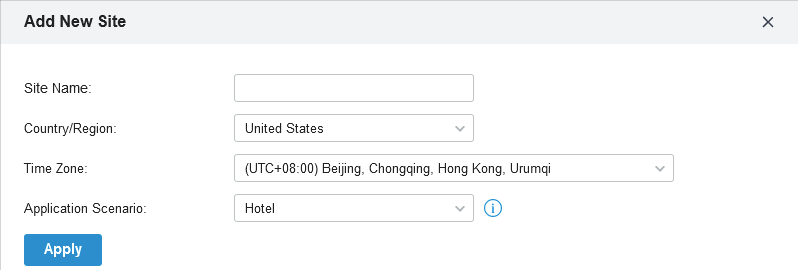
To create a site, choose one from the following methods according to your needs.
1.
Click
+ Add New Site
in the drop-down list of
Sites
. Alternatively, click
 in the drop-down list of
Sites
and click
in the drop-down list of
Sites
and click
 in the
Site Management
page.
in the
Site Management
page.
2. Enter a Site Name to identify the site, and configure other parameters according to where the site is located. Then click Apply . The new site is added to the drop-down list of Sites , and the table in the Site Management page as well.
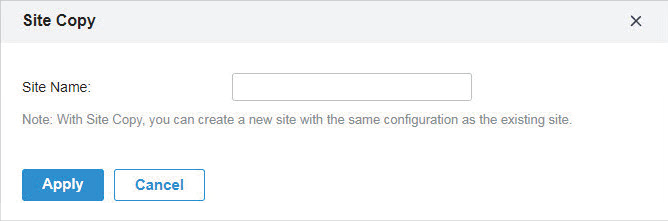
You can quickly create a site based on an existing one by copying its site configuration, wired configuration, and wireless configuration among others. After that, you can flexibly modify the new site configuration to make it different from the old.
1.
Click
in the drop-down list of
Sites
. In the
Site Management
page, click
 in the ACTION column of the site which you want to copy.
2. Enter a Site Name to identify the new site. Click Apply . The new site is added to the drop-down list of Sites , and the table in the Site Management page as well.
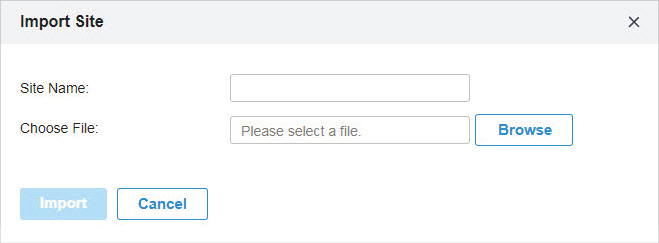
�? Import a site from another controller
If you want to migrate seamlessly from an old controller to a new one, import the site configuration file of the old controller into the new. Before that, you need to export the site configuration file from the old controller, which is covered in 5. 4. 1 Site Migration .
1.
Click
 in the drop-down list of
Sites
. Alternatively, click
in the drop-down list of
Sites
and click
in the drop-down list of
Sites
. Alternatively, click
in the drop-down list of
Sites
and click
 in the
Site Management
page.
in the
Site Management
page.
2. Enter a Site Name to identify the site. Browse your file explorer and choose a site configuration file. Click Import . The new site is added to the drop-down list of Sites , and the table in the Site Management page as well.
|
Create a Site |

|
View and Edit the Site |

|
Go Into the Site |
After you create the site, you can click
in the drop-down list of
Sites
, and view the site status in the
Site Management
page. You can click
 in the ACTION column to edit the site configuration. You can click
 in the ACTION column to delete the site.

|
Create a Site |

|
View and Edit the Site |
|
Go Into the Site |
To monitor and configure a site, you need first go into the site.
1. Select the site from the drop-down list of Sites to go into the site.
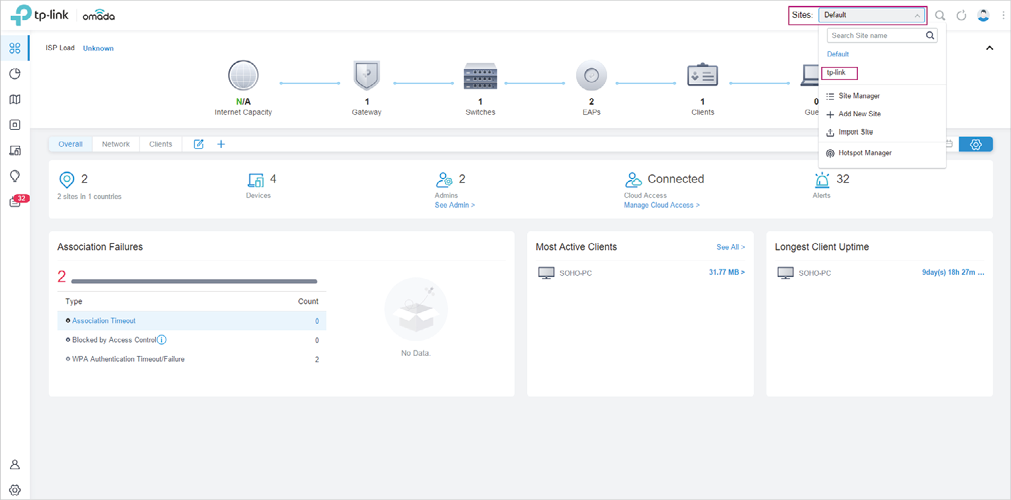
2. The Site field indicates the site which you are currently in. Some configuration items in the menu are applied to the site which you are currently in, whereas others are applied to the whole controller.
After you create a site, add your devices to the site by making the controller adopt them. Make sure that your devices in each LAN are added to the corresponding site so that they can be managed centrally.

Choose a procedure according to the type of your controller:
�? 3. 3. 1 For Omada Software Controller / Omada Hardware Controller
�? 3. 3. 2 For Omada Cloud-Based Controller (Coming Soon)
3. 3. 1 For Omada Software Controller / Omada Hardware Controller
To adopt the devices on the controller, follow these steps:
1 ) Prepare for communication between the controller and devices.
2 ) Prepare for device discovery.
3 ) Adopt the devices.
|
Prepare for Communication |
|
Prepare for Device Discovery |
|
Adopt the Devices |
![]() Note:
Note:
|
If the controller and devices are in the same LAN, subnet and VLAN, skip this step. |
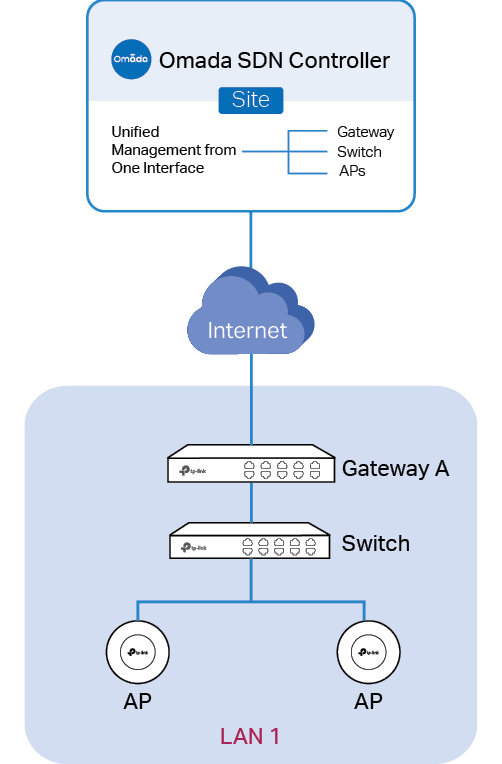
Make sure that the controller can communicate with the devices. Otherwise, the controller cannot discover or adopt the devices by any means. If the controller and devices are in different LANs, subnets or VLANs, use the following techniques to build up the connection according to your scenario.
1. Set up the Network
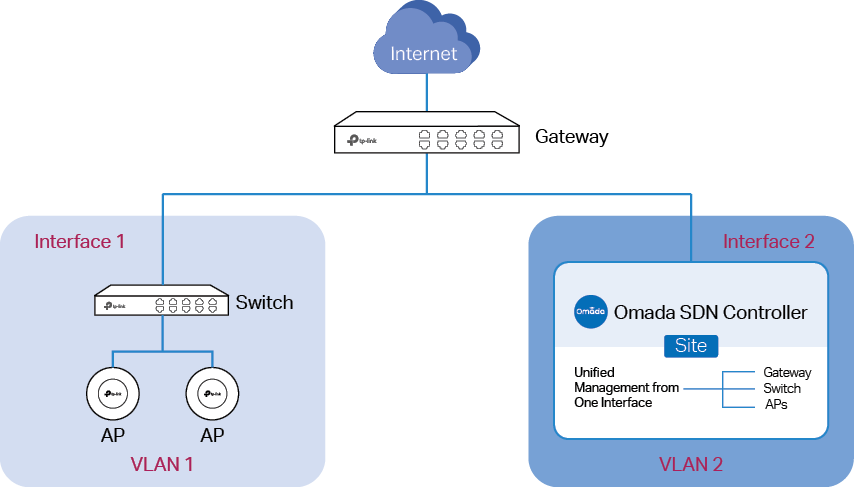
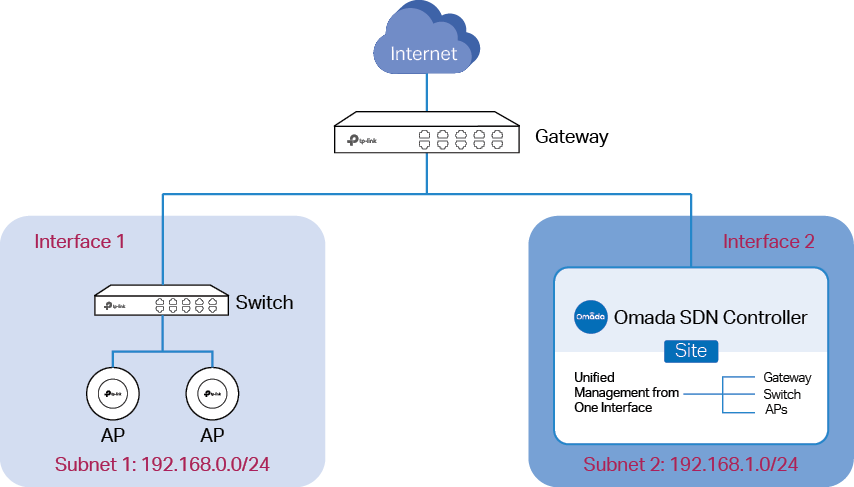
�? Scenario 1: Across VLANs or Subnets
As shown in the following figures, the controller and devices are in different VLANs or subnets. You need to set up a layer 3 interface for each VLAN or subnet, and make sure the interfaces can communicate with each other.
�? Scenario 2: Across LANs
As shown in the following figure, the controller and devices are in different LANs. You need to establish communication across the internet and the gateways.
By default, devices in LAN 1 cannot communicate with the controller in LAN 2, because Gateway B is in front of the controller and block access to it. To make the controller accessible to the devices, you can use Port Forwarding or VPN.
�? Use Port Forwarding
Configure Port Forwarding on Gateway B and open port 29810-29813 for the controller, which are essential for discovering and adopting devices. If you are using firewalls in the networks, make sure that the firewalls don’t block those ports.
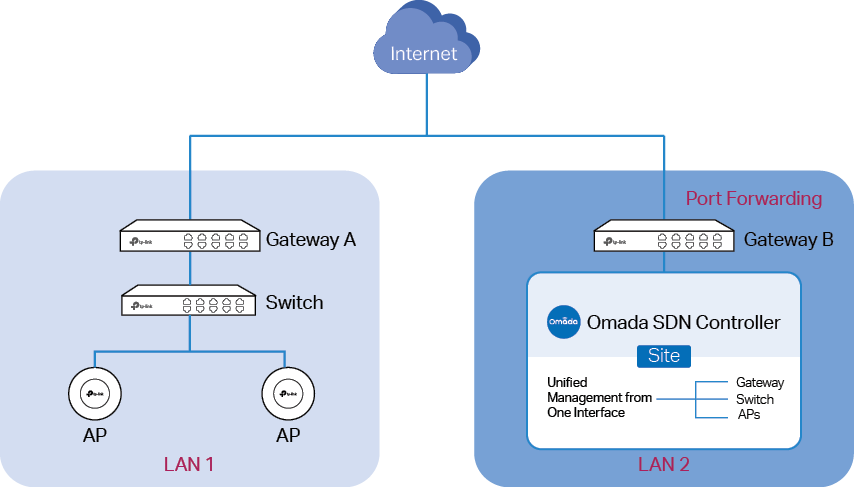
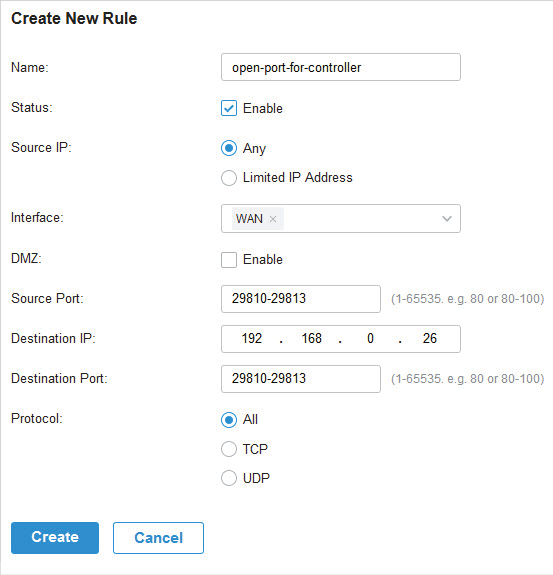
To configure Port Forwarding on Gateway B, you need first adopt Gateway B on the controller. For how to adopt Gateway B, refer to Adopt the Devices . Go to Settings > Transmission > NAT > Port Forwarding . Click + Create New Rule to load the following page. Specify a name to identify the Port Forwarding rule, check Enable for Status, select Any as Source IP, select the desired WAN port as Interface, disable DMZ, specify 29810-29813 as Source Port and Destination Port, specify the controller’s IP address as Destination IP, and select All as Protocol. Then click Create .
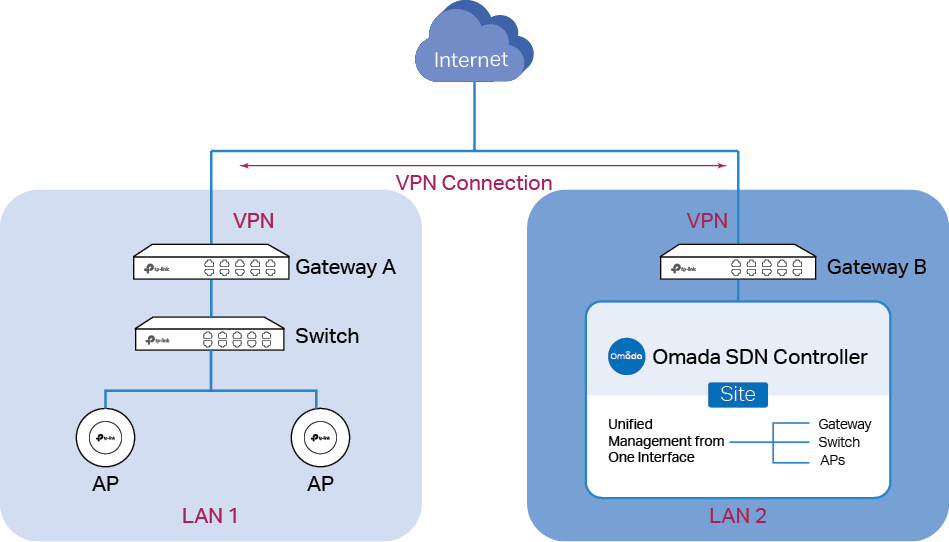
�? Use VPN
Set up a VPN connection between Gateway A and Gateway B in Standalone Mode. For details about VPN configuration, refer to the User Guide of the gateways.
2. (Optional) Test the network
If you are not sure whether the controller and devices can establish communication, it’s recommended to do the ping test from the devices to the controller.
Let’s take a switch for example. Log into the web page of the switch in Standalone Mode. Then Go to MAINTENANCE > Network Diagnostics > Ping to load the following page, and specify Destination IP as the IP address of the controller (if you have configured Port Forwarding on the controller side, use the public WAN IP address of the gateway instead). Then click Ping .
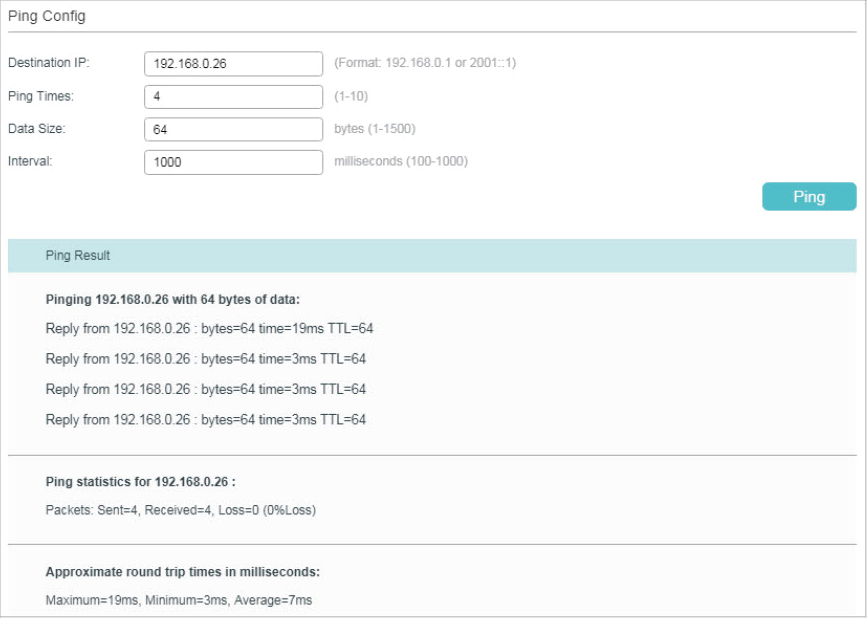
If the ping result shows the packets are received, it implies that the controller can communicate with the devices. Otherwise, the controller cannot communicate with the devices, then you need to check your network.
|
Prepare for Communication |
|
Prepare for Device Discovery |
|
Adopt the Devices |
![]() Note:
Note:
|
If the controller and devices are in the same LAN, subnet and VLAN, skip this step. In this scenario, the controller can discover the devices directly, and no additional settings are required. |
Make sure that the controller can discover the devices.
When the controller and devices are in different LANs, subnets or VLANs, the controller cannot discover the devices directly. You need to choose Controller Inform URL , Discovery Utility , or DHCP Option 138 as the method to help the controller discover the devices.
Controller Inform URL informs the devices of the controller’s URL or IP address. Then the devices make contact with the controller so that the controller can discover the devices.
You can configure Controller Inform URL for devices in Standalone Mode. Let’s take a switch for example. Log into the management page of the switch in Standalone Mode and go to SYSTEM > Controller Settings to load the following page. In Controller Inform URL , specify Inform URL/IP Address as the controller’s URL or IP address (if you have configured Port Forwarding on the controller side, use the public WAN IP address of the gateway instead). Then click Apply .
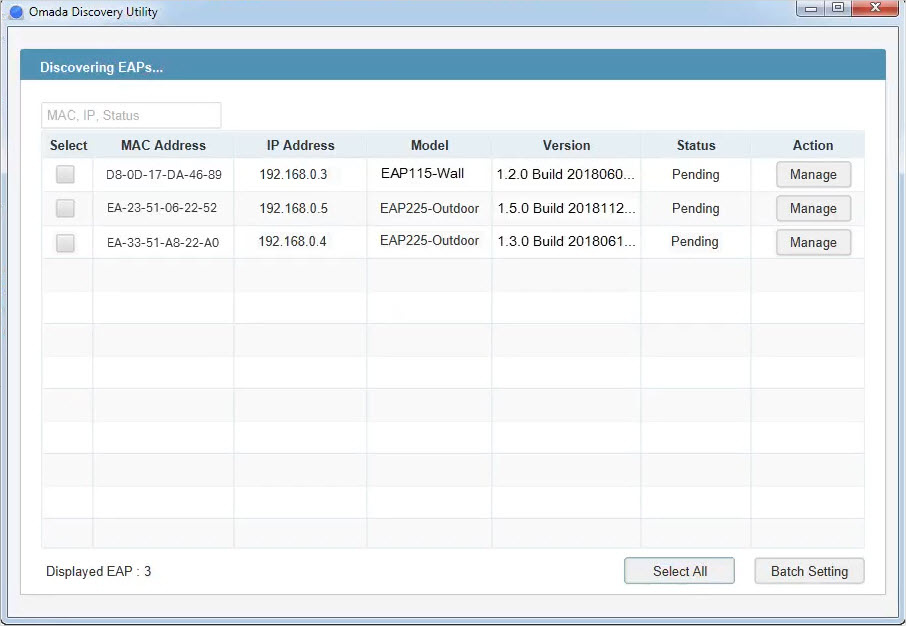
Discovery Utility can discover the devices in the same LAN, subnet and VLAN, and inform the devices of the controller’s IP address. Then the devices make contact with the controller so that the controller can discover the devices.
1. Download Discovery Utility from the website and then install it on your PC which should be located in the same LAN, subnet and VLAN as your devices.
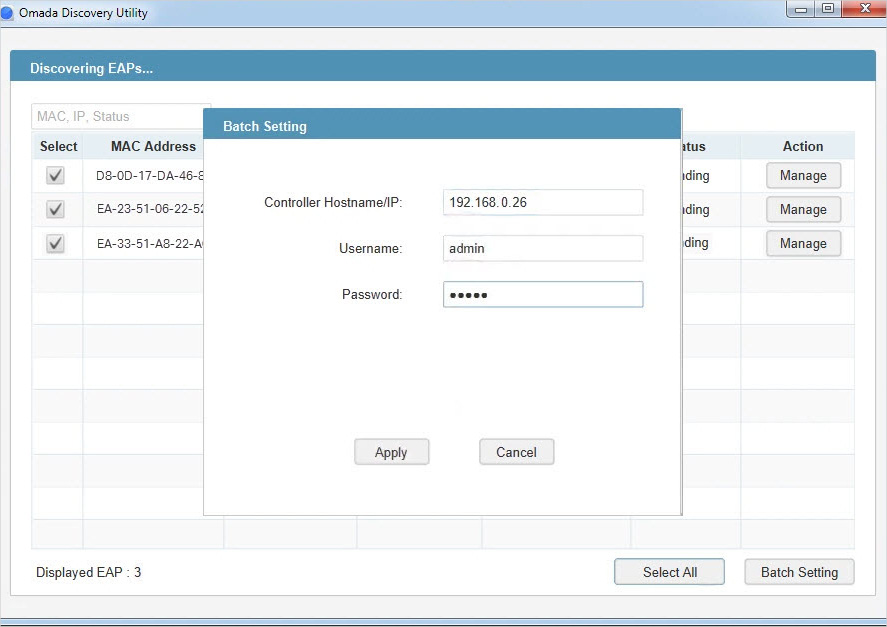
2. Open Discovery Utility and you can see a list of devices. Select the devices to be adopted and click Batch Setting .
3. Specify Controller Hostname/IP as the IP address of the controller (if you have configured Port Forwarding on the controller side, use the public WAN IP address of the gateway instead), and enter the username and password of the devices. By default, the username and password are both admin. Then click Apply . Wait until the setting succeeds.
DHCP Option 138 informs a DHCP client, such as a switch or an EAP, of the controller’s IP address when the DHCP client sends DHCP requests to the DHCP server, which is typically a gateway.
1. To use DHCP Option 138, you need to adopt the gateway on the controller first, which may require other techniques like Controller Inform URL or Discovery Utility if necessary.
2.
After the gateway is adopted, go to
Settings
>
Wired Networks
>
LAN
>
Networks
, and click
 in the ACTION column of the LAN where the DHCP clients are located. Enable DHCP Server and configure common DHCP parameters. Then click
Advanced DHCP Options
and specify Option 138 as the controller’s IP address (if you have configured Port Forwarding on the controller side, use the public WAN IP address of the gateway instead). Click
Save
.
in the ACTION column of the LAN where the DHCP clients are located. Enable DHCP Server and configure common DHCP parameters. Then click
Advanced DHCP Options
and specify Option 138 as the controller’s IP address (if you have configured Port Forwarding on the controller side, use the public WAN IP address of the gateway instead). Click
Save
.

3. To make DHCP Option 138 take effect, you need to renew DHCP parameters for the DHCP clients. One possible way is to disconnect the DHCP clients and then reconnect them.
|
Prepare for Communication |
|
Prepare for Device Discovery |
|
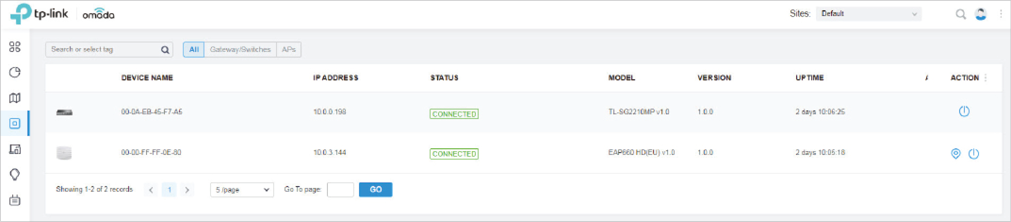
1. Decide which site you want to add the devices to. On the controller configuration page, select the site from the drop-down list of Sites .
2.
Go to
Devices
, and devices which have been discovered by the controller are displayed. Click
 in the ACTION column of the devices which you want to add to the site.
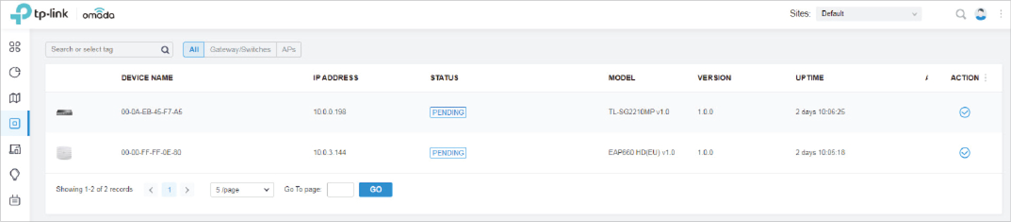
3. Wait until the STATUS turns into Connected . Then the devices are adopted by the controller and added to the current site. Once the devices are adopted, they are subject to central management in the site.
3. 3. 2 For Omada Cloud-Based Controller (Coming Soon)
To adopt the devices on the controller, follow these steps:
1 ) Connect to the internet.
2 ) Prepare for controller management.
3 ) Adopt the devices.
|
Connect to the Internet |
|
Prepare for Controller Management |
|
Adopt the Devices |
1. Set up the network.
Make sure that your devices are connected to the internet.
If you are using firewalls in your network, make sure that the firewall doesn’t block traffic from the controller. To configure your firewall policy, you may want to know the URL of the controller. After you open the web page of the controller, you can get the URL from the address bar of the browser.
2. (Optional) Test the network.
If you are not sure whether the devices are connected to the internet, it’s recommended to do the ping test from the devices to a public IP address, such as 8.8.8.8.
Let’s take a switch for example. Log into the web page of the switch in Standalone Mode. Go to MAINTENANCE > Network Diagnostics > Ping to load the following page. Specify Destination IP as a public IP address, such as 8.8.8.8. Then click Ping .
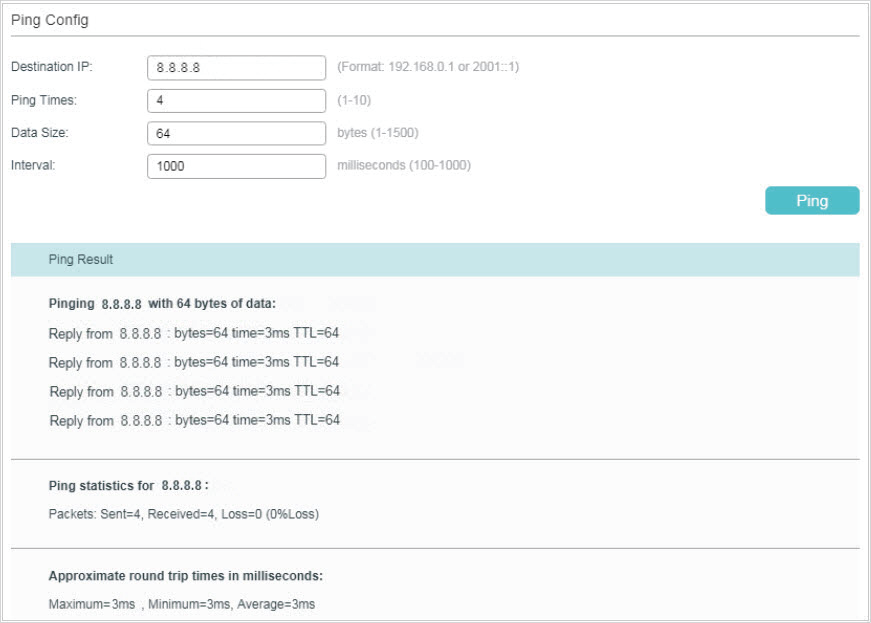
If the ping result shows the packets are received, it implies that the devices are connected to the internet. Otherwise, the devices are not connected to the internet, then you need to check your network.
|
Connect to the Internet |
|
Prepare for Controller Management |
|
Adopt the Devices |
![]() Note:
Note:
|
If your devices are on the factory default setting, skip this step. |
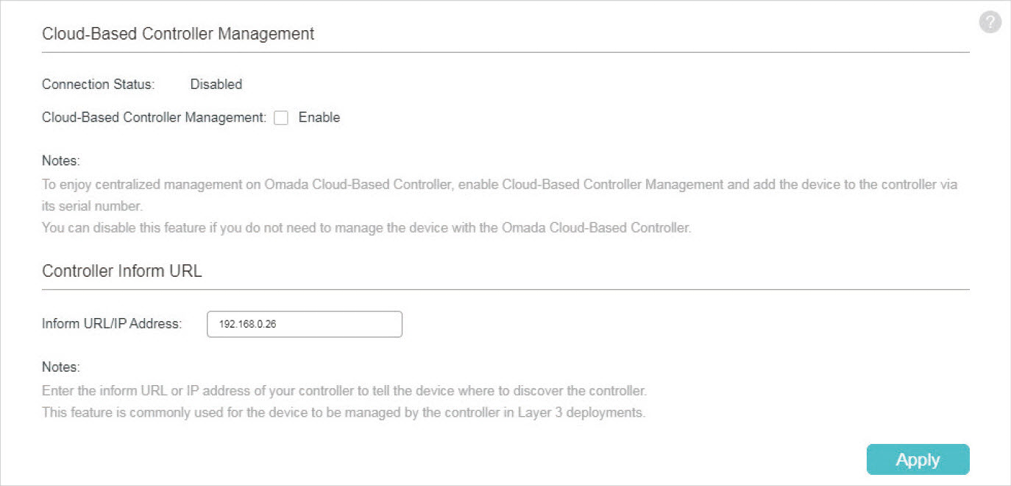
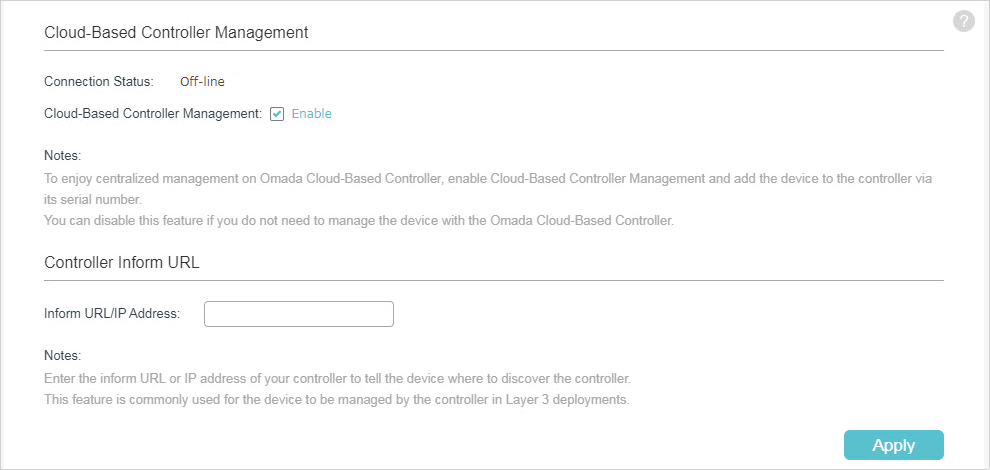
The Cloud-Based Controller Management feature allows the devices to be adopted by Omada Cloud-Based Controller. Make sure Cloud-Based Controller Management is enabled on the devices. For details, refer to the User Guide of your devices, which can be downloaded from the TP-Link download center .
Let’s take a switch for example. Log into the web page of the switch in Standalone Mode. Go to SYSTEM > Controller Settings to load the following page. In Cloud-Based Controller Management , enable Cloud-Based Controller Management and click Apply .
|
Connect to the Internet |
|
Prepare for Controller Management |
|
Adopt the Devices |
On the controller configuration page, go into the site where you want to add the devices. Go to Devices and click Add Devices . Then add your devices to the controller. Once the devices are adopted, they are subject to central management in the site.