Omada SDN Controller User Guide

Configure the Omada SDN Controller

Controller Settings control the appearance and behavior of the controller and provide methods of data backup, restore and migration:
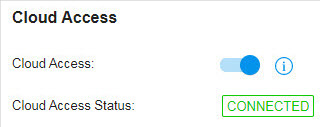
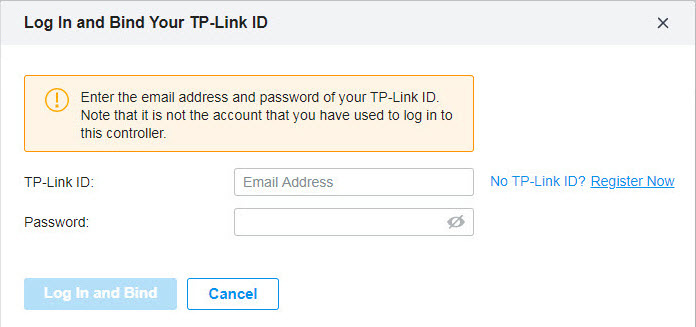
? 5. 1 Manage the Controller

? 5. 2 Manage Your Controller Remotely via Cloud Access

? 5. 3 Maintenance

? 5. 4 Migration

? 5. 5 Auto Backup

5. 1 Manage the Controller

5. 1. 1 General Settings

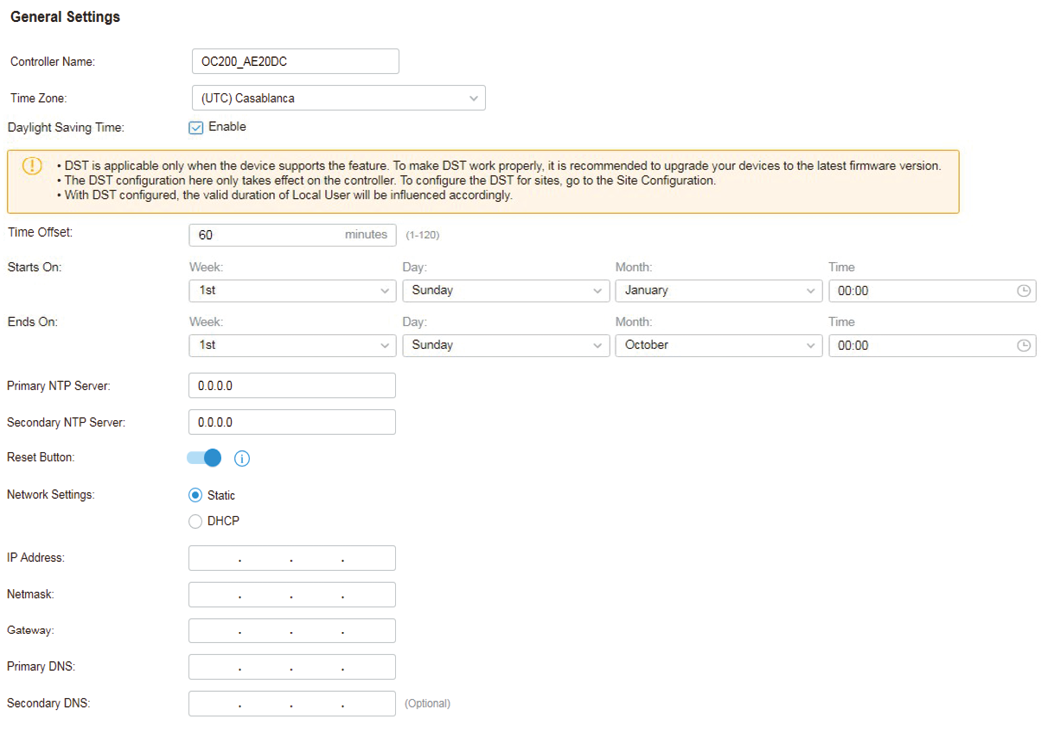
Go to Settings > Controller . In General Settings , configure the parameters and click Save .

? For Omada Hardware Controller

Controller Name

Time Zone

Daylight Saving Time

Time Offset

Starts On

Ends On

Primary NTP Server/ Secondary NTP Server

Reset Button

Network Settings

Static : You need to specify the IP address , Netmask , Gateway , Primary DNS , and Secondary DNS for the controller.

DHCP : The controller get IP settings from the DHCP server. If the controller fails to get IP settings from the DHCP server, it will use the Fallback IP Address and Fallback Netmask .
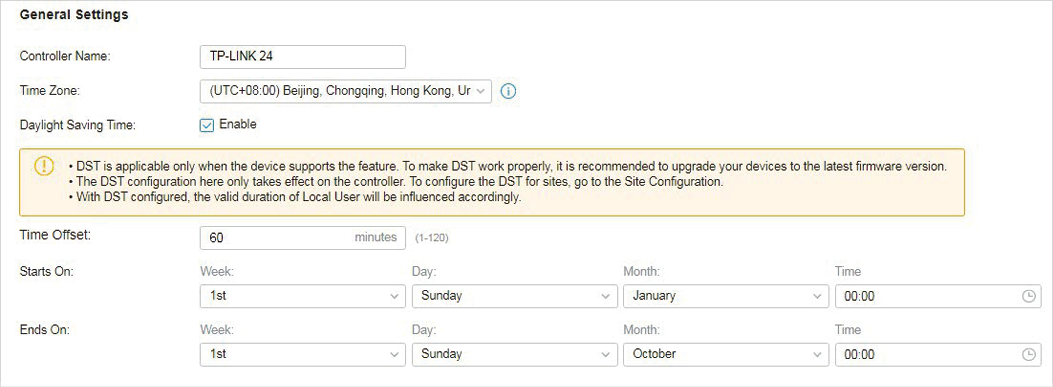
? For Omada Software Controller / Omada Cloud-Based Controller

Controller Name

Time Zone

Daylight Saving Time

Time Offset

Starts On

Ends On

5. 1. 2 Mail Server

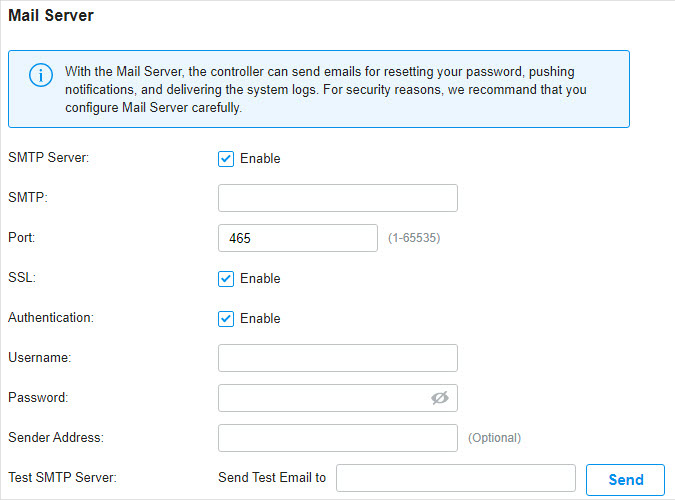
With the Mail Server, the controller can send emails for resetting your password, pushing notifications, and delivering the system logs. The Mail Server feature works with the SMTP (Simple Mail Transfer Protocol) service provided by an email service provider.

1. Log in to your email account and enable the SMTP (Simple Mail Transfer Protocol) Service. For details, refer to the instructions of your email service provider.

2. Go to Settings > Controller . In Mail Server , enable SMTP Server and configure the parameters. Then click Save .

SMTP

Port

SSL

Authentication

Username

Password

Sender Address

Test SMTP Server

With History Data Retention, you can specify how the controller retains its data.

Go to Settings > Controller . In History Data Retention , configure the parameters and click Save .

Data Retention

Collect Clients?History Data

5. 1. 4 Customer Experience Improvement Program

Click the checkbox if you agree to participate in the customer experience improvement program and help improve the quality and performance of TP-Link products by sending statistics and usage information.

5. 1. 5 HTTPS Certificate

If you have assigned a domain name to the controller for login, to eliminate the “untrusted certificate?error message that will appear in the login process, you can import the corresponding SSL certificate and private key here. The certificate and private key are issued by the certificate authority.

Note:

? HTTPS Certificate configuration is only available for Omada Software Controller and Omada Hardware Controller.

? You need to restart you controller for the imported SSL certificate to take effect.

Go to Settings > Controller . In HTTPS Certificate , import your SSL certificate and configure the parameters. Then click Save .

Keystore Password

Private Key Password

5. 1. 6 Access Config

With Access Config, you can specify the port used by the controller for management and portal.

Note:

? Access Config is only available on Omada Software Controller and Omada Hardware Controller.

? Once applying the change of HTTPS and HTTP port, restart the controller to make the change effective.

? For security, the HTTPS and HTTP port for Potal should be different from that for controller management.

Go to Settings > Controller . In Access Config , configure the parameters and click Save .

Controller Hostname/IP

HTTPS Port for Controller Management

HTTPS Port for Portal

HTTP Port for Portal

5. 2 Manage Your Controller Remotely via Cloud Access

With Cloud Access, it’s convenient for you to manage your controller from anywhere, as long as you have access to the internet.

To manage your controller from anywhere, follow these steps:

1. Prepare your controller for Cloud Access

? For Omada Software Controller / Omada Hardware Controller:

Note:

? Before you start, make sure your Omada Software Controller Host or Omada Hardware Controller has access to the internet.

? If you have enabled cloud access and bound your TP-Link ID in the quick setup wizard, skip this step.

1 ) Go to Settings > Cloud Access . Enable Cloud Access.

2 ) Enter your TP-Link ID and password. Then click Log In and Bind .

? For Omada Cloud-Based Controller

Your Omada Cloud-Based Controller is based on the Cloud, so it’s naturally accessible through Cloud Service. No additional preparation is needed.

2. Access your controller through Cloud Service

Go to Omada Cloud and login with your TP-Link ID and password. A list of controllers that have been bound with your TP-Link ID will appear. Then click to manage the controller.

5. 3 Maintenance

5. 3. 1 Controller Status

Go to Settings > Maintenance . In Controller Status , you can view the controller-related information and status.

Controller Name

5. 1. 1 General Settings .

MAC Address

System Time

5. 1. 1 General Settings .

Uptime

Controller Version

5. 3. 2 User Interface

You can customize the User Interface settings of the controller according to your preferences.

Go to Settings > Maintenance . In User Interface , configure the parameters and click Apply .

Use 24-Hour Time

Statistic/Dashboard Timezone

Site’s : Site’s Timezone is set in Site Configuration of the corresponding site.

Browser’s : Browser’s Timezone is synchronized with the browser configuration.

Controller’s : Controller’s Timezone is set in General Settings of the controller.

UTC : UTC (Coordinated Universal Time) is the common time standard across the world.

Fixed Menu

Show Pending Devices

Refresh Button

Refresh Interval

Enable WebSocket Connection

5. 3. 3 Backup & Restore

You can backup the configuration and data of your controller to prevent any loss of important information. If necessary, restore the controller to a previous status using the backup file.

? Backup

Go to Settings > Maintenance . In Backup & Restore , select the time range in the drop-down menu of Retained Data Backup. Only configuration and data within the time range is backed up. If you select Settings Only, only configuration (no data) is backed up. Click Download Backup Files to download the backup file to your computer.

? Restore

Go to Settings > Maintenance . In Backup & Restore section, Click Browse and select a backup file from your computer. Click Restore .

5. 4 Migration

Migration services allow users to migrate the configurations and data to any other controller. Migration services include 5. 4. 1 Site Migration and 5. 4. 2 Controller Migration , covering all the needs to migrate both a single site and the whole controller.

5. 4. 1 Site Migration

Site Migration allows the administrators to export a site from the current controller to any other controller that has the same version. All the configurations and data of the site will be migrated to the target controller.

The process of migrating configurations and data from a site to another controller can be summarized in three steps: Export Site, Migrate Site and Migrate Devices.

Step1: Export Site

Export the configurations and data of the site to be migrated as a backup file.

Step2: Migrate Site

In the target controller, import the backup file of the original site.

Step3: Migrate Devices

Migrate the devices which are on the original site to the target controller.

To migrate a site to anther controller, follow these steps below.

Note:

The connection to internet will be lost for several minutes during the migration. Clients need to connect the wireless network again after the migration is completed. Please choose the time to start migration operation carefully.

Export Site

Migrate Site

Migrate Devices

3. Go to Settings > Migration . On the Site Migration tab, click start button on the following page.

4. Select the site to be imported into the second controller in the Select Site drop-down list. Click Export to download the file of the current site. If you have backed up the file, click Skip .

Export Site

Migrate Site

Migrate Devices

1. Start and log in to the target controller, click the top right corner of the screen and select 
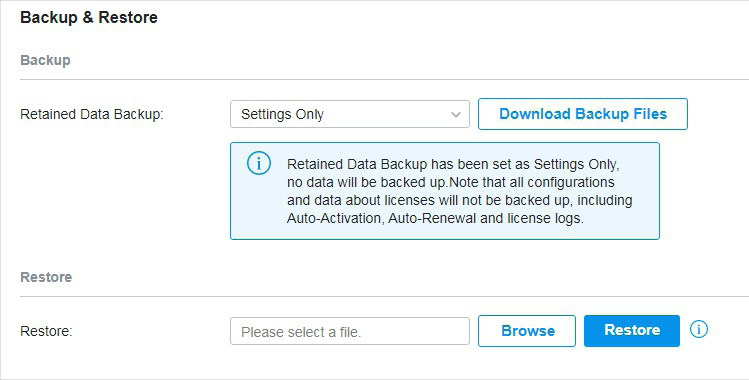
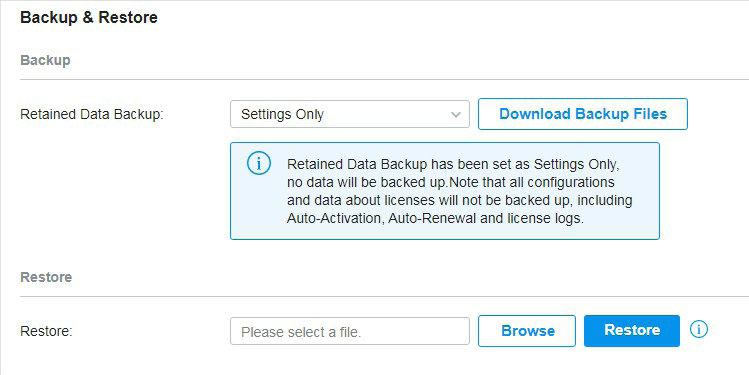
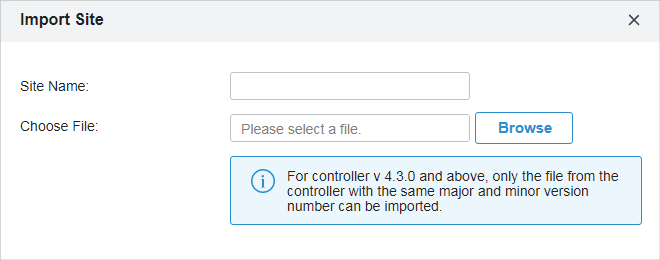
, and then the following window will pop up. Note that for controller v 4.3.0 and above, only the file from the controller with the same major and minor version number can be imported.

2. Enter a unique name for the new site. Click Browse to upload the file of the site to be imported and click Import to import the site.

3. After the file has been imported to the target controller, go back to the previous controller and click Confirm .

Export Site

Migrate Site

Migrate Devices

1. Enter the IP address or URL of your target controller into Controller IP/Inform URL input filed. In this case, the IP address of the target controller is 10.0.3.23.

Note:

Make sure that you enter the correct IP address or URL of the target controller to establish the communication between Omada managed devices and your target controller. Otherwise Omada managed devices cannot be adopted by the target controller.

2. Select the devices that are to be migrated by clicking the box next to each device. By default, all the devices are selected. Click Migrate Devices to migrate the selected devices to the target controller.

3. Verify that all the migrated devices are visible and connected on the target controller. When all the migrated devices are in Connected status on the Device page on the target controller, click Forget Devices to finish the migration process.

4. When the migration process is completed, all the configuration and data are migrated to the target controller. You can delete the previous site if necessary.

5. 4. 2 Controller Migration

Controller Migration allows Omada administrators to migrate the configurations and data from the current controller to any other controller that has the same version.

The process of migrating configurations and data from the current controller to another controller can be summarized in three steps: Export Controller, Migrate Controller and Migrate Devices.

Step1: Export Controller

Export the configurations and data of the current controller as a backup file.

Step2: Migrate Controller

In the target controller, import the backup file of the current controller.

Step3: Migrate Devices

Migrate the devices on the current controller to the target controller.

To migrate your controller, follow these steps below.

Note:

The connection to internet will be lost for several minutes during the migration. Clients need to connect the wireless network again after the migration is completed. Please choose the time to start migration operation carefully.

Export Controller

Migrate Controller

Migrate Devices

1. Go to Settings > Migration . On the Controller Migration tab, click start button on the following page.

2. Select the length of time in days that data will be backed up in the Retained Data Backup , and click Export to export the configurations and data of your current controller as a backup file. If you have backed up the file, click Skip .

Export Controller

Migrate Controller

Migrate Devices

1. Log in to the target controller, go to Settings > Maintenance > Backup & Restore . Click Browse to locate and choose the backup file of the previous controller. Then click Restore to upload the file.

2. After the file has been imported to the target controller, go back to the previous controller and click Confirm .

Export Controller

Migrate Controller

Migrate Devices

1. Enter the IP address or URL of your target controller into Controller IP/Inform URL input filed. In this case, the IP address of the target controller is 10.0.3.23.

Note:

Make sure that you enter the correct IP address or URL of the target controller to establish the communication between Omada managed devices and your target controller. Otherwise Omada managed devices cannot be adopted by the target controller.

2. Select the devices that are to be migrated by clicking the box next to each device. By default, all the devices are selected. Click Migrate Devices to migrate the selected devices to the target controller.

3. Verify that all the migrated devices are visible and connected on the target controller. When all the migrated devices are in Connected status on the Device page on the target controller, click Forget Devices to finish the migration process.

When the migration process is completed, all the configuration and data are migrated to the target controller. You can uninstall the previous controller if necessary.

5. 5 Auto Backup

With Auto Backup enabled, the controller will be scheduled to back up the configurations and data automatically at the specified time. You can easily restore the configurations and data when needed.

Note:

? For OC200, Auto Backup is available only when it is powered by a PoE device and a storage device is connected to its USB port.

? On Omada Cloud-Based Controller, you have no need to configure Auto Backup. It will automatically save your configurations and data on the cloud.

To configure Auto Backup, follow these steps:

1. Go to Settings > Auto Backup . Click 
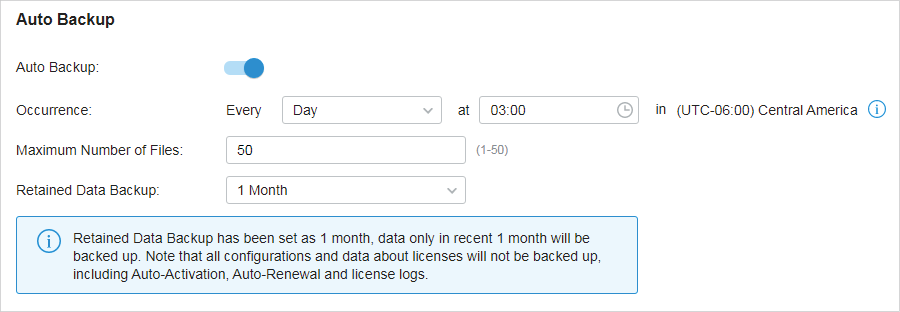
to enable Auto Backup.

2. Configure the following parameters to specify the rules of Auto Backup. Click Apply .

Occurrence

Every Day , Week , Month , or Year first and then set a time to back up files.

Every Month . For example, if you choose to automatically backup the data on the 31st of every month, Auto Backup will not take effect when it comes to the month with no 31st, such as February, April, and June.

Maximum Number of Files

Retained Data Backup

Settings Only : Back up controller settings only.

7 Days / 1 Month / 2 Months / 3 Months / 6 Months / 1 Year : Back up the data in the recent 7 days/1 month/2 months/3 months/6 months/1 year.

All Time : (Only for Omada Software Controller) Back up all data in the controller.

Saving Path

You can view the name, backup time and size of backup files in Backup Files List .

To restore, export or delete the backup file, click the icon in the Action column.

To keep the backup data safe, please wait until the operation is finished. This will take several minutes.

Note:

? To back up data manually and restore the data to the controller, refer to 5. 3. 3 Backup & Restore to configure Backup&Restore.

? The configuration of cloud users can be neither backed up nor restored. To add cloud users, please refer to 9. 3 Manage and Create Cloud User Accounts .