-
Para Casa
Modems/ Gateways
A sua porta de acesso à internet
Expansão de Rede
Forma mais fácil para expandir e melhorar a sua rede
SOHO Switches
Conexões de qualidade através de cabo de rede
Adaptadores
Equipe os seus equipamentos com um acesso Wi-Fi mais rápido
Acessórios
Tudo o que precisa para um estilo de vida conectado
-
Smart Home
Câmaras Cloud
Um olhar no que é importante
Smart Plugs
Autonomia nos equipamentos domésticos
Smart Bulbs
Luz para todas as ocasiões
-
Para Empresas
JetStream Switches
Rede com fios de alta velocidade com e sem gestão L3
Omada EAP Series
Professional business Wi-Fi with centralized management
Omada Cloud SDN
A solução Wi-Fi Cloud inteligente para redes de negócios
Pharos Wireless Broadband
Ideal para redes Wi-Fi bridge ponto a ponto de longo alcance
SafeStream Router
Secure VPNs e Gateways de balanceamento de carga para negócios
-
Para ISP
DSL
Capable of high-speed network and integrated broadband applications
LTE/3G
Maintains internet access wherever you go.
PON
The leading technology for delivering gigabit Internet services
Powerline Adapter
Transforms electrical wiring to carry the network signal.
Range Extender
Easily expand your Wi-Fi coverage.
Switches
Boosts your business network with premium performance.
Business Wireless
Takes your enterprise Wi-Fi to new levels.
How to set system time on TL-WR802N/WR810N (standard router and hotspot router mode-new logo)?
Here takes TL-WR802N as an example.
1. Login the router. Please refer to FAQ.
2. Go to System Tools > Time Settings and configure the system time as needed.
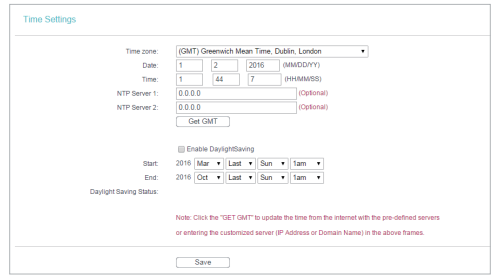
To set time manually:
3. Select your local time zone.
4. Enter the Date in Month/Day/Year format.
5. Enter the Time in Hour/Minute/Second format.
6. Click Save.
To set time automatically:
7. Select your local time zone.
8. Enter the address or domain of the NTP Server I or NTP Server II.
9. Click Get GMT to get time from the Internet if you have connected to the Internet.
To set Daylight Saving Time:
1. Select Enable DaylightSaving.
2. Select the start time from the drop-down list in the Start field.
3. Select the end time from the drop-down list in the End field.
4. Click Save.
Note: This setting will be used for some time-based functions such as firewall. You must specify your time zone once you log in to the router successfully; otherwise, time-based functions will not take effect.
Get to know more details of each function and configuration please go to Download Center to download the manual of your product.
A sua resposta ajuda-nos a melhorar o nosso site.