How to setup USB storage sharing on your Archer Modem Router (new-designed blue UI)
The File sharing feature allows you to share files in a USB drive to the wired or wireless users on the same network.
Note: Here take Archer VR900 as an example.
Step 1
Plug a USB Storage device into the USB port, make sure the USB light lit up on the router.
Check the USB LED Explanation below.

Step 2.
Log into the management interface of your modem router.
If you don’t know how to do that, please click How to log into the web-based interface of the AC VDSL/ADSL Modem Router (new logo)?.
Step 3
Click Advanced on the top, then click USB Settings -> Disk Settings on the left side menu. Check whether the USB device is identified by the modem router. If there is no device listed on this page, please click Scan. And you can also try unplug the USB device and plug it back in.
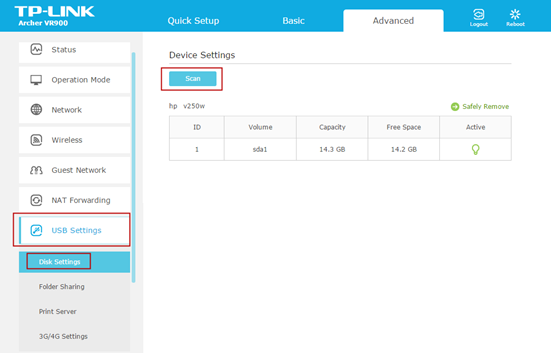
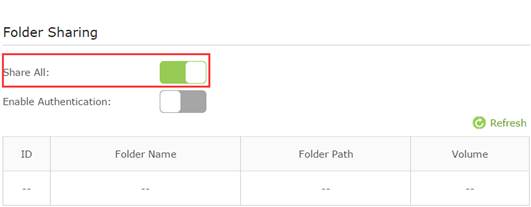
If the USB device is identified, the Network Neighborhood function will be Enabled by default, and it is set to Share All by default.
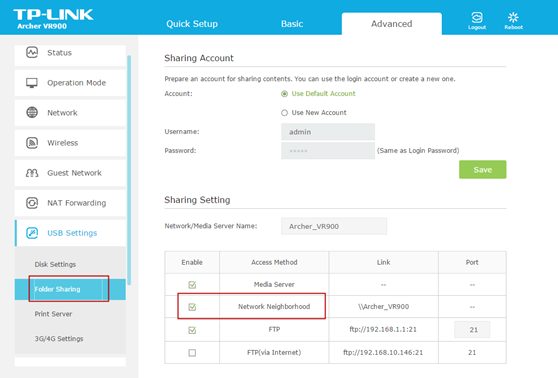
On the Folder Settings part below, the Network/Media Server Name can be changed to something else.

Step4.
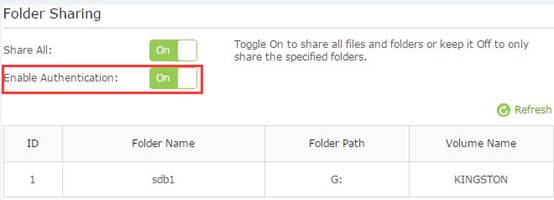
Switch on Enable Authentication on the bottom. This option can only be checked when Share All is on.
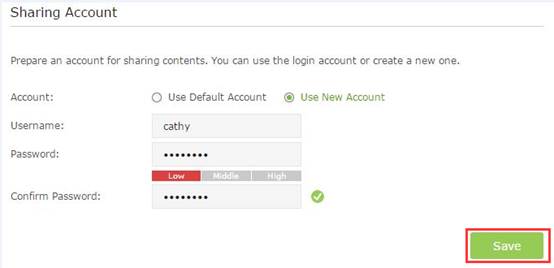
Go to Sharing Account on the top. If you choose Use New Account, you will have a separate login account for the USB device. If check on Use Default Account, it would be admin/admin. Click on Save.
Step5.
It is set to share all the files by default. If you want to customize the shared content, switch off Share All, and click on Add to choose specific folder.
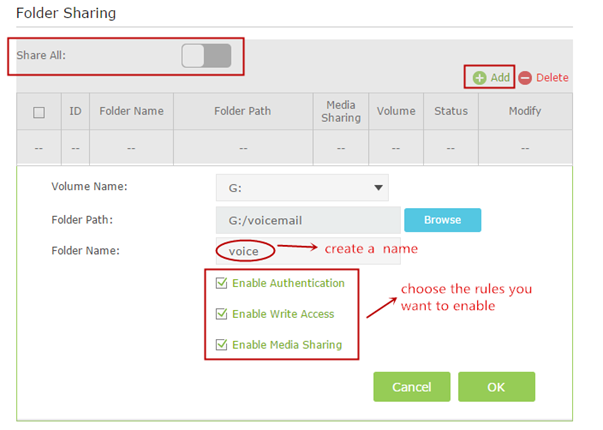
Below are explanations for the options:
Volume Name - From the pull-down list, select which volume to save the file under.
Folder Path- Path to the folder is determined by where the file is saved.
Folder Name - Name of the shared folder, customized by users.
Enable Authentication - Select the check box to require users to log in with a username and password.
Enable Write Access - Select the check box to allow users to make changes to the folder content.
Enable Media Sharing - Enable media server function, you may click here to get more info.
Step 6
Access the USB Storage
Please go to the following link for detailed instructions on How to Use the Local Storage Sharing Feature.
https://www.tp-link.com/support/faq/420/
Get to know more details of each function and configuration please go to Download Center to download the manual of your product.
Este guia foi útil?
A sua resposta ajuda-nos a melhorar o nosso site.
