Comment configurer le contrôle d'accès à Internet avec un pare-feu sur un routeur modem (interface utilisateur auto-développée)
Remarque : cet article s'applique au TD-W8968 V1/V2, pas au TD-W8968 V3 s'il s'agit du V2. Nous prendrons le TD-W8968 V1 comme exemple dans cet article. Les étapes sont les mêmes pour les autres modèles répertoriés.
Un pare-feu peut être utilisé pour contrôler l'accès des utilisateurs à Internet. Cette FAQ explique comment le configurer, à l'aide d'un exemple donné ci-dessous
Bloquer un ordinateur dont l'IP est 192.168.1.100 pour accéder à Internet de 00h00 à 06h00
Conformément à l'objectif ci-dessus, certains paramètres nécessaires doivent être requis et clarifiés tout au long du processus de configuration. Ils sont :
Type de règle : Bloc
Hôte LAN : 192.168.1.100
Cible : Internet
Horaire : 00h00 à 06h00
Après avoir obtenu les informations ci-dessus, vous pouvez démarrer la configuration sur TD-W8968.
Étape 1
Connectez-vous à la page de configuration du modem routeur .
Ouvrez votre navigateur Web et saisissez l'adresse IP LAN du routeur dans la barre d'adresse (l'adresse IP par défaut du routeur modem TP-Link est http://192.168.1.1. ), puis appuyez sur Entrée .

Lorsque vous y êtes invité, entrez le nom d'utilisateur et le mot de passe du routeur (le nom d'utilisateur et le mot de passe par défaut sont tous deux admin ).
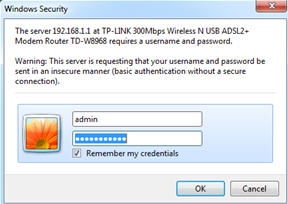
Si vous ne pouvez pas ouvrir cette page, veuillez cliquer ici pour plus d'instructions.
Étape 2
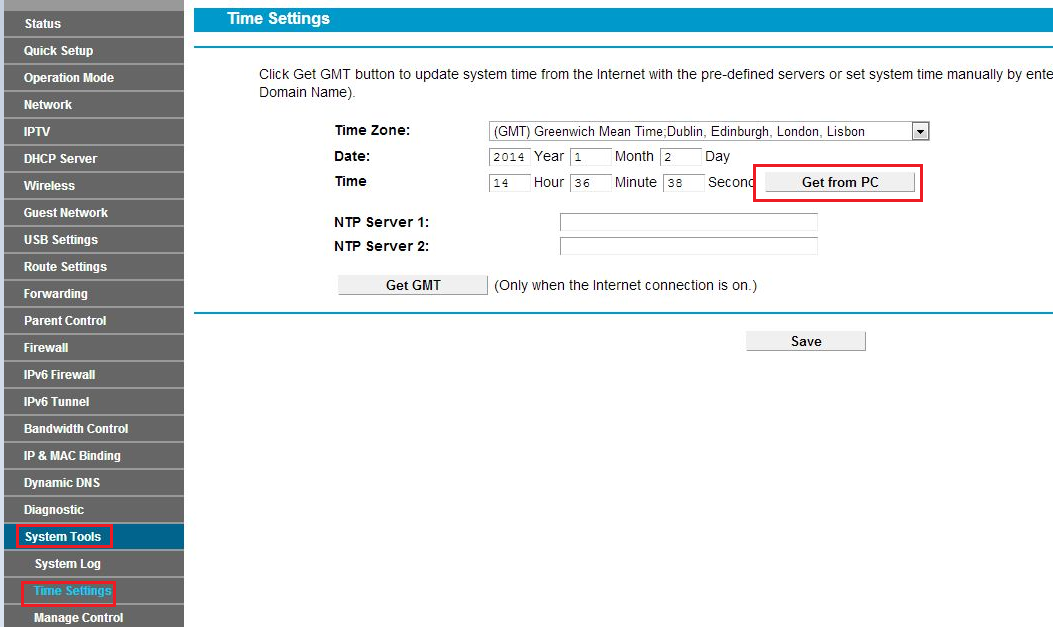
Les paramètres du pare-feu sont basés sur l'heure du modem plutôt que sur celle du PC. Nous devons donc tout d'abord ajuster l'heure du modem en fonction de celle du PC. Allez dans Outils système-> Paramètres de l'heure-> Obtenir depuis le PC-> Enregistrer.
Étape 3
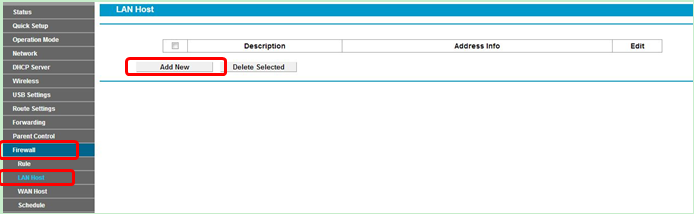
Accédez à Pare-feu -> Hôte LAN et cliquez sur Ajouter un nouveau .
Étape 4
Sélectionnez l' adresse IP dans le champ Mode , puis saisissez une brève description de la règle que vous configurez, ici nous prenons le LAN comme exemple. Et saisissez la plage d'adresses IP ou une plage d'adresses IP spécifique que vous souhaitez bloquer dans la barre d'adresses IP .
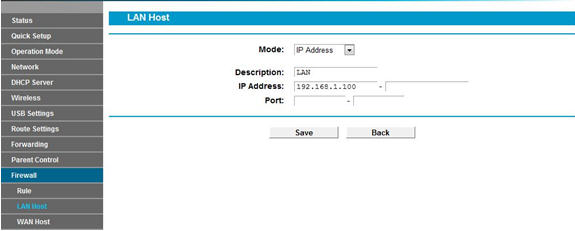
Remarque : laissez le port vide.
Étape 5
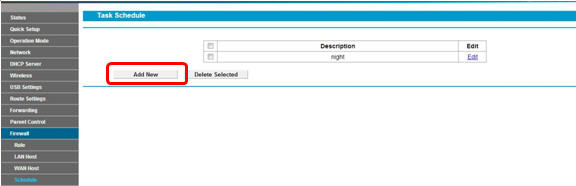
Accédez à Pare-feu -> Planification et cliquez sur Ajouter un nouveau.
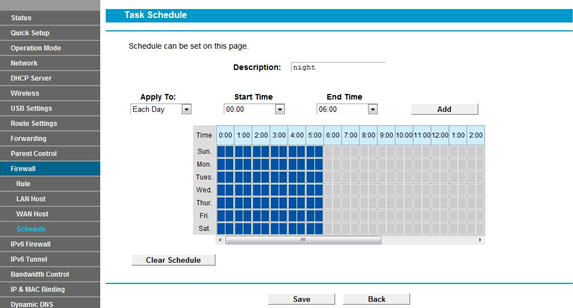
Étape 6
Sélectionnez le mode Jour , puis entrez une brève description de la règle que vous configurez. Vous pouvez sélectionner un ou plusieurs jours précis ou choisir Chaque jour . De plus, vous pouvez également sélectionner une heure précise pour accéder à Internet, spécifier vous-même l' heure de début et l'heure de fin , ici nous définissons la période entre 00h00 et 06h00. Cliquez ensuite sur Enregistrer pour enregistrer les paramètres.
Étape 7
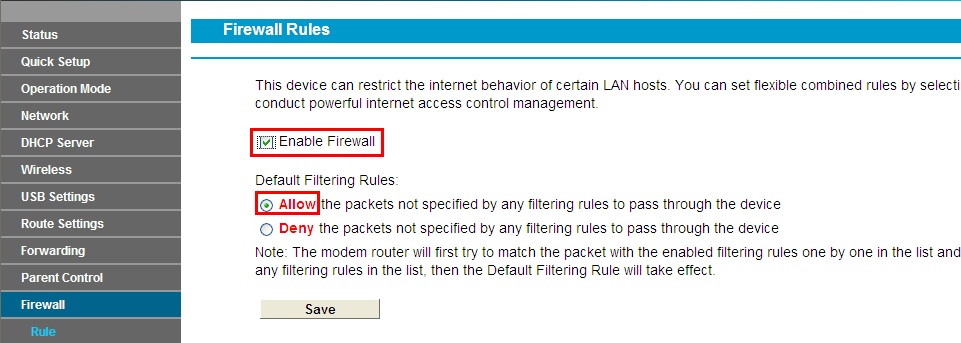
Allez dans Pare-feu -> Règle , sélectionnez Activer le pare-feu et cochez Autoriser , puis cliquez sur Enregistrer .
Étape 8
Cliquez sur Ajouter nouveau.
Étape 9
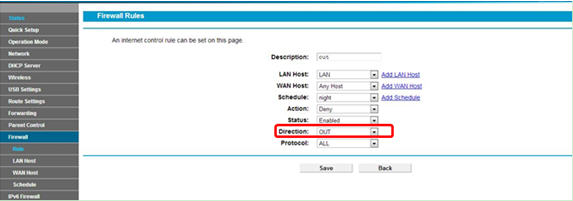
a . Tapez un nom pour la règle dans la description.
b . Sélectionnez un hôte dans la liste déroulante Hôte LAN ou choisissez « Ajouter un hôte LAN ».
c . Sélectionnez N’importe quel hôte dans la liste déroulante Hôte WAN.
d . Sélectionnez un calendrier dans la liste déroulante Calendrier ou choisissez « Ajouter un calendrier ».
e . Dans le champ Action , sélectionnez Refuser pour refuser votre entrée. Cela signifie que l'accès à Internet est refusé. (Si vous choisissez Autoriser , cela signifie que l'accès à Internet est autorisé)
f . Dans le champ Statut , sélectionnez Activé pour activer votre entrée.
g . Dans le champ Direction , sélectionnez OUT dans la liste déroulante pour la direction.
h . Dans le champ Protocole , voici quatre options : Tous, TCP, UDP et ICMP . En général, nous choisissons TOUS . (Vous pouvez sélectionner une option spécifique si vous savez laquelle choisir).
je . Cliquez sur Enregistrer .
Une fois tout terminé, vous pouvez obtenir les paramètres ci-dessous :

Désormais, l'ordinateur avec l'adresse IP : 192.168.1.100 ne peut pas accéder à Internet de 0h00 à 6h00 tous les jours.
Pour en savoir plus sur chaque fonction et configuration, rendez-vous sur le Centre de téléchargement pour télécharger le manuel de votre produit.
Est-ce que ce FAQ a été utile ?
Vos commentaires nous aideront à améliorer ce site.


