Cómo configurar la red de invitados en Archer C2_V5
La red de invitados le permite proporcionar acceso Wi-Fi a los invitados sin revelar su red de anfitrión. Cuando tenga invitados en su casa, apartamento o lugar de trabajo, puede crear una red de invitados para ellos. Además, puede personalizar la configuración de la red de invitados para garantizar la seguridad y la privacidad de la red.
Nota: El C2_V5 de Archer se utiliza para la demostración en este artículo.
1. Inicie sesión en el router. Para saber cómo hacerlo, consulte ¿Cómo inicio sesión en la utilidad basada en la web (página de administración) del router inalámbrico TP-Link?
2. Ve a Red de invitados.
3. Habilite la función de red de invitados.
4. Crea un nombre de red para tu red de invitados.
5. Seleccione el tipo de seguridad y cree la contraseña de la red de invitados.
6. Seleccione Programar en la lista desplegable Tiempo de acceso y personalícelo para la red de invitados.
Nota: La programación se basa en la hora del router. La hora se puede establecer en ¿Cómo configurar la hora del sistema de Archer C2_V5?
7. Haga clic en Guardar.
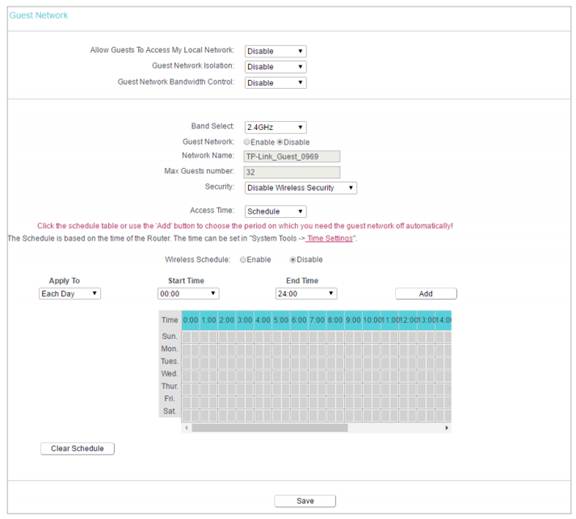
• Permitir que el invitado acceda a mi red local: si está habilitado, los invitados pueden acceder a la red local y administrarla.
• Aislamiento de red de invitados: si está habilitado, los invitados están aislados entre sí.
• Habilitar el control de ancho de banda de la red de invitados: si está habilitado, las reglas de control de ancho de banda de la red de invitados surtirán efecto.
Nota: El rango de ancho de banda para la red de invitados se calcula de acuerdo con la configuración de Control de ancho de banda en la página Control de ancho de banda > Configuración de control.
Conozca más detalles de cada función y configuración, vaya al Centro de descargas para descargar el manual de su producto.
¿Es útil este artículo?
Tus comentarios nos ayudan a mejorar esta web.