How to configure DHCP Address Reservation (Trendchip Solution)
This Article Applies to:
Preparation: Check Ethernet adapter’s MAC address of computer.
Step 1
Click on windows key  + R key on the keyboard at the same time.
+ R key on the keyboard at the same time.Step 2
Type “cmd” in the box, and then press OK.
Step 3
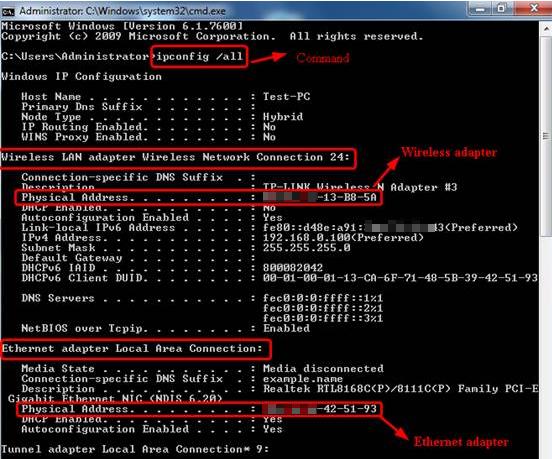
On the popping up black window, type command “ipconfig /all” and press Enter. It will show all current network adapters’ MAC address of this computer.
For example, MAC address of this computer’s Ethernet adapter: XX-XX-XX-42-51-93 (please write it down for later use)
Step 4
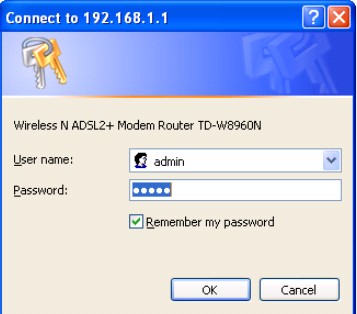
Open the web browser and type in http://192.168.1.1 in the address bar and press Enter. The Username and Password are both “admin”.

Step 5
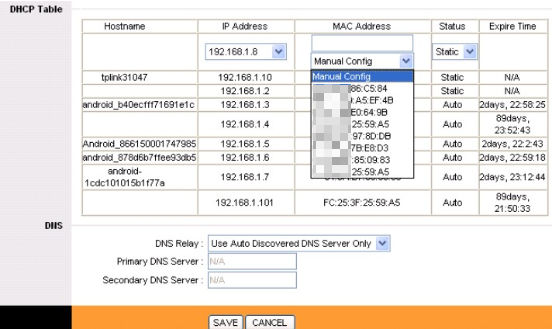
Click on Interface Setup -> LAN-> DHCP Table.
(Note: If you cannot see DHCP Table, please upgrade the firmware of the modem router first. click here to download the firmware. )
Step 6
In the DHCP Table, under the MAC Address, click on Manual Config and it will pop out a MAC address list. Select the MAC address of your computer. Click the IP Address drop-down list, and choose the IP address which you want to attach to the MAC address. Change Status to Static. Click on Save. You will see the MAC address of the computer, if its IP address is manually configured on the computer.
Step 7
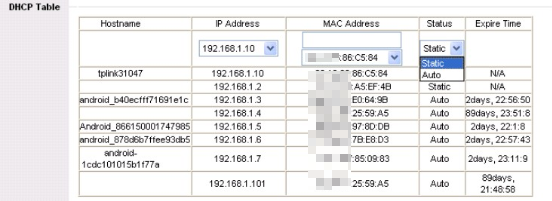
If you want to change the computer back to automatically obtain IP address from the modem, select the PC’s MAC address and change the Status to Auto. Click on Save.
Step 8
Each MAC address can only be binged to an unique IP address, or you will come across this error message: “ERROR: FAIL TO UPDATE DUE TO…Duplicate MAC Address”:

Please go back to Step 7 to release the IP address and change a different IP address for the computer.
Get to know more details of each function and configuration please go to Download Center to download the manual of your product.
Is this faq useful?
Your feedback helps improve this site.
-3.0-package_normal_1584497266805j.png)
8.0-F_normal_20231212005905m.png)

TP-Link Community
Still need help? Search for answers, ask questions, and get help from TP-Link experts and other users around the world.