TP-Link Smart Connect: O que é e como ativá-lo no seu roteador
O TP-Link Smart Connect atribui automaticamente cada dispositivo conectado à banda Wi-Fi de 2.4GHz ou 5GHz que oferece a velocidade mais rápida. Isso é o que o TP-Link Smart Connect faz em sua essência. Ao equilibrar a carga de rede entre as bandas, o Smart Connect da TP-Link pode reduzir atrasos e interrupções. Quando o Smart Connect está ativado, ambas as bandas compartilham o mesmo nome de rede (SSID) e senha, para que os dispositivos se conectem de forma contínua, sem que você precise alternar manualmente. Você pode ativar o Smart Connect através da página de gerenciamento web do seu roteador em tplinkwifi.net ou pelo aplicativo TP-Link Tether.
Principais Conclusões
- O TP-Link Smart Connect atribui automaticamente cada dispositivo conectado à banda Wi-Fi de 2.4GHz ou 5GHz que oferece a velocidade mais rápida, equilibrando a carga da rede para reduzir atrasos e interrupções.
- Quando o Smart Connect está ativado, as redes de 2.4 GHz e 5 GHz do roteador compartilham o mesmo SSID e senha. Os dispositivos se conectem de forma contínua, sem que o usuário precise alternar as bandas manualmente.
- O Smart Connect pode ser ativado através da página de gerenciamento web do roteador em tplinkwifi.net (vá em Avançado > Wireless > Configurações Wireless) ou pelo aplicativo TP-Link Tether (vá em Configurações Wireless e ative a chave do Smart Connect).
- O Smart Connect é particularmente útil quando você tem uma mistura de dispositivos mais antigos e mais novos na rede. Dispositivos legados que suportam apenas 2.4GHz são gerenciados automaticamente sem sobrecarregar essa banda.
O TP-Link Smart Connect atribui automaticamente os dispositivos conectados à banda Wi-Fi que oferece a velocidade mais rápida. Ao equilibrar a carga e atribuir os dispositivos à banda mais adequada, o Smart Connect pode reduzir atrasos e interrupções.
Quando o Smart Connect está ativado, as redes de 2.4 GHz e 5 GHz do roteador compartilham o mesmo SSID (nome da rede) e senha. Você pode desfrutar de uma conectividade contínua entre as redes de 2.4 GHz e 5 GHz.
TP-Link Smart Connect Ligado ou Desligado: Quando Ativá-lo
1) Quando você não tem certeza de qual banda de frequência ou qual local oferece o melhor sinal sem fio
Os sinais sem fio não conseguem se manter estáveis o tempo todo. Por isso, às vezes é necessário ajustar a frequência para melhorar o sinal. Se você não tiver certeza de qual banda de frequência ou qual local oferece o melhor sinal, relaxe e experimente o Smart Connect no seu roteador TP-Link.
2) Quando você tem dispositivos lançados em épocas diferentes
Dispositivos lançados em períodos diferentes possuem compatibilidades distintas com a rede sem fio de 5 GHz. Alguns dispositivos legados só funcionam bem na rede sem fio de 2.4 GHz. Se você tiver muitos dispositivos antigos misturados com dispositivos mais novos na rede sem fio, sua rede de 2.4 GHz pode ficar sobrecarregada pelo acúmulo de aparelhos nela. Ative o Smart Connect para permitir que o roteador escolha automaticamente a banda mais eficiente, garantindo que cada dispositivo atinja seu potencial máximo.
Como Ativar o TP-Link Smart Connect no seu Roteador
Aqui, utilizaremos o Archer AX50 como exemplo. A interface real pode variar um pouco dependendo do modelo do produto. Para mais detalhes, consulte o Guia do Usuário do seu roteador.
Via Gerenciamento Web
Passo 1: Verifique a conexão física do hardware e certifique-se de que seu roteador está conectado à Internet.
Passo 2: Conecte-se ao roteador via Wi-Fi ou por um cabo Ethernet, acesse http://tplinkwifi.net e faça login com seu TP-Link ID ou com a senha que você definiu para o roteador.
Passo 3: Vá em Avançado > Wireless > Configurações Wireless e ative o Smart Connect.
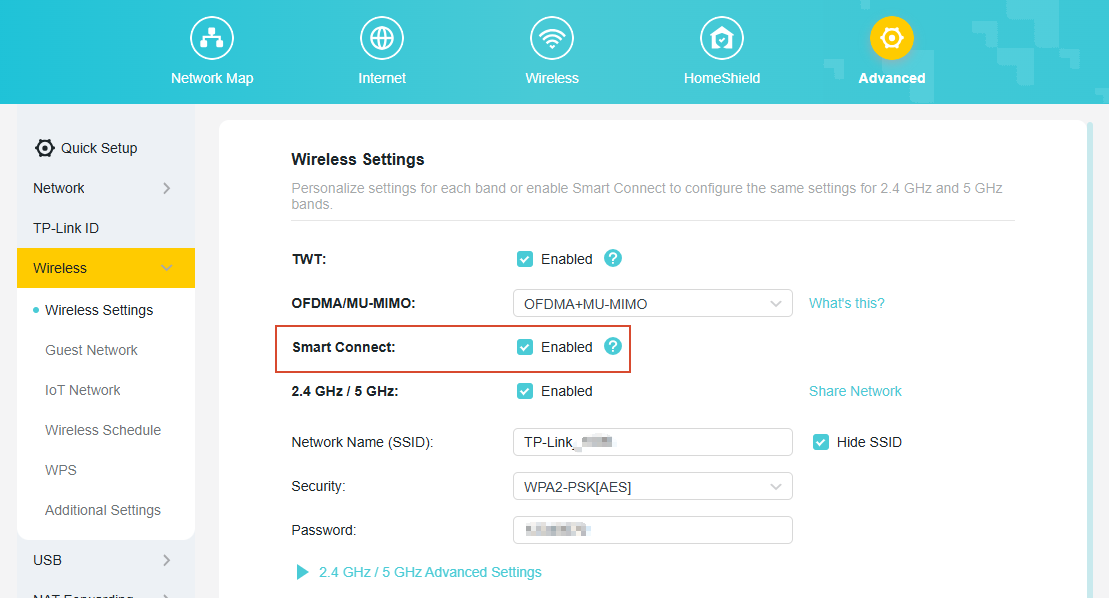
Passo 4: Personalize o nome da sua rede e a senha. Clique em Salvar para aplicar as configurações.
Via Aplicativo Tether
Passo 1: Conecte-se ao seu Roteador Wi-Fi da TP-Link.
Passo 2: Abra o Aplicativo Tether, selecione o seu roteador na lista de Dispositivos e faça o login nele.
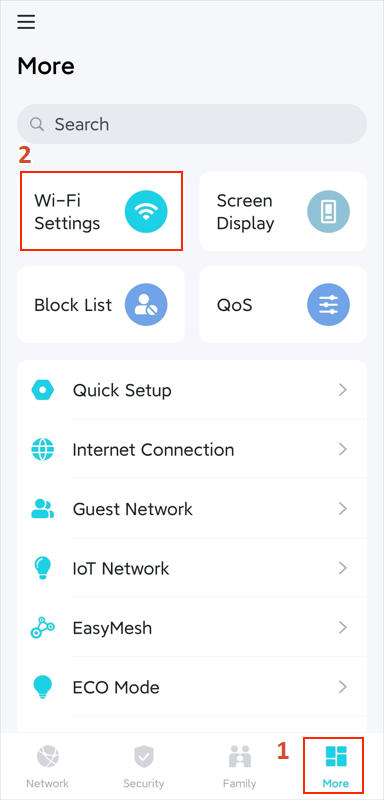
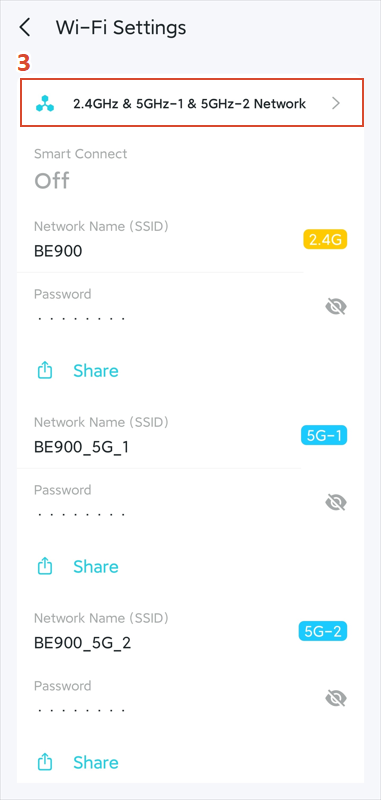
Passo 3: Vá em Mais > Configurações do Wi-Fi > Rede de 2.4GHz e 5GHz.
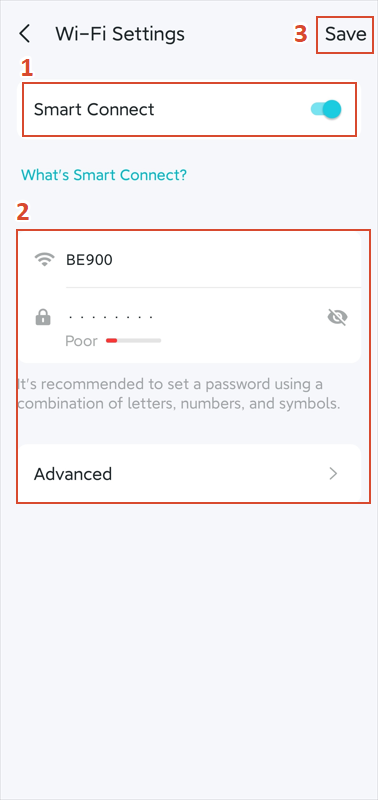
Passo 4: Ative a chave do Smart Connect, personalize o nome da sua rede e a senha e, em seguida, clique em SALVAR para aplicar as configurações.
Como Desativar o Smart Connect no Roteador TP-Link
Desativar o Smart Connect pode ser útil quando você precisa separar as bandas de 2.4 GHz e 5 GHz. Por exemplo, alguns dispositivos de casa inteligente (smart home) suportam apenas 2.4 GHz e podem ter problemas para se conectar quando ambas as bandas compartilham o mesmo SSID. Ativar ou desativar o Smart Connect leva apenas um momento e pode ser revertido a qualquer momento.
Você pode desativar o Smart Connect nos mesmos locais onde o ativou, seja pela página de gerenciamento web (Avançado > Wireless > Configurações Wireless) ou pelo aplicativo Tether (Mais > Configurações do Wi-Fi > 2.4GHz e 5GHz). Para instruções detalhadas, consulte as seções acima.
Para saber mais detalhes de cada função e configuração, acesse a Central de Downloads para baixar o manual do seu produto.
Procurando por mais
Esta FAQ é útil?
Seu feedback ajuda a melhorar este site.

1.0_normal_20210812031127k.png)
TP-Link Community
Still need help? Search for answers, ask questions, and get help from TP-Link experts and other users around the world.