Troubleshooting TP-Link Access Point Web Interface Login Issues
The TP-Link access point web interface, accessible via tplinkap.net or 192.168.0.254, is used to set up and manage your access point. Login issues are usually caused by connection, IP address, or browser configuration problems. This guide covers two scenarios: first-time setup or reinstallation, and reconnecting to an access point that is already working.
Key Takeaways
- To log in to the TP-Link access point web interface during initial setup, connect your device directly to the AP (not the main router) and use either http://tplinkap.net or http://192.168.0.254 in a web browser.
- If the default login address does not work on an already-configured AP, your main router may have assigned the AP a new IP address. Check the router's DHCP client list to find the current IP.
- Turning off mobile data and any VPN on your device before attempting to log in can resolve access issues during initial setup.
- If the AP has been previously configured and you cannot access the web interface, resetting the AP to factory defaults and starting setup again is the recommended fix.
- For ongoing management, assign the AP a static IP address within the same subnet as your router to ensure the login address stays consistent.
Case 1: First-Time Setup or Reinstallation
Step 1. Check physical connection.
Make sure your client device is connected to the Access Point, not the main router or another network. If you are using a mobile phone or tablet, turn off mobile data and any VPN.
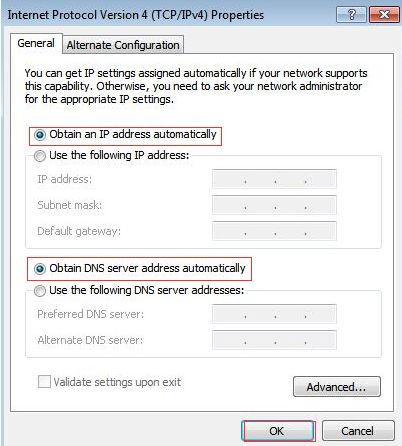
Step 2. Check the TCP/IP Settings of Your Client Device.
If the computer has a static IP address, change its settings to obtain an IP address automatically.
You could refer to: How to configure TCP/IP Properties of the Wireless Connection on my computer, to configure Windows OS as “obtain an IP address automatically”, and configure MAC OS as “Using DHCP”.
Step 3. Verify that the login address is correctly entered in the web browser.
You could use either http://tplinkap.net or http://192.168.0.254 to login web interface of the TP-Link Access Point for initial setup.
Step 4. Disconnect the Access Point from your main router.
Disconnect the Ethernet cable between the main router and the Access Point, or power off the router, then try again.
Step 5. Reboot your Access Point and try again.
Step 6. Use another web browser and try again.
Step 7. Reset the Access Point to factory defaults, especially for reinstallation.
You could refer to How to hard reset TP-Link wireless access points, extenders to factory defaults
Case 2: Access Point Is Working, But You Can't Log In
Step 1. Ensure the internet from the AP is working.
If the internet doesn’t work, please refer to Case One above to log in to the web interface and install it first, or refer to What should I do if I fail to configure TP-Link Access Point?
Step 2. Find the current IP address of the Access Point.
When setting up the AP, did you assign it a static IP address?
If so, please confirm if that static IP is in the same subnet as your main router. For example, if your router LAN IP is 192.168.1.1 with a subnet mask of 255.255.255.0, then it is recommended to use 192.168.1.X on the AP. However, if the static IP you set for the AP is 192.168.0.X, which is in a different subnet from your router, you will not be able to use 192.168.0.X to access the Access Point. In that case, you will need to either configure a static IP on your client device to 192.168.0.X to access the AP or reset the AP to factory defaults to set it up again.
However, if you didn’t set a static IP for the AP, after it is connected to your main router, your main router will assign a new IP address to the AP, thus the default IP address 192.168.0.254 might not work. You will need to find the new IP address of the AP on your router’s web interface or App (DHCP Client list).
Step 3. Use the current IP address of the AP to access its web interface.
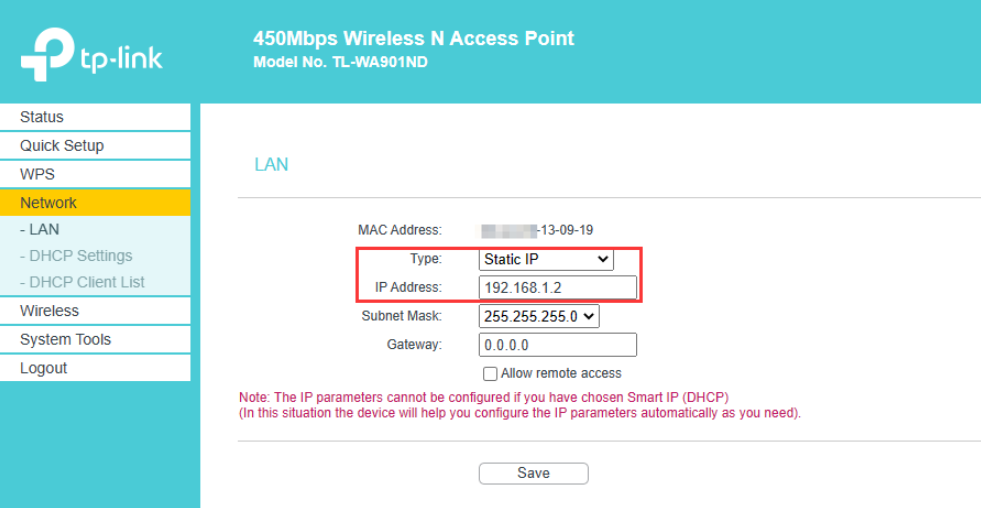
Note: Recommendation for Future Management.
After successfully logging in, assign the AP a static IP address within the same subnet as your router to ensure consistent access in the future.
Example:
If the router's LAN IP address is 192.168.1.1, it is recommended to configure a static IP 192.168.1.X(X cannot be the same as the router) on the AP, such as 192.168.1.2 or 192.168.1.254, etc., on the Network->LAN page, then in the future, you could use 192.168.1.1 to access your router and use 192.168.1.X to access the AP easily.
Looking For More
Полезен ли беше този ЧЗВ?
Вашите отзиви помагат за подобряване на този сайт.

6_normal_1578296539191n.jpg)
6.0-package_normal_1578295057780i.jpg)
TP-Link Community
Still need help? Search for answers, ask questions, and get help from TP-Link experts and other users around the world.