How to Set Up TP-Link DDNS on Your Wireless Router
Most Internet service providers (ISPs) assign a dynamic IP address to your router. This address can change at any time, which makes remote access unreliable. Dynamic Domain Name Server (DDNS) solves this by binding a fixed domain name to your router's current public IP address automatically. TP-Link DDNS is a free DDNS service built into compatible TP-Link wireless routers, giving you a stable address like yourhostname.tplinkdns.com without needing to track changing IPs.
Key Takeaways
- TP-Link DDNS is a free Dynamic Domain Name Server (DDNS) service built into TP-Link wireless routers with cloud functions. It lets you access your home network remotely using a fixed domain name, such as yourhostname.tplinkdns.com.
- Setup takes two steps: first, bind a TP-Link ID to your router; then, register a hostname under Advanced > Network > Dynamic DNS.
- Your domain name is automatically tied to your network's external public IP address. If your ISP assigns a private WAN IP address (such as 192.168.1.x), the public IP is still used.
- If your chosen hostname is unavailable, another user has already registered it. Try a different hostname.
- To change your domain name, click Unbind to remove the current domain, then click Register to create a new one.
Before You Begin
Note:
- This guide applies to TP-Link wireless routers with cloud functions, such as the Archer C8 V3 and Archer C9 V3/V4.
- Most applicable models currently support only the online upgrade feature. Additional cloud functions are planned for future firmware updates.
- For the Archer C5400 V1, cloud services are available on the EU version only. Please check the hardware version on the label on the back of your router.
Step 1: Register and Bind Your TP-Link ID to the Router
Register and bind your TP-Link ID to your TP-Link wireless router before continuing. This step is required for TP-Link DDNS to work.
Step 2: Register Your TP-Link DDNS Hostname
- Connect your phone or computer to the router’s Wi-Fi or Ethernet port. Open a browser, enter https://tplinkwifi.net/ , and log in to access its web management page.
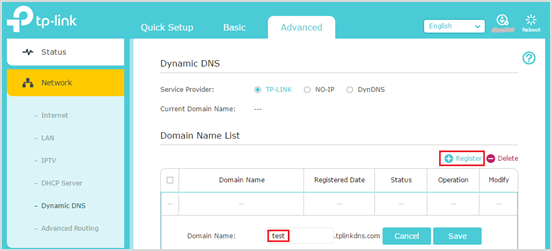
- Go to Advanced > Network > Dynamic DNS.
- Select TP-Link as the Dynamic Domain Name Server (DDNS) service provider.
- Click Register, then enter a hostname to create your domain name. For example: test.tplinkdns.com.
- Click Save. Your domain name will be bound to your router automatically.

- Make sure you have an active Internet connection when registering a TP-Link domain name.
- If registration fails, the hostname you entered has already been registered by another user. Try a different hostname.
- Your domain name is bound to the external public IP address of your network. You do not need to worry if your ISP assigns a private WAN IP address (such as 192.168.1.x) to the router.
- To change your domain name: click Unbind and delete your current domain name, then click Register to bind a new one.
For more details on each function and configuration, visit the Download Center to download the manual for your product.
Полезен ли беше този ЧЗВ?
Вашите отзиви помагат за подобряване на този сайт.

1.0_normal_1591236279433p.png)
1.0_normal_20240923021822p.png)