Network Video Recorder User Guide
Configure Your Network Camera
This chapter introduces how to add your cameras to NVR and configure them. You can customize image effects and configure OSD (On Screen Display), Privacy Mask, Stream, and Pan&Tilt. This chapter contains the following sections:
VIGI NVR can add cameras singly, in batches or to a certain screen. You can also manually add cameras by entering their IP addresses and passwords. The processes vary depending on whether the camera has a password and whether Plug and Play is enabled. TP-Link security cameras have no passwords in default settings.
Choose one of the methods below and follow the steps to add your cameras:
�? Add Cameras Singly or in Batches
�? Add a Camera to a Certain Screen
When adding TP-Link security cameras, the NVR will automatically modify the IP addresses to ensure every camera has a unique IP address and they are in the same subnet as your NVR. To add cameras from other brands, it is recommended to refer to their user guides before adding. If the cameras cannot be automatically found by the NVR, refer to 2. 1. 3 Add Cameras Manually .
2. 1. 1 Add Cameras Singly or in Batches
To add cameras without passwords, refer to Add Cameras without Passwords . To add cameras with passwords, refer to Add Cameras with Passwords .
Note: If you forget the camera’s password, refer to FAQ to reset the password.
Add Cameras without Passwords
�? When Plug and Play Enabled
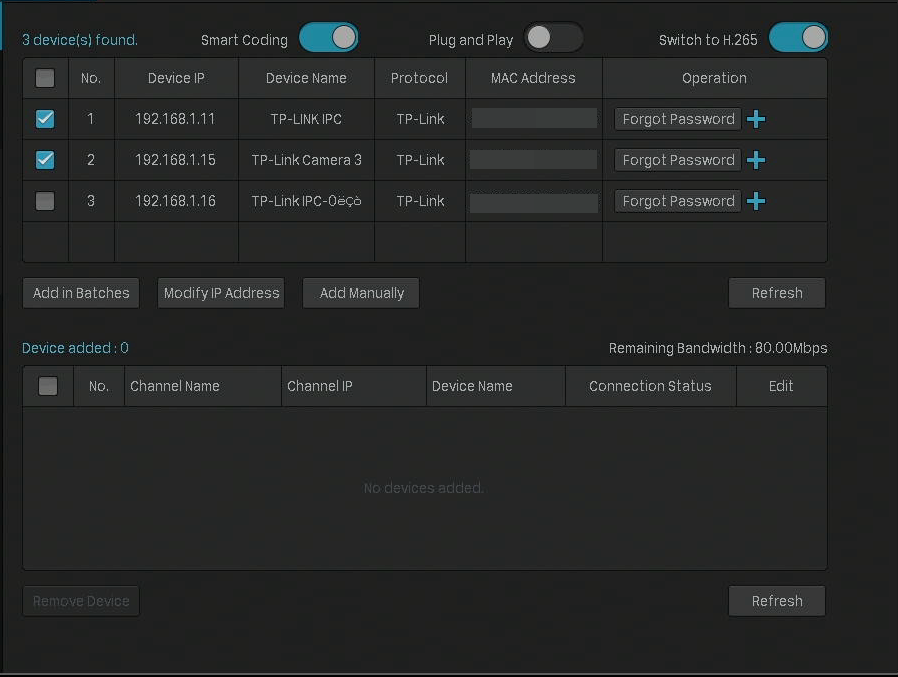
After you connect the cameras to the network device, stay in the Live View screen and wait for the NVR to add the cameras. If detecting that the cameras are not in the same subnet, the NVR will automatically modify the IP addresses of your cameras . Click Add to add the cameras.

�? When Plug and Play Disabled
Follow the steps below to add the cameras.
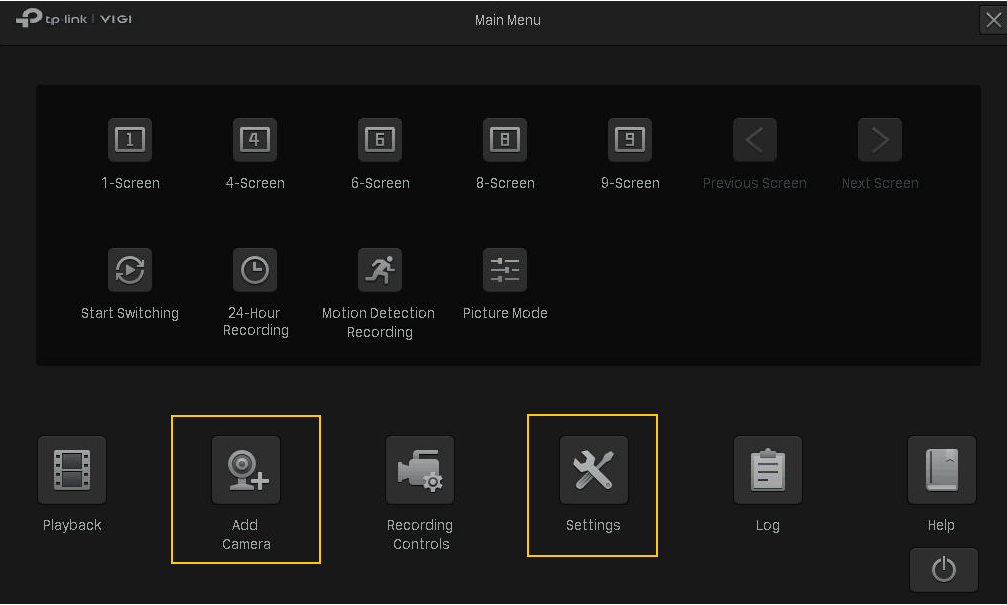
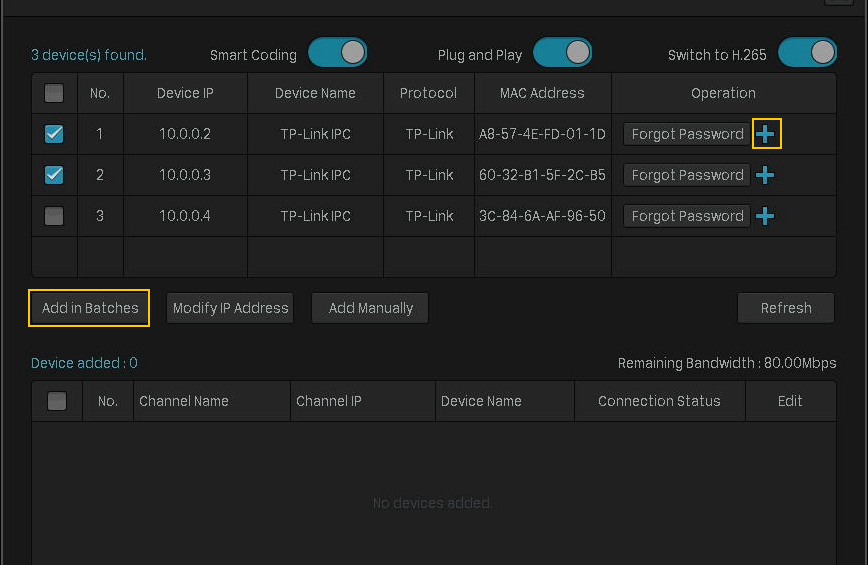
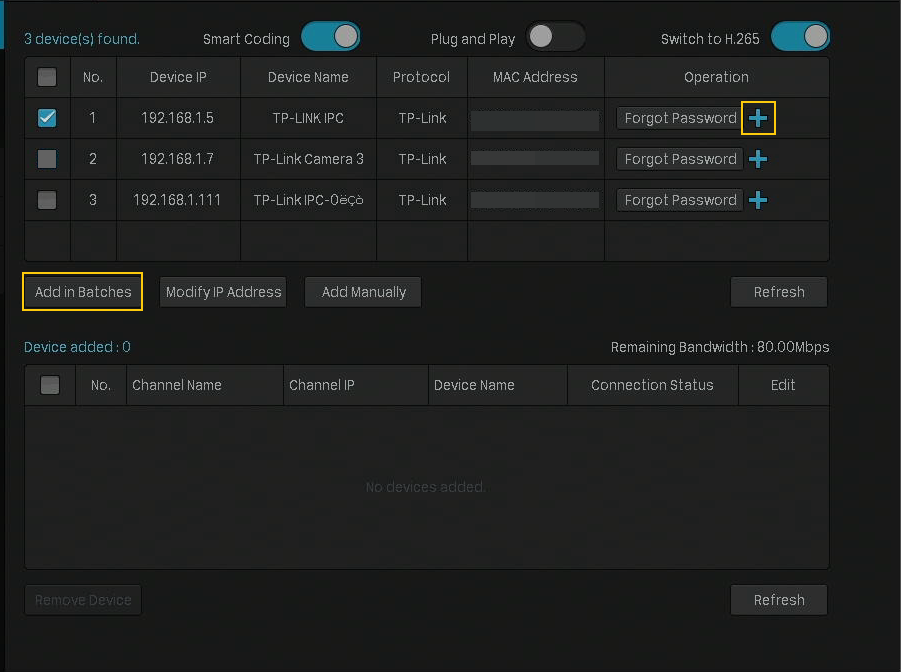
1. Right click on the Live View screen and click Add Camera in the pop-up Main Menu. Alternatively, right click on the Live View screen and click Settings in the pop-up Main Menu, then go to Camera > Device Access > Add Device .
2.
Click
 to add a single camera. If you want to add cameras in batches, click the checkbox of cameras and click
Add in Batches
.
to add a single camera. If you want to add cameras in batches, click the checkbox of cameras and click
Add in Batches
.
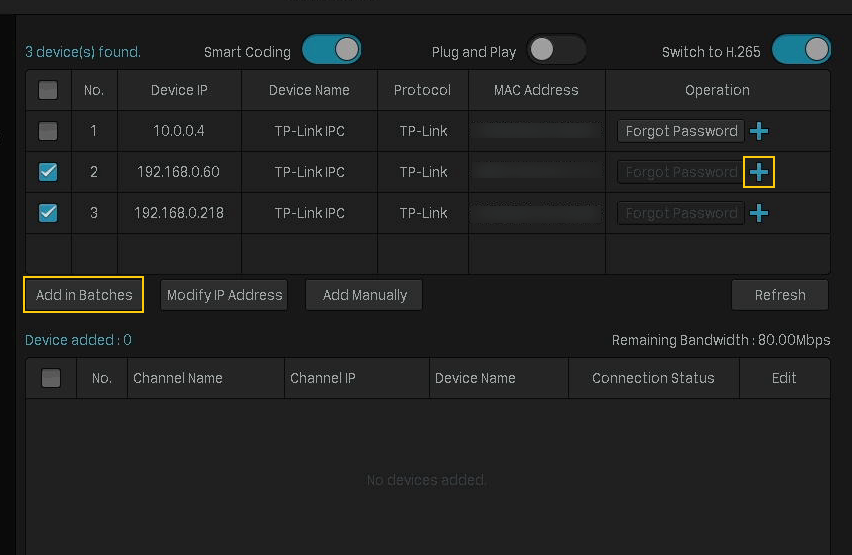
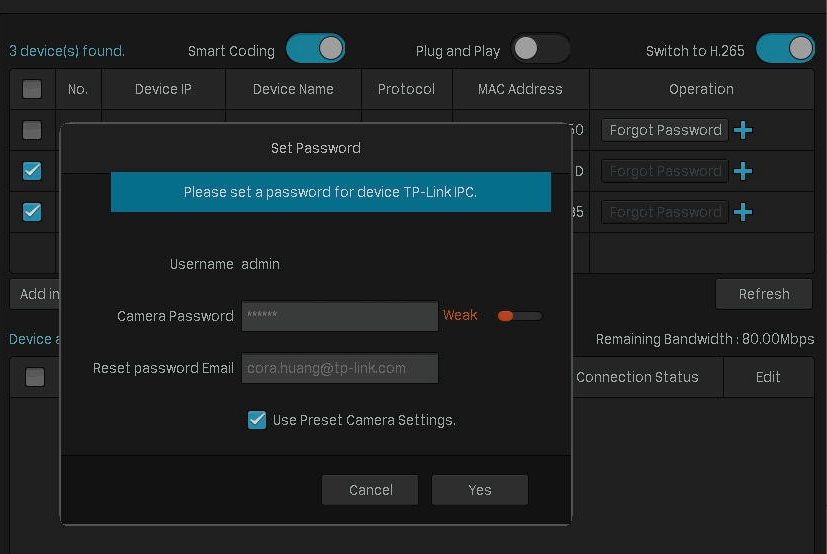
3. Set a password for your cameras. You can also click the checkbox to use the preset password settings for cameras. Click Yes . After the cameras are added, you can view the cameras in the Device Added list.
Add Cameras with Passwords
�? When Plug and Play Enabled
After you connect the cameras to the network device, stay in the Live View screen and wait for the NVR to add the cameras. The cameras will be automatically added to the NVR. Then enter the passwords in the Live View screen to verify the cameras.
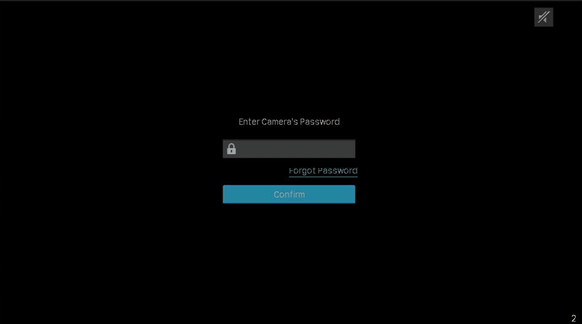
You can also follow the steps below to verify the passwords.
1. Right click on the Live View screen and click Add Camera in the pop-up Main Menu. Alternatively, right click on the Live View screen and click Settings in the pop-up Main Menu, then go to Device Access > Add Device .
2.
Click
to add a single camera. If you want to add cameras in batches, click the checkbox of cameras and click
Add in Batches
.
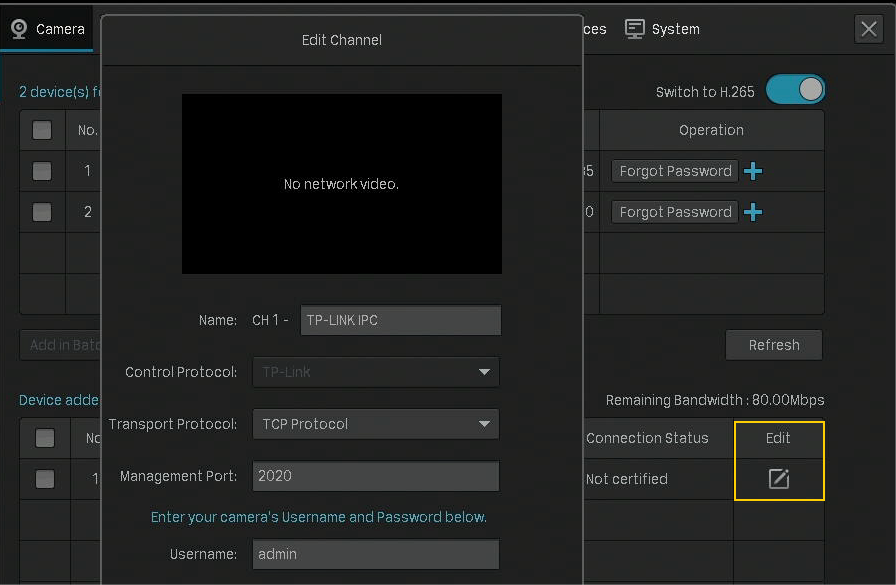
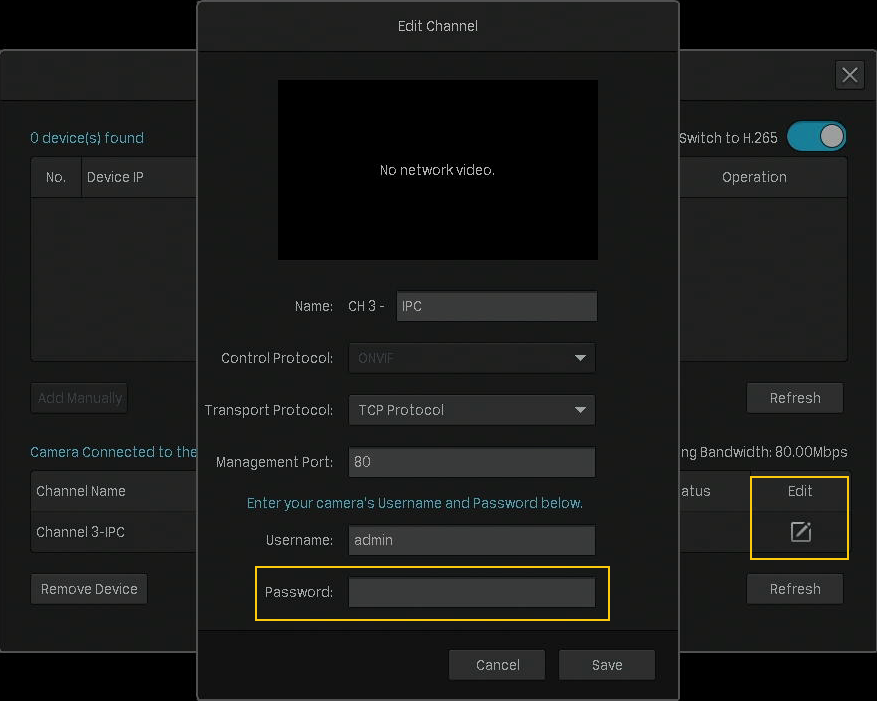
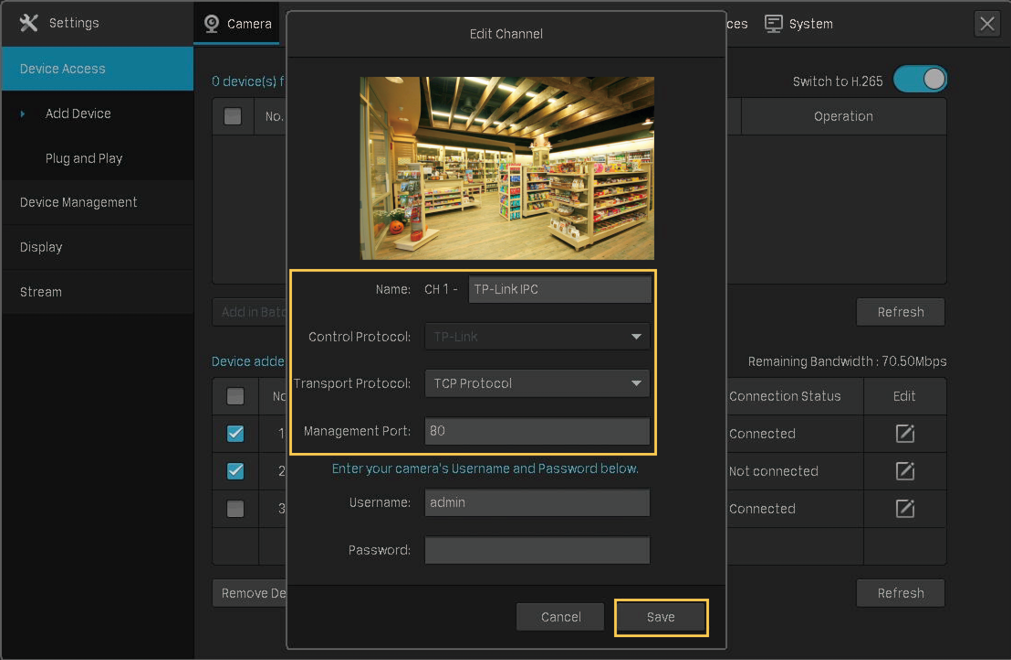
3.
Click
 Edit
in the connected device list. Then enter the password in
Edit Channel
and click
Save
. After a successful verification, the connected status will change from
Not certified
to
Connected
.
Edit
in the connected device list. Then enter the password in
Edit Channel
and click
Save
. After a successful verification, the connected status will change from
Not certified
to
Connected
.
�? When Plug and Play Disabled
When plug and play is disabled, follow the steps below to add cameras.
1. Right click on the Live View screen and click Add Camera in the pop-up Main Menu. Alternatively, right click on the Live View screen and click Settings in the pop-up Main Menu, then go to Camera > Device Access > Add Device .
2.
Click
to add a single camera. If you want to add cameras in batches, click the checkbox of cameras and click
Add in Batches
.
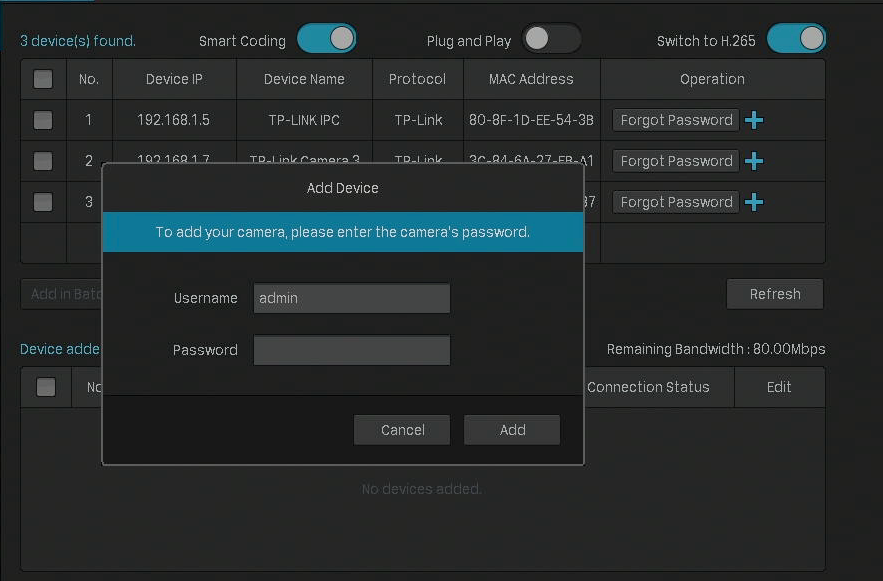
3. Enter the password manually to verify it. Click Add . After the cameras are added, you can view the cameras in the Device Added list.
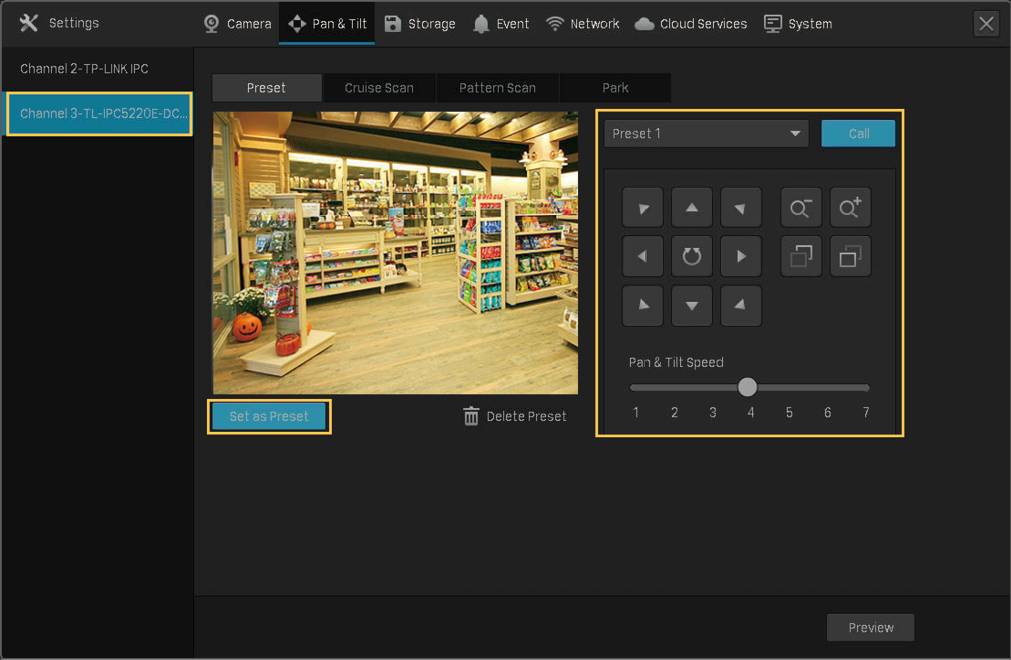
2. 1. 2 Add a Camera to a Certain Screen
You can add a camera to a certain channel in the Live View screen. Follow the steps below to finish the configuration.
1.
Click a screen in the Live View screen and click
 on the bottom left corner.

2.
Click
.
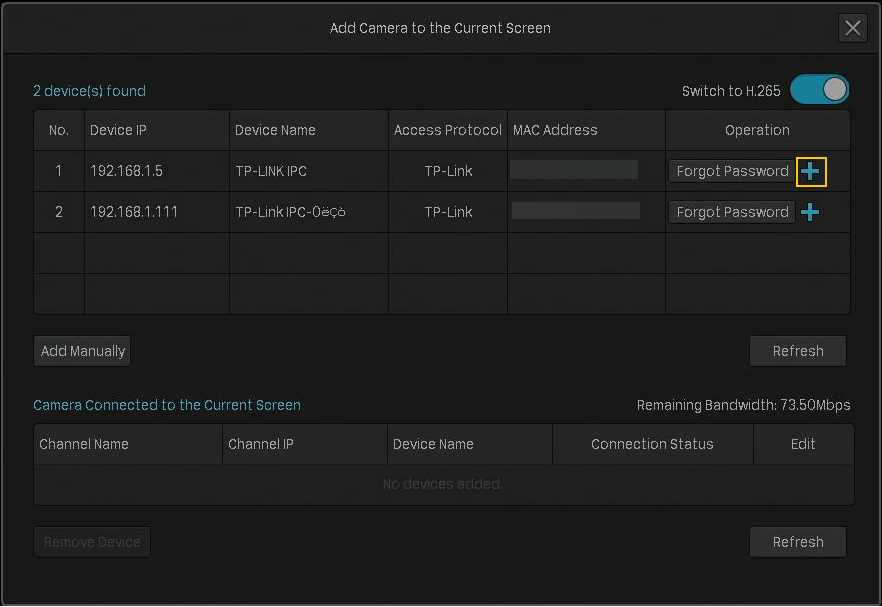
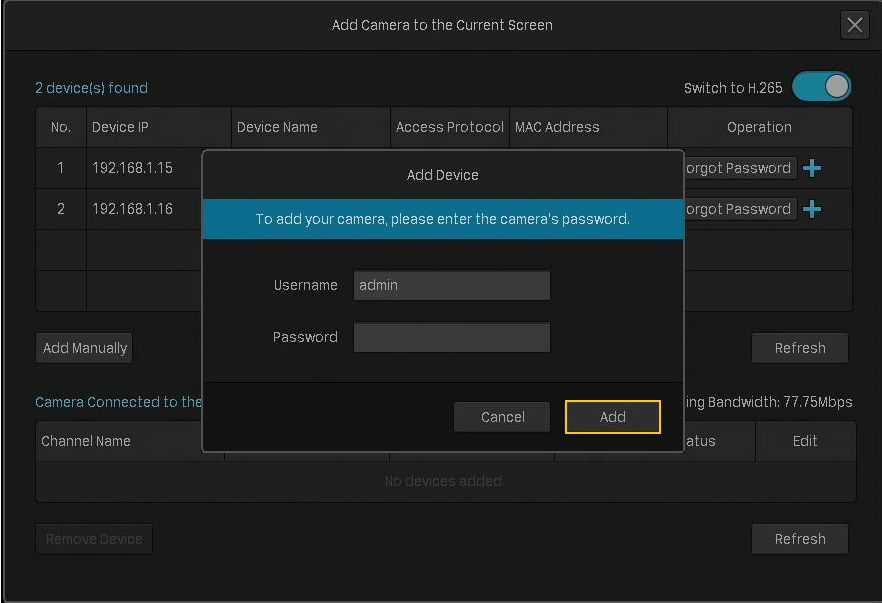
3. (Optional) If your cameras have set the password, follow the steps below to manually verify the password.
�?
When Plug and Play is enabled, click
Edit
in the connected device list. Then enter the password in
Edit Channel
and click
Save
. After a successful verification, the connected status will change from
Not certified
to
Connected
.
�? When Plug and Play is disabled, enter the password manually in the pop-up window to verify it. Click Add .
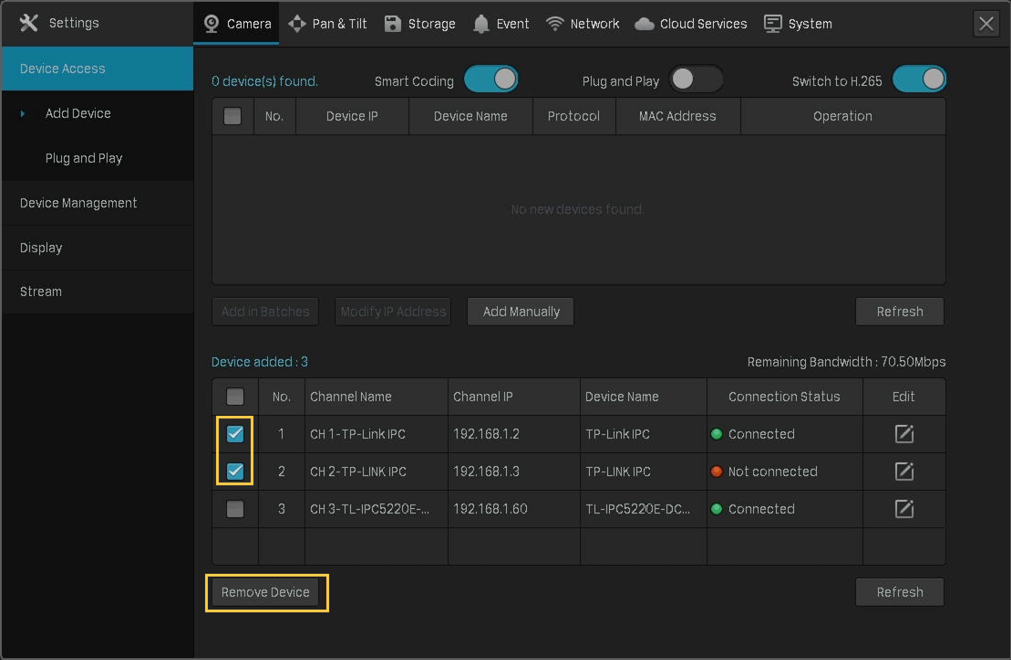
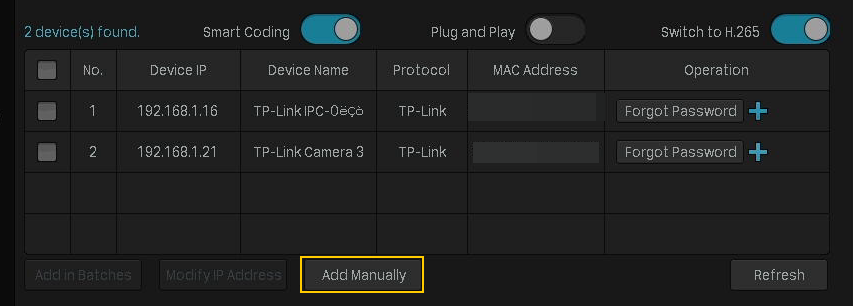
If the devices cannot be automatically found by the NVR, you can add cameras manually using its information. Follow the steps below to finish the configuration.
1. Right click on the Live View screen and click Add Camera in the pop-up Main Menu. Alternatively, right click on the screen and click Settings in the pop-up Main Menu, then go to Camera > Device Access > Add Device .
2. Click Add Manually .
3. Enter the information of the camera to add it. For VIGI security camera, enter the IP address and password. Click Add .
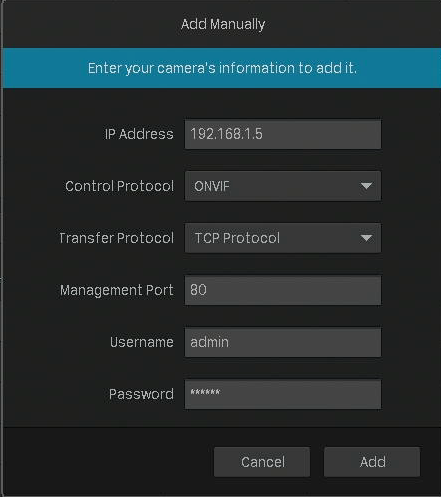
|
IP Address |
|
Control Protocol |
|
Transfer Protocol |
|
Management Port |
|
Username |
|
Password |
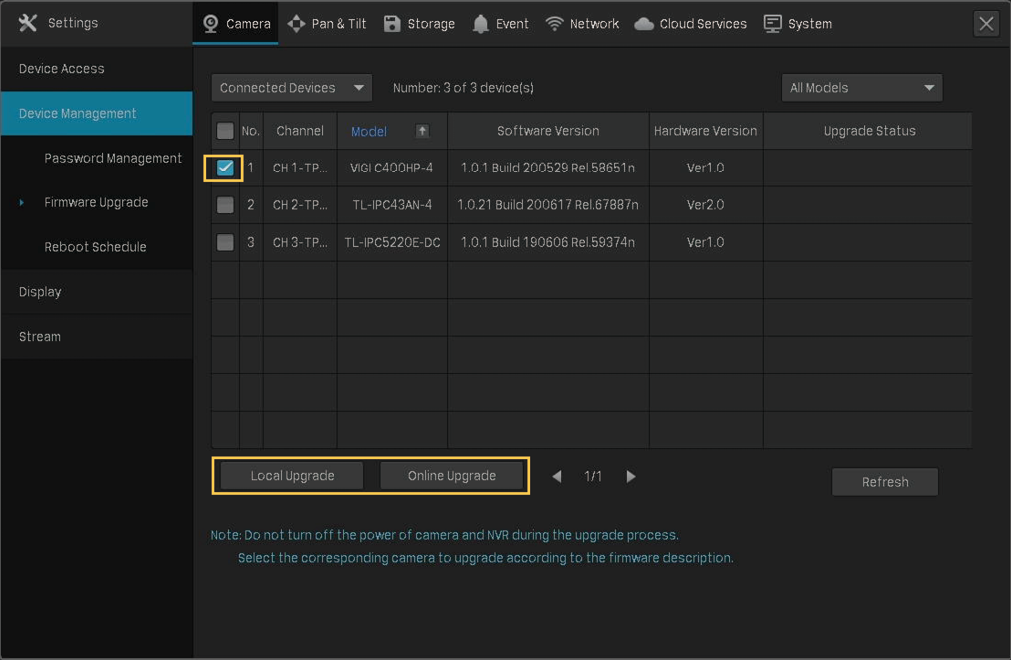
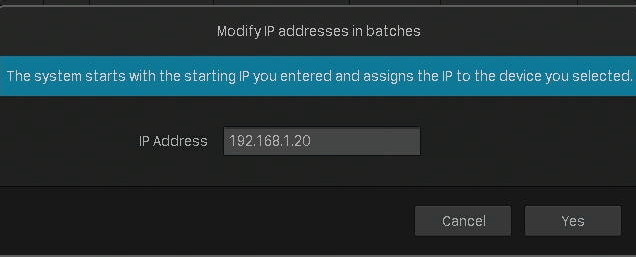
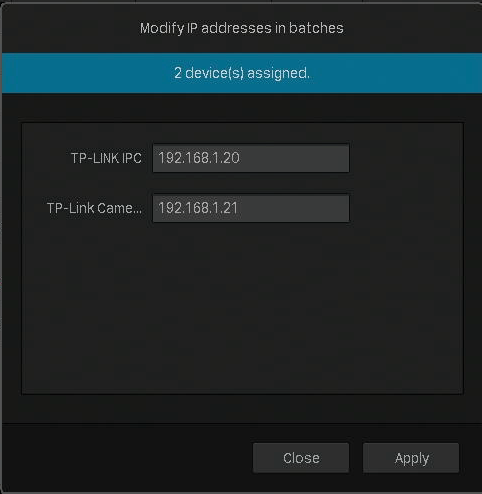
2. 1. 4 Modify IP Addresses of Cameras To avoid IP conflict and make sure your cameras are in the same subnet, you can modify the IP addresses manually. Follow the steps below to finish the configuration. 1. Right click on the Live View screen and click Add Camera in the pop-up Main Menu. Alternatively, right click on the Live View screen and click Settings in the pop-up Main Menu, then go to Camera > Device Access > Add Device . 2. Click the checkbox of camera(s) and click Modify IP Address . You can select multiple cameras to modify their IP addresses in batches.
3. Set the starting IP address you assigned for the camera(s). Click Yes .
4. Click Apply to confirm the new IP address(es). Note: The IP address(es) will be assigned to camera(s) in order.
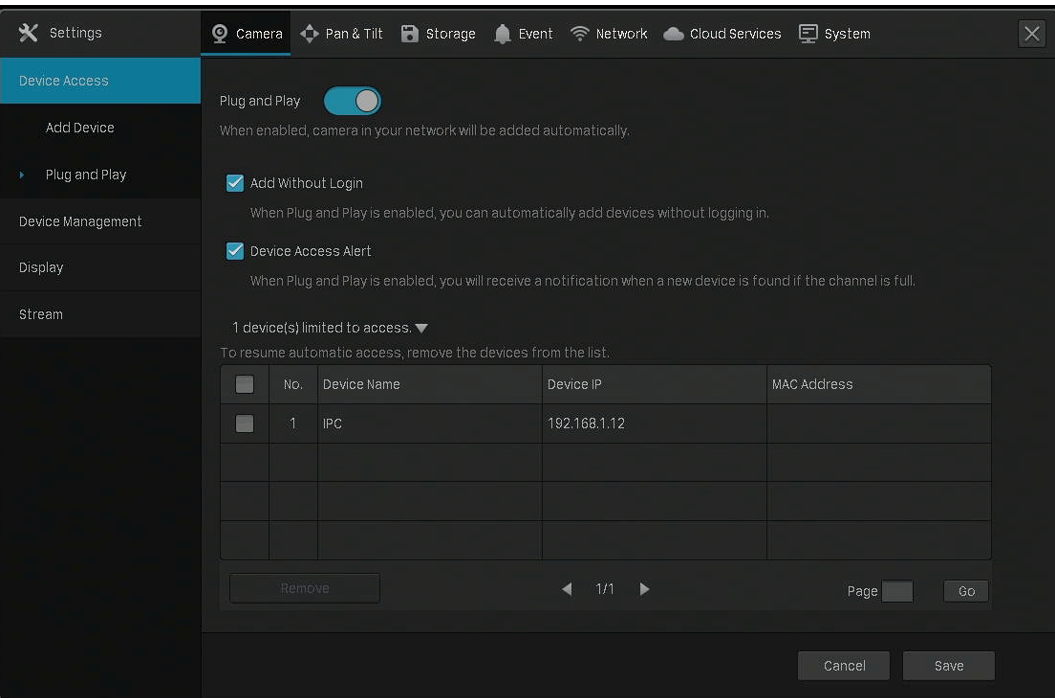
Plug and Play function enables NVR to automatically find and add cameras. You can enable or disable this function according to your needs. To configure and view the settings, right click on the Live View screen and click Settings in the pop-up Main Menu, then go to Camera > Device Access > Plug and Play .
�? Add Without Login When the cameras and your NVR are in the same network, the cameras will be automatically added without your account logged in. �? Device Access Alert If a new camera is found when the channels are full, your NVR will receive a notification. �? Devices Limited to Access After the cameras are added to the NVR, they will be automatically added to the list, which means they cannot be added to the NVR again automatically. If you want to automatically add the cameras for the second time, remove the cameras from the devices limited access list. To adjust the image effect, you can configure the picture mode and image settings. 2. 3. 1 Change Picture Mode 1. Right click on the Live View screen and click Picture Mode in the pop-up Main Menu. 2. Select a mode to adjust the image. Click OK .
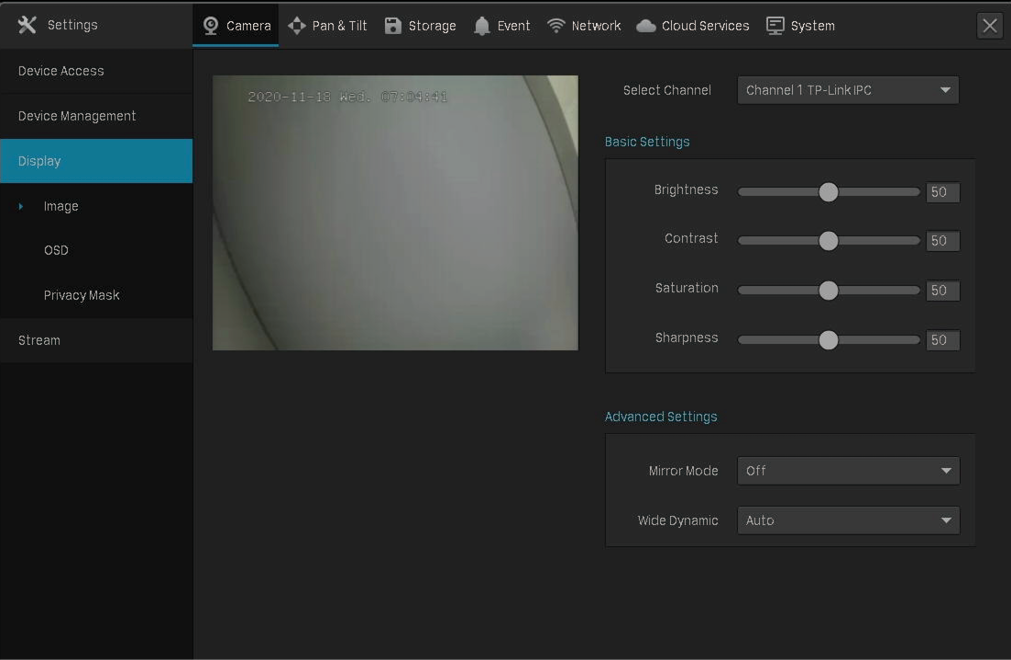
2. 3. 2 Configure Image Settings 1. Right click on the Live View screen and click Settings in the pop-up Main Menu. Go to Camera > Display > Image . 2. Select a channel and configure the following parameters.
You can also select a channel on the Live View screen to reveal the toolbar and click
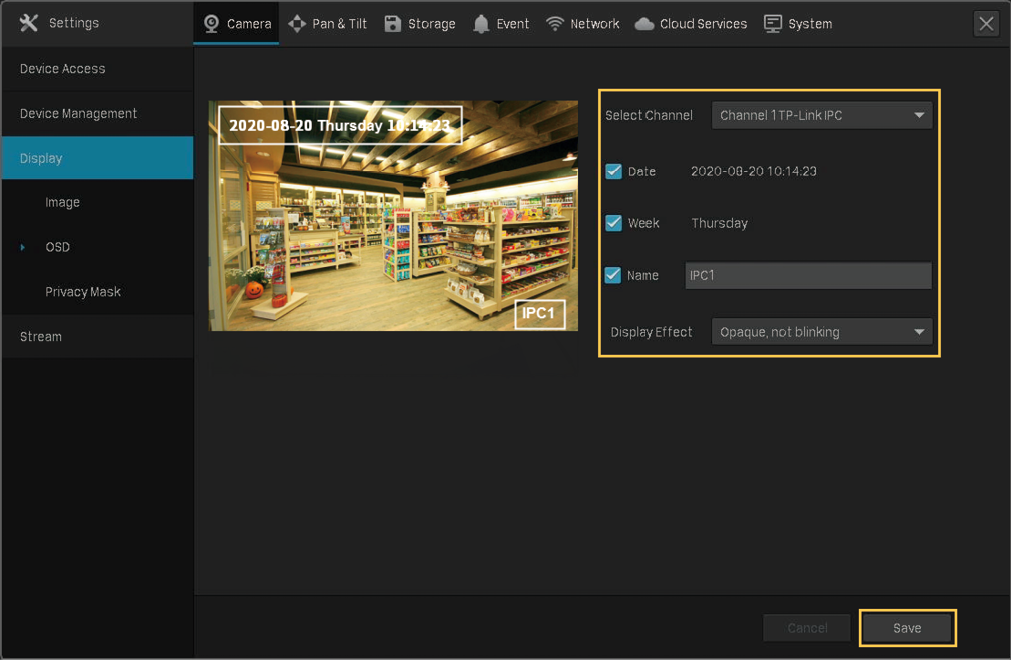
You can configure OSD (On Screen Display) to edit the information displayed in Live View and recordings. Follow the steps below to configure OSD. 1. Right click on the Live View screen and click Settings in the pop-up Main Menu. Go to Camera > Display > OSD . 2. Select a channel, click the checkbox to display or hide the information, and select a display effect. Click Save .
Note : If you change Name in the OSD setting, you also change the camera name.
You can also select a channel on the Live View screen to reveal the toolbar and click
With Privacy Mask, you can set privacy area in the image. The area cannot be recorded and monitored.
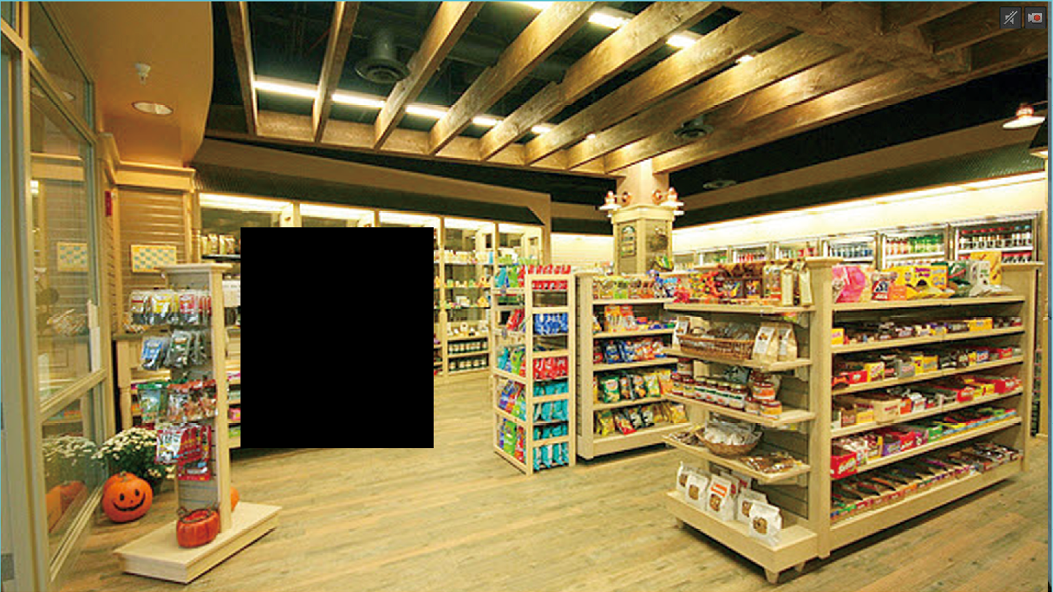
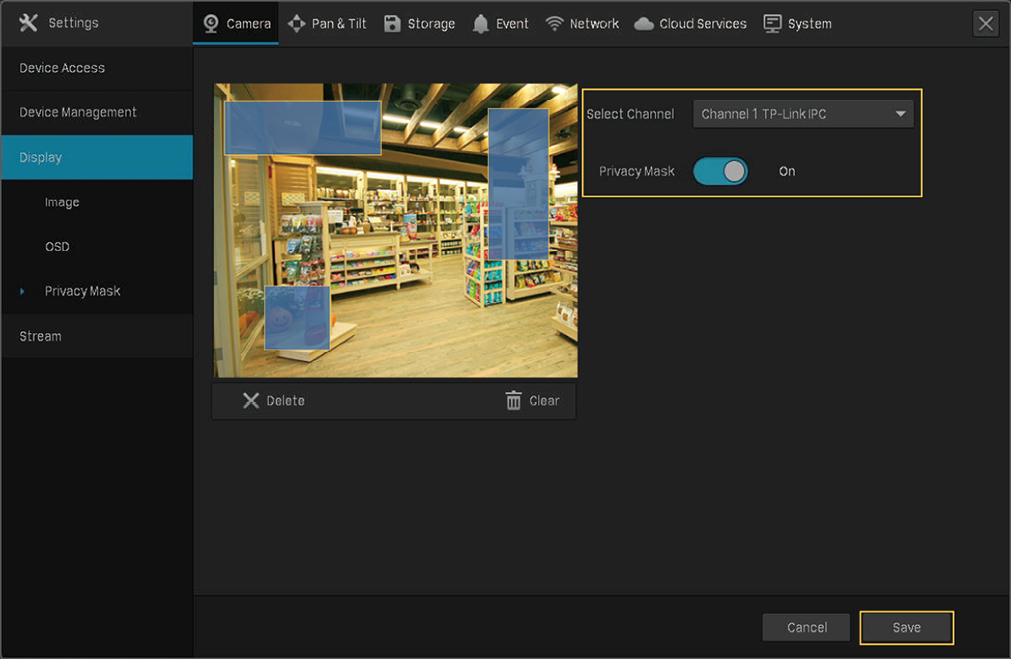
Follow the steps below to configure Privacy Mask. 1. Right click on the Live View screen and click Settings in the pop-up Main Menu. Go to Camera > Display > Privacy Mask . 2. Select a channel and enable Privacy Mask . Draw the privacy areas on the preview screen (the blue squares in the picture below). Use the mouse to adjust the size and location of areas. To remove a certain privacy area, select it and click Delete . To remove all privacy areas, click Clear . Click Save to finish the configuration.
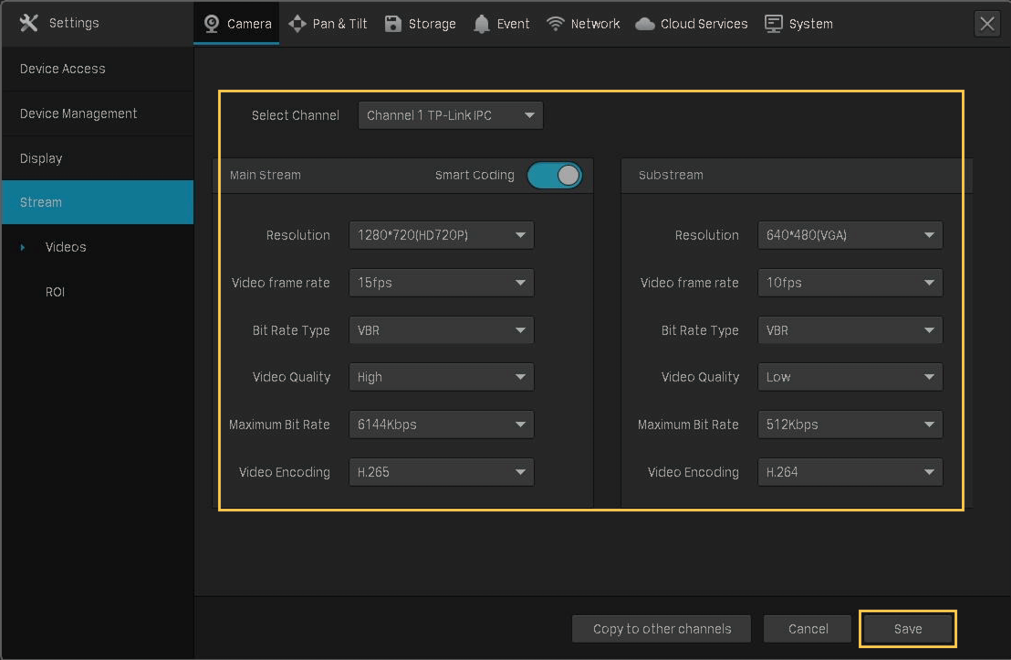
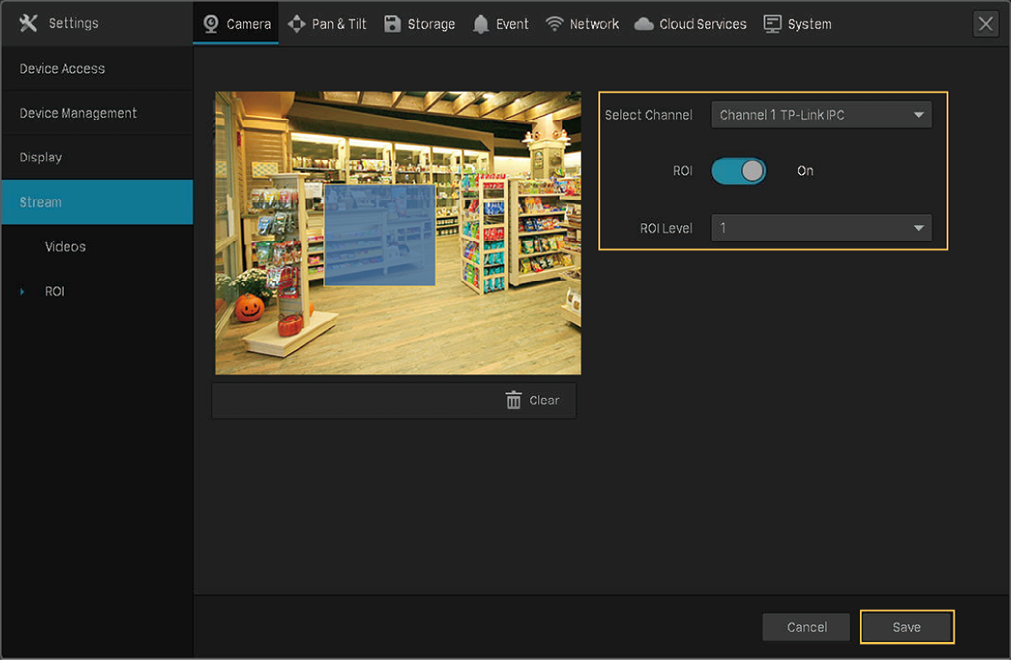
2. 6 Configure Stream Settings In Stream Settings, you can configure video stream levels and ROI (Region of interest) level. Video stream levels decide the video quality in Live View and recording for each channel, and you can adjust the video quality of certain area by specifying the ROI level. 2. 6. 1 Configure Main Stream and Substream The NVR supports two stream levels, main stream and substream. In Live View, the NVR decides which stream is applied to the channels automatically based on network bandwidth and device performance. In Recording Controls, you can apply them to the channels to record with different stream settings. After configuring the streams, refer to 4. 2 Recording Controls to apply them to recordings. Follow the steps below to configure the stream settings. 1. Right click on the Live View screen and click Settings in the pop-up Main Menu. Go to Camera > Stream > Videos . 2. Select a channel and configure the following parameters. Click Save .
|


 in the table and modify the name, protocols, and management port. Click
 in the table. To change the password of multiple cameras in batches, select the cameras and click
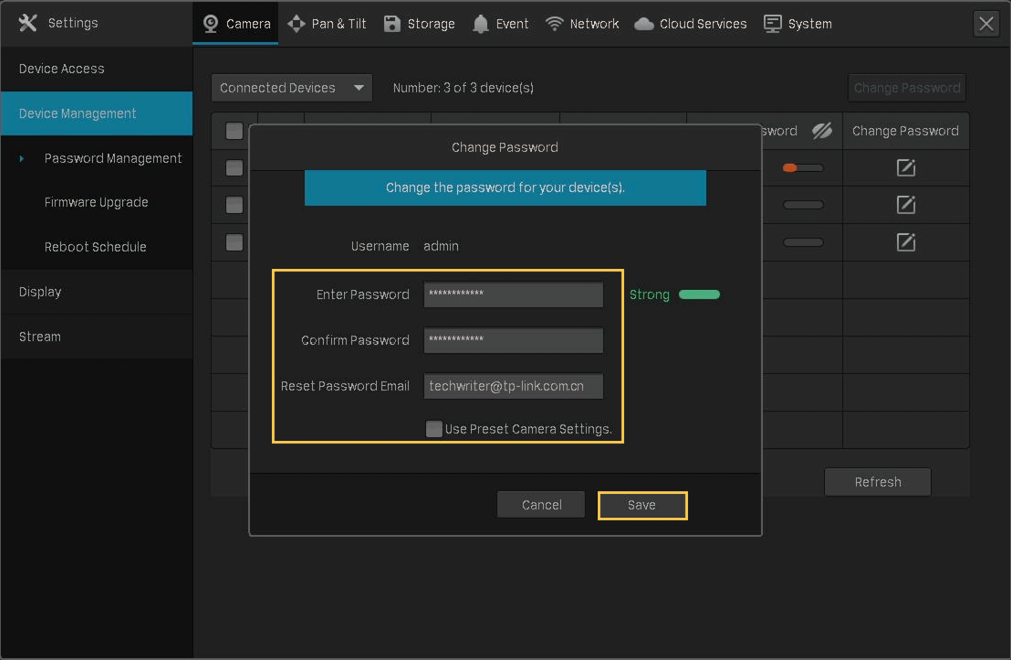
 of the administrator.